Wednesday, April 25, 2018

2018 Computer Build - Bringing The Parents Into The 21st Century Pt. 3

No tricks in '86, it's time to build... (c) Rakim

At a basic level, assembling a computer is like putting together a Lego or Erector set. Insert Tab 'a' into Slot 'b' until you're done. Pretty straightforward, really. You don't need any specialized tools for your build, just a phillips screwdriver (though when something doesn't work you may be tempted to pick up a hammer...). But as with many things, the devil is in the details, and there are always one or two things that you have to think your way around. This build would be no different.

To prove the basic assembly steps of putting together a computer aren't nearly as hard as some may think, I had my 8 year old assistant Sophia Karynn (aka 'Baby Suri') help out with some of the initial assembly. To help her understand what the different components do I likened them to parts of the body. First up: we had to get the motherboard ready, which I compared to the central nervous system, or her spinal cord:


Ideally I'd have an anti-static mat to place the motherboard on, but I don't build enough computers (or anything electrical, really) to need one. So, setting the board on top of the anti static bag and on top of the box it came in gives us time to add the other components. Next up was the 'brain' of the operation, the Ryzen 3 APU.

For all the packaging, the chip itself is pretty small. Most of the space is for the included CPU cooler. But since I'm using the Kraken X42 for this build, there isn't any need to even unpack it the cooler for a glamour shot. Once you line up the notch on the motherboard and the processor, the APU literally drops into its socket, with the metal arm latching down and locking it in place.


With the 'brain' in place it was time to tackle the DDR4 modules, or the 'short term memory'. While 8GB should be more than enough for this build, knowing I got double the memory for the same price just a few years ago annoys me. No matter. Technology and market swings wait for no man, and it was more than my parents had before.


These only line up one way in the memory slot and snap in with enough force. Sophia needed a little help pushing them into place, but she got it done


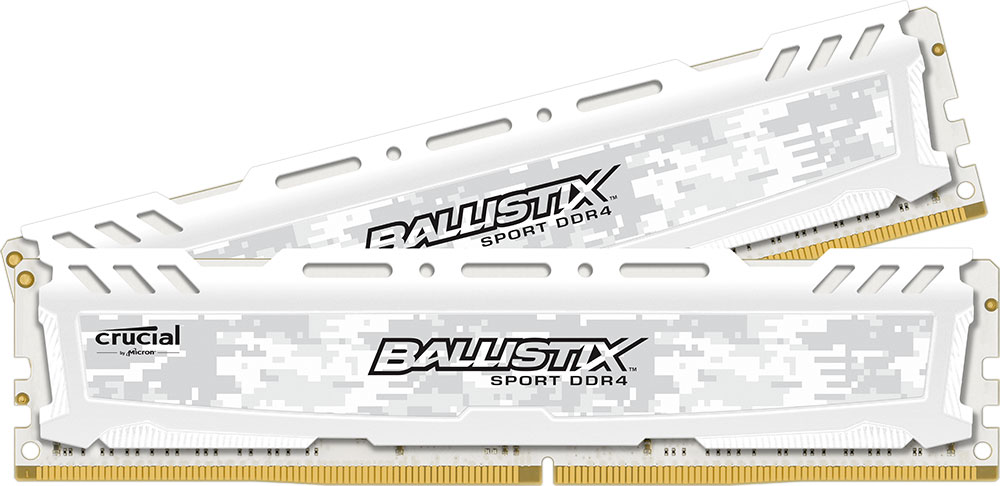
At this point I was quite happy I went with the white memory sticks here, as they blend in perfectly. My parents probably won't notice or care about the aesthetic choices, but I'll sleep better. Time to move on to one of my most important party pieces, the 'long term memory', aka the  M.2 SSD


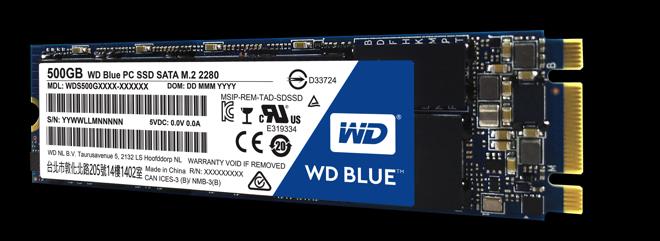
I can't stress enough how much of a difference having a SSD as your main drive makes over your common HDD. 30 seconds from cold start to sign in screen is amazing the first time you experience it. I almost want to spend my own money and upgrade my work laptop just for the speed increase, but I don't like my job nearly as much. Installing the drive was yet another 'tab-into-slot' affair, with the drive lining up one way to the M.2 slot (at a slight angle, though), then folding down and being held by a small screw. Sophia made work work of this as well, but not before noticing the blue Western Digital logo being the only splash of color on this board so far. At least someone else noticed...


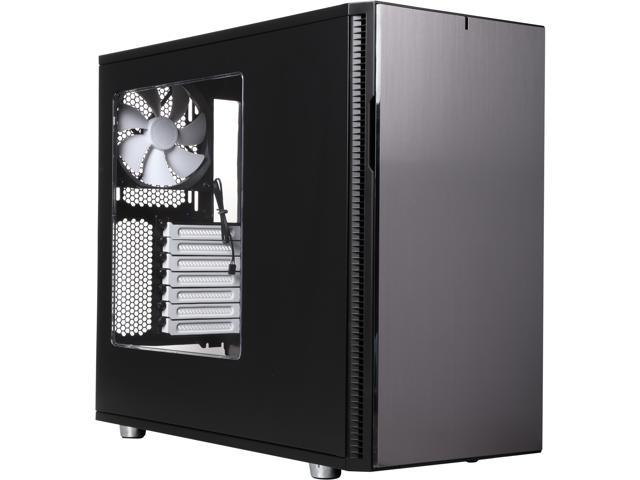
It was now time to get the 'body', or the case, prepped. Building inside a Fractal Design case is pretty painless, as there's plenty of room to run and organize all of your cables (and there would be plenty of those in this build) and thoughtful touches like over-sized grommets to route those wires and hide some of the clutter while keeping said wires from any edges that may fray the wires and grommets on the hard drive trays to reduce vibration and noise. Little (and nerdy) things that you may not notice, but does make for a better building experience. I installed the brass motherboard standoffs, installed the I/O shield to the back of the case, lined up the motherboard, slid it in place, and screwed it down.


Next it was time to install the 'heart' of the system, the PSU, which will push electricity, the 'life blood' of the system, at all the components (OK, the analogy may be stretching a little thin, but it seems to have helped Sophia remember what part does what, so I'm sticking with it. Sue me...).


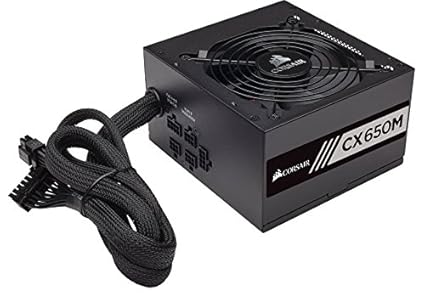
The nice thing about having a modular power supply is you only use the cables that you need, and the rest can be stored in the box rather than taking up real estate inside the case. While the cables weren't individually sleeved with color coordinated Techflex braiding like THIS, they will do the trick. 650 watts may seem like overkill for a relatively modest system, but it comes from a reputable manufacturer (Corsair), has a certified efficiency rating (80 Bronze) and should supply stable power and remain silent for years. Having cheaped out on PSUs on a few budget projects before, I wasn't about to do the same thing here. So, in the case it went, where it sat on 4 small pads Fractal had installed to reduce any noise and vibration (again, nice little nerdy touches nobody will notice until you do). 4 screws later and we were set.


At this point it was way past Sophia's bedtime, so she had to get to sleep before I could tackle the 'lungs' of the system, the LED fans. First, it was time to RELEASE THE KRAKEN!!!


At this point things start to get a bit trickier and your thinking cap should be on. Unfortunately, it was also close to midnight and history was being made by UMBC, a #16 seed, defeating #1 seeded Virginia, which had never happened in the NCAA men's basketball tourney before. So, I was a little distracted and things took a bit longer than I would have liked. In order to get this installed I had to:

  • Install the correct retention ring on the water pump (the round thing with lights)
  • Remove the stock CPU cooler brackets that were installed on the motherboard and install the standoffs for the water pump
  • Screw the water pump onto the standoffs
  • Wonder why the pump was not pressed tight against the APU and the motherboard as it should be
  • Go online and discuss UMBC's improbable win
  • Watch highlights of said improbable win
  • Look for websites and forums to see if anyone else had this problem with their pump and standoffs
  • Remove the standoffs and install the correct standoffs for the motherboard
  • Stare at the water pump and wonder why the NZXT logo isn't horizontally oriented
  • Watch Kenny, Charles, Ernie, and Clarke break down the games of the tournament
  • Look at images of other builds with the logo in the correct orientation
  • Debate on reaching for the hammer
  • Realign the retention ring so that the logo is now horizontal 
  • Reinstall water pump on standoffs
  • Pat myself on the back for figuring it out
  • Kick myself for not figuring it out sooner
  • Mount one of the AER RGB fans to the back of the Kraken radiator
  • Laugh at Jason Jones in The Detour
  • Futilely try to align the stock fan in between the radiator and the case
  • Watch more of The Detour
  • Wonder why I haven't watched this show before
  • Wrangle the fan and radiator in place, and screw it all down
  • Stand back and admire my work
  • Realize this should not have taken over an hour to install
  • Finish watching The Detour, then call it a night


Tuesday, March 27, 2018

2018 Computer Build - Bringing The Parents Into The 21st Century Pt. 2

With marching orders in hand and a budget well over what was needed, it was time to select the components for the build. Some were a no-brainer. Others had very little choice. And still others proved more finicky than anticipated. Here's what they got:

CPU: AMD Ryzen 3 2200G.


There were a few things that went into this pick. First, AMD's Ryzen chips are the first time in a LONG time AMD has been able to challenge Intel's CPUs is anything other than the low end/value market. Couple decent benchmarks with on-board graphics that smack down anything Intel can muster (so much so that Intel will soon be partnering with AMD for their onboard graphics on Intel chips in the near future) and you have a pretty compelling CPU for $99. Now, my parents don't need much, if any, computing power, and the likelihood of them playing anything more that a rousing game of Mahjong is highly unlikely. Still, if they were to try any PC gaming at some point, they at least could do so with decent frame rates without a separate GPU (and looking at the price and availability of the GPU market in March 2018, that's definitely a good thing). Also, AMD is good at supporting their platforms over time, so upgrading the CPU down the line (which, considering their last computer was over a decade old, is quite possible) would be much easier than with, say, an Intel i3, which would definitely require swapping the motherboard as well. Speaking of which:

Motherboard: AsRock X370 Pro4


Picking a motherboard wasn't difficult per se, but I did have to do a bit of research. The 2200G is relatively new, and while most AMD boards will support this chip and activate the video output on the boards (the 1st gen Ryzen chips did not have any onboard graphics, requiring a separate GPU for any video output), many would require a BIOS update to work. Doing that may be easier said than done, as AMD has resorted to sending customers loaner CPUs so they can boot up the system to upgrade the BIOS, then install the new Ryzen chips. The alternative was to find a newer board that was certified to work with the 2200G out the box. The Pro4, which was released shortly after the 2200G, fit the bill perfectly. I have an AsRock board in my personal rig, and it has given me zero problems (then again, a mobo should rarely give you any problems). On the plus side, AMD promised to support the AM4 Socket at least through 2020, so if there ever is a need to upgrade my parents to a more powerful (or at least newer) CPU it should be a drop in solution. On the minus side, the board only has 2 internal USB ports, which would become a problem later on. Still, the $99 price tag was a winner, and the white on black color scheme works nicely with the case. Which brings us to:

Case: Fractal Design R5


This would be my third build in a Fractal case (I have a R4; my brother's computer, which I rebuilt, has a R5). Part of me wanted to find something different, but my options were limited by two requests:

1. My mother wanted 2 external drive bays for an optical drive and a SD card reader, and
2. She wanted a door on the front of her computer.

Now, most cases today are eliminating the optical drive bays completely, opting instead for solid front panels to allow installation of multiple fans or water cooling radiators (that and physical media is slowly but surely being phased out everywhere). There were only a handful of cases that had 2 bays and still looked decent, and even fewer that had a front door. So, the R5 got the call. I really wanted to go with the newer R6, which has a nice tempered glass side panel (quite a few cases have hopped on the tempered glass bandwagon it seems). But, the R6 only had one drive bay, and my mother would not be talked out of wanting 2 bays. So be it. I knew the R5 had plenty of room for the components that I would need.

Memory: Crucial Ballistix Sport DDR4 2x8GB


When I built my rig, 16GB only cost me $72. In 2018? 8GB runs $90. That's insane. Still, considering my parents were trudging around with a paltry 2GB RAM in their old rig (I'm honestly not sure the mobo could support more, nor could I even find the DDR sticks anymore), quadrupling their current amount wasn't a bad thing. Finding the memory in white keeps the color scheme going. Gotta coordinate, after all....

SSD: WD Blue 3D NAND 500GB


While the price of memory has gone up, the price on storage has come down, which seems to be the inverse of what the market looked like when I built my computer. At that time, a 240GB SSD would run somewhere in the $160-$180 range. In 2018? I found this 500GB SSD for $130. The market giveth, and the market taketh, it seems. Realistically, 500GB should be more than enough space for my parents to install, download, or save whatever and not run out of space before it's time to do a major hardware upgrade. And the speed benefits of going with a SSD as the primary drive cannot be overstated. As far as going with the M.2 form factor over the regular 2.5" enclosure? There wasn't a price difference, the motherboard has 2 M.2 slots built in, and that would be one less set of cables I'd have to run through the case come installation time. Having that dash of blue throws off the black and white aesthetic a bit, but I'm going to be the only one bothered by it, because reasons.... A few minuted comparison shopping a few sites and an order was placed to Newegg for all 5 items, which arrived in 2 days.

HDD: Toshiba 2TB 7200rpm Internal Drive


Unless you're doing a budget build, the best storage solution for most setups would be to have whatever SSD you can find at your price range coupled with a higher capacity HDD to store your data (music, photos, videos, etc). Prices have gone down a bit since my personal build, so finding a drive for cheap was no problem. $58 later, my father had enough storage for every video he's taken of his grandkids so far and then some.

PSU: Corsair CX650M


A PSU isn't a hugely exciting thing, but it is an extremely important thing. One thing I have learned over the years is never cheap out on one. You don't need a 1200 watt behemoth with cloud based power monitoring, but you do want something from a reputable brand that at least has 80 Bronze certification. Go cheap  and you run the risk of having an extremely noisy PSU fan or a PSU that dies within months. Been there, done that. Won't make that mistake again. Something in the $50-$70 range should net you something like this Corsair PSU I picked up at Microcenter. At 650 watts there is more than enough power to support my parent's modest system. Being semi-modular I don't need to hide the wires I'm not using. At $60 with a mail in rebate, this would be a safe bet (though I did get an extended warranty, just because it was cheap and the cashier was nice)

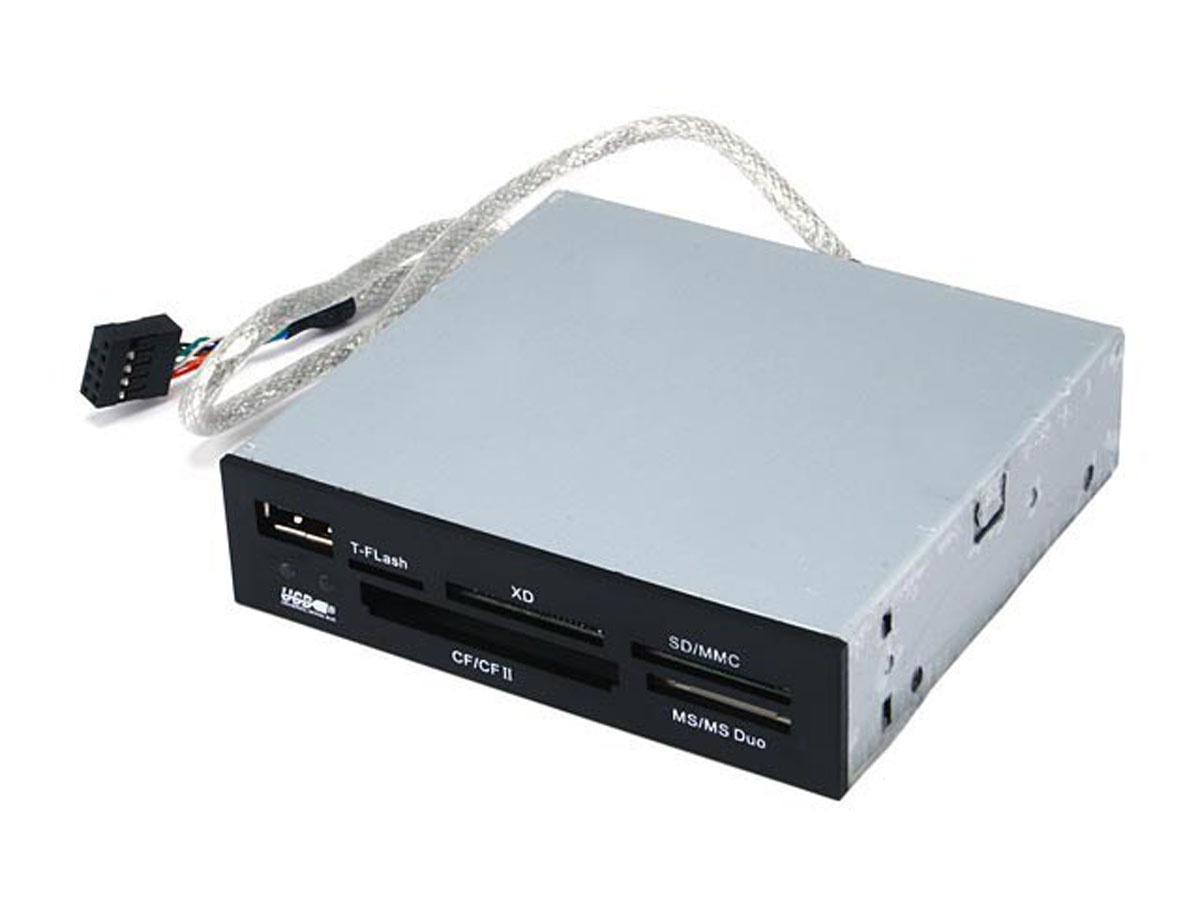
Internal SD Card Reader: Generic
My father has a sizable collection of SD and Compact Flash cards with all forms of blurry photos and videos that he has taken over the years. An external card reader would have worked fine. But, my mom wanted an internal reader if she wasn't getting a second optical drive. I wasn't going to overthink it. So, I grabbed whatever card reader and drive bay adapter I could get with Amazon Prime One-Day delivery.


CPU Cooler: NZXT Kraken X42
There is absolutely no need for this cooler for my parents. They are not gaming. The CPU will not be overclocked. The stock AMD Spire cooler that came with the CPU would have been just fine. But, my mother wanted lights. And while a few other manufacturers make RGB coolers (Corsair and Thermaltake come to mind), none of them stand out quite like the NZXT offering. The pump assembly has the LEDs set up in a descending ring for a 'infinity' display, and the NZXT logo is a separate LED which can be colored and controlled separately from the rings, making for some interesting effects:

At $130 this bit of vanity is overkill, to be honest. But it is impressive. So, if my parents want lights, they got lights...


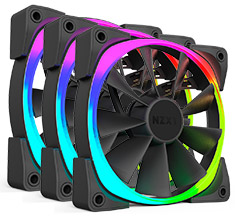
Fans: NZXT AER RGB 140mm (x5)


RGB lighting in computer cases is in a weird place at the moment. Every RGB component needs to have some sort of control to change the color of the LEDs and any effects you may want (color change, strobe, breathing effect, etc). While RGB lights follow a similar principle, every manufacturer seems to have a different method of controlling those lights, and few are compatible, either on a hardware or software level. Now, some will gladly mix and match coolers, LED strips and fans, and deal with different ways to hook them up and separate programs to control each component. I was not about to deal with that, even if it meant some compromise. For example, Corsair's newest RGB fans have 2 separate LED rings compared to the NZXT fans, making for more dramatic lighting effects. However, going with Corsair fans would mean having a separate program to change the color on the cooling pump and the fans, which may cause some internal conflicts (and at the very least would be one more thing to explain to my parents, which I dearly want to avoid). On the hardware side, the NZXT fans allow you to daisy chain each LED connection to each other, whereas with the Corsair setup each fan needed to be wired to a controller individually. This would mean a much more involved installation and cable management solution, which I didn't feel was worth it for a few fancier effects. So, the AER RGBs made the cut. For maximum effect, I went with 5 fans: 2 in the front panel, 2 in the top panel, and one in the rear. While the X42 did come with a fan for the radiator, it was not lighted. So, I decided to set the radiator up in a push/pull configuration, with the AER RGB on the front of the radiator and the stock fan in the rear. At $40 a pop they aren't exactly cheap (though they did have a 3 pack at some savings). And quite honestly, 5 fans for a setup that will not be pushed is overkill. But again, they wanted lights.

RGB Controller: NZXT Hue+

As mentioned earlier, every RGB component needs a controller, and every manufacturer has their own hardware and software solution. The Hue+ is NZXT's. The controller is relatively compact, about the same dimension as a 2.5" hard drive, but slightly taller. The Hue+ has two channels, which can control up to 5 RGB fans on one channel and 4 RGB light strips (which came with the controller) on the other. Installing the Hue+ in one of the unused drive bays was no problem. Figuring out how to connect everything was quickly becoming a problem...


Internal Power Expansion: NZXT Internal USB Hub
While looking over the parts I was collecting for the build I was trying to visualize how everything needed to be wired and routed through the case. Running power to everything didn't seem like too much of a problem, as the PSU has enough cables to provide power via SATA or Molex connections. However, the Kraken pump and Hue+ both needed an internal USB connector so that the software could talk to the hardware. There was also the front panel connections on the R5 case that needed their own USB connection, along with the internal card reader That's 4 internal USB devices. The mother board only had 2 internal USB headers. That wasn't going to work at all. So, an expansion was going to be needed. I had already gone all in with NTXZ components so far, so picking up their internal HUB just worked. I got the extra internal headers I needed, and as a  bonus I could put the USB dongle for their mouse inside the case as well, freeing up an external USB port (and making it harder for them to lose the dongle in the first place).

At this point I had assembled just about everything I needed for assembly. I planned on reusing their current DVD drive, as there wasn't anything wrong with it (and it wasn't worth spending $15 on another one). I picked up a few Y-Cables for the fans so that I could run 2 fans on each of the fan headers and thus control the speed of both pairs of fans (front and top). It was now time to put it all together.


Wednesday, March 21, 2018

2018 Computer Build - Bringing The Parents Into The 21st Century Pt. 1

Almost every family seems to have a designated IT person. The one family member that knows something about a computer that goes a bit more than just how to turn them on. That person is then tasked to answer and service any electronic issue that their respective family members (and said family members friends, co-workers, associates, acquaintances or hangers-on) may have for eternity. That person also needs to be on call 24/7 in the event that any of said electronics break, resulting in texts and/or phone calls at the most inopportune times and numerous devices being left at their home for servicing at any given moment. If the issue cannot be resolved by instructions given over the phone (which conversation will be simultaneously frustrating and hilarious), expect to make housecalls to resolve said issue, which most likely will take less time than it took to drive to their home, but which you cannot bill them an hourly rate or suggest they call Geek Squad next time. I"ll give you 3 guesses who fills that role in my family...

Anyway, the IT project at hand is my parent's desktop computer. My parents bought a HP Pavillion a1640n, most likely at my suggestion. A quick Google search shows the computer came out in 2006, which is an absolute eternity in tech years. For a bit of perspective: The system is rocking a Core 2 Duo processor, 2 GB memory, 250GB hard drive, a Lightscribe DVD burner, front panel memory card reader with USB and Firewire(?!?) ports, and a 'Pocket Media Drive', which was basically a removable USB drive. I know all of this not because I remember it like some kind of tech savant, but because HP made sure to plaster stickers all over the front panel to remind you what your wonderful silver box could do.


The computer came with Windows XP Media Center Edition 2005, which was more or less a 'skinned' version of Windows XP that was focused on being a media hub for your home entertainment (which few people, including my parents, ever did). If memory serves HP also issued vouchers to buyers for a free upgrade to Windows Vista, which was set to roll out a few months after the computer was purchased. That means this collection of hardware has soldiered on through 4 major OS versions (Vista, Win 7, Win 8, and Win 10). Just let that marinate for a minute...

I've performed my IT duties on this rig the past 12 years. I upgraded the system to Win 7 and then Win 10, skipping the undercooked OS that was Vista and the desktop disaster that was Windows 8 (though I still had to deal with that horrible OS when my mom purchased 3 Windows 8 tablets, because secretly she doesn't like me. Even on a tablet, that OS was a disaster). The hard drive was replaced at least twice. Two PSUs were installed. The optical drive inexplicably died and was replaced (as for the Lightscribe setup? They never once bought the correct CDs to take advantage of burning their own labels to the CD, instead handwriting things with a Sharpie like everyone else). The memory was upgraded to a whopping 4GB a few years ago (which was surprisingly challenging to find memory for this computer and cost more than expected). And every device driver, print driver, anti virus, malware and software install and update were dutifully ran by me, either via remote access (when it worked), phone conversation (which was always a painful ordeal) or house call (like the time somebody clicked a bad link and 15 windows of porn popped up and would not close). For the last 5 years I've told my parents there's not much more I can do to patch their computer up anymore and they would need to finally upgrade their system sooner rather than later. When the computer refused to boot up and started screaming out beep codes just before Christmas, I decided enough was enough. They were going to upgrade whether they wanted to or not.

My parents use their computer like most people do: they check e-mail, pay bills, look at websites about old people stuff, and store (but not edit) pictures and videos of their grandchildren. Pretty basic, low level stuff. As such, they could have walked into Best Buy, blindfolded themselves, spun around three times, pointed at any computer there, and bought it. Whatever they chose would have been generations better than what they currently had and more than they would need for the next 5-10 years based on their usage. But no. My mother decided she wanted one custom built. Why? Because she could. She only provided 3 build guidelines:

  • The case has to have lights, preferably purple and orange (her favorite colors)
  • It has to have 2 external drive bays, since her soon to be decommissioned computer had 2 drive bays (one of which, I pointed out, was empty and never used)
  • It had to be under $2500
The last one would be the easiest to meet. I told her even going custom I could likely keep everything around $700 (though I underestimated that price a bit, it was still much less than her $2500 cap). The other 2 guidelines took ka bit more planning than I originally thought...


Sunday, May 28, 2017

Semi-Pro: Beef Ribs

Ribs. They are a staple of BBQ. A well cooked rack of ribs is a beautiful (and tasty) thing. For most people, pork ribs, be they spare ribs or baby back ribs, reign supreme, as they are pretty easy to find, relatively inexpensive, and taste wonderful. However, in some parts of the country where cattle is more prominent than pig, beef ribs are the staple. And believe you me, they are something special.

For today's cook, we're going to be doing beef short ribs. The name, however, doesn't necessarily refer to the size, but refers to where the ribs are cut: the short plate of the cow's rib section. Usually, you will find short ribs in your local supermarket cut into individual rib sections a few inches in length, like this:

Don't let the size fool you...

Because of their size, they can be cooked a number of ways: smoked, braised, crock pot, fried, sous vide, etc. For presentation sake, we're looking for something like this:

Looks like a book of meat..


Sometimes these are called plate ribs, or 'dino ribs', because of the size of the bone. Now, I could go on about different cuts of beef ribs and where they come from on the cow, but that will take too long and we've got to get cooking. If you want to know, watch the video below:


With that out of the way, let's get to the business of cooking these ribs. As always, preparation is key, but not very difficult (and really not much different than your pork ribs). First, buy the ribs.


These ribs are usually cryovac'd in 2 to 4 rib sections. I found these at my local big box store (BJ's) but places like Restaurant Depot carry them as well. If you don't see them in the refrigerator case, ask the butcher and see if they have any on hand. Next it's time to clean the ribs up. Set the racks on your cutting board for prep.


 As with pork ribs, there is a membrane on the back of each slab which can be removed. Is this 100% necessary? Depends on who you ask. There's no meat back here, so worrying about a crunchy bit of membrane isn't too much of a concern, as you're not going to eat it. Also, if you're not careful, pulling the membrane could cause the meat to separate from the bone. On the other hand, some reason that the membrane would inhibit the smoke from penetrating the ribs. Your call. For this cook, I'm removing the membrane, as it's not hard to do. Grab your butterknife and slide it between the membrane and one of the rib bones. Once you lift it up, use a paper towel to remove the wax papery film.


Next, flip the ribs over and assess what needs to be done. Again, we've got a decision to make


We've got a ton of fat and silverskin on the top of this rack, and underneath is all the beefy goodness that will make this cook worth it. The decision is whether or not to remove that fat. Now, a lot of people will leave the fat on the ribs as is, reasoning that the fat will render off and baste and flavor the meat during the cook. The fat could also act as a heat barrier to keep the meat from burning over the long cook. Others reason that only so much of the fat will render off, and the rest will simply remain on top of the meat once we're done cooking. The rub would then only be on the fat, as it can't really penetrate through the fat to the meat. Or, as the fat is rendering off the rub would drip away with the fat. While I'm firmly in the latter camp, there are legions of people, including renowned pitmaster Aaron Franklin, who take the side of the former. I won't say which was is right or wrong. You decide on your preference and/or how much time you have . For this cook, that fat is coming off. Much like a brisket, you can spend over an hour removing every little piece of fat and silverskin you see, or you can just cut off the biggest pockets and leave the rest to render during the cook. Totally up to you. A sharp knife makes the job a lot easier.


Once you're done slather the ribs with a binder of your choice (hot sauce, like Mr. Franklin uses, mustard, oil, etc) and coat the ribs with the rub of your choice. Generally any rub that goes good with steak works perfectly on these ribs, as the strong flavor of beef doesn't really need the sweetness that a pork rub would generally have. A simple salt/pepper.garlic/chili powder rub would work wonders on beef ribs. That said, let your personal palate be the judge, not mine. The ribs will taste great regardless.


That's pretty much it for prep work. You can either put the rub on as you're getting the cooker ready to roll or park the ribs in the fridge overnight to 'dry brine' the ribs until you're ready to cook them. Set the cooker up for indirect cooking at a temp of 250-275 degrees. Place the ribs on the cooking grate bone side down and let them roll. The ribs will be on for about 5-7 hours as this temp, depending on the thickness of the meat on the bones. If the cooker runs hot, or if the ribs look like they are drying out, feel free to spritz them with water or beef broth. The cook will be done when the internal temperature hits 203 degrees (I'm not even going to ask if you have your thermometer for the food or cooker, because if you don't by now I don't even know what to say). The probe (or toothpick) should slide through the meat like melted butter. Pull them off the cooker, wrap them in foil for about 30 minutes and let them rest. After that, it's time to feast:


Look at the bark. Notice the smoke ring. give the meat a squeeze and see the juices start to ooze. Not have a bite. It's tender, like filet mignon, but much more flavorful, like a rib eye. It's like brisket on a stick.

Good eats to all until next time

Sunday, January 24, 2016

Semi-Pro: Smoked Turkey


Turkey. The 'other' other white meat. A bit tougher than chicken, but slightly more versatile. Turkey can be sliced thin for cold cuts. It can be ground as a substitute for beef. It can be used as a substitute for bacon (though really, it's more turkey jerky, as if it doesn't come from a pig, it's not bacon. Deal with it people...). Turkey is often the signature dish for most Americans for Thanksgiving. It's sad, really, as turkey is fantastic at ANY point in the year. The two most popular ways of cooking turkey is either in the oven or in a deep fryer. The oven is the time tested method of cooking the big bird, though if it is not prepped correctly, you've got a dry bird. Deep frying has become extremely popular as of late, but unless the bird is prepped correctly and the fryer is set up properly, this method is extremely dangerous, as the number of fires reported around Thanksgiving can attest. But there is yet another method of cooking a turkey, one that's safe, is not likely to dry the bird out, and will produce some of the best turkey you've ever tasted: Smoked Turkey. As with anything, preparation is key, but the results will be so worth it. Let's get to it, shall we?

First off: get some turkey. Usually I will just get a fresh turkey breast, bone-in, as getting a whole turkey for my family may be a bit much. Your needs may vary, as you may have a bigger party to feed or you may prefer dark meat. That's up to you. Alternately, you could choose to get the turkey breast and, say, turkey wings or drums separately. Whatever your preference, fresh is preferred, as you don't have to deal with thawing out your bird, which is a hassle all it's own (and one I'm not going into here). For this post I am going to focus strictly on cooking a turkey breast. The techniques for cooking the whole bird apply, but adjust your cook times


When cooking only a turkey breast, you have a few advantages. First, you don't have to worry about the light meat cooking quicker (and possibly drying out or burning) than the dark meat. Also, there's less to clean, so there's no worry about whether you left the giblets inside the turkey (usually they are in a separate pouch, which you can use for the gravy if you so choose).. Still, you do want to trim up some of the skin and cut down (or cut out) the breastbone do the turkey lays evenly.


One thing to note: See that pop up thermometer? Pull it out now and toss it in the trash. This is not the way to tell if the bird is done. A digital thermometer (which really, if you don't have one by now, why don't you?) is the only way to go. 

Next up, let's talk about the brine

I've said before and I'll say it again, if I don't have time to brine my poultry, I won't cook it. It goes double for turkey. Brining adds so much more flavor and juiciness you'll wonder why people still have dry turkey that tastes like cardboard. Even if you have a simple brine of water, salt and sugar, your turkey will be so much better because of it. Now, I like to use a prepackaged brine like you see above, which has all the salt, sugar, and spices already measured out. However, instead of using water, I like to use apple cider, which adds more flavor and sweetness. Most of the turkey brine recipes will have you boil the brine mixture and the liquid to bring everything together, then let it cool, as you don't want to boil the bird. This step can be done well in advance of cooking the turkey, so it will be ready to go once you have it cleaned and trimmed.

Next, it's time to submerge your turkey in the cooled brine. With a turkey breast, it's pretty simple. Usually a 1 or 2 gallon bag (depending on the size of the turkey breast) is big enough to hold the bird. Simply pour enough of the brine to completely cover the turkey, then place the bird in the fridge. Overnight is the minimum amount of time I like to brine my turkey. 24 hours or more is even better. If you're doing a whole bird, you could use a 5 gallon bag, or a container large enough to hold the bird and the brine. If there's no room in the fridge, a cooler lined with ice works wonders


Once it's ready to cook, pour out the brine, rinse the turkey and pat it dry. Now we need to season the bird. What you use is totally up to you. Poultry seasoning? Why not. Your favorite BBQ rub? Sure thing. A simple SPG (salt, pepper, garlic) rub? Keeping it simple always works. I found a nice rosemary, garlic and thyme spice blend at the grocery store that works wonders on poultry. What I like doing is mixing about 4 tablespoons of the rub with about 2 tablespoons of olive oil or butter. Either mix by hand or toss in a food processor for a good blend.


Once that's done we can apply the wet rub to the turkey. Use your hands to loosen the skin and massage the rub between the breast meat and the skin (you could use a spoon to scoop out some of the rub, then use your hands to work the rub across the meat). If you have extra rub, rub some on the outside as well.


For extra insurance and more flavor, melt a stick of butter and mix with 1 teaspoon each of onion powder, garlic powder, white pepper and cayenne pepper (don't worry, your turkey will not be too spicy). Load up your injector (you did get one of those, right? If not, why not?) and go to town on both sides of the breast. Any butter that seeps out just rub on the skin. 


Now for the finishing touches. Stuff the inside of the breast cavity with some aromatics (a quartered orange, sliced onion, possibly celery, sprigs of rosemary and thyme, etc) to give the breast some additional mass, which should help it cook evenly. Place a cooking rack over a broiling pan (a thick aluminium pan would do the trick too)and add some fluid (water, apple juice, beer, etc) to the bottom of the pan. Give the skin one light coating of seasoning, and we're ready to hit the cooker


Two things of note. First, I made no mention of placing stuffing inside the turkey. Don't. Just...don't. Make that separately and avoid a health risk. Second, I made no mention of gravy. Two reasons for this. First, this bird will be so flavorful and juicy you won't need anything on it. Second, there are waaaaaaaay too many recipes handed down by your great-great-grandma that I'm not about to get in the way of. However, if you have to have some gravy just in case, here's what I'd recommend. Mix up some mirepoix (roughly cut onion, celery and carrot) and toss that in the pan. Usually, you would use the bones and trimmings from the turkey to use for the stock, but with a turkey breast there really isn't much of that. Therefore, you'll need some turkey necks or turkey wings instead. Add those to the pan, and a tablespoon  of bouillon. Cover that with your fluid of choice, then add the cooking rack and bird.

Once we're done the prep, it's time to cook. Set your cooker up to cook indirectly at a temp of 325-350 degrees. The relatively high temperatures will help crisp the skin, and with the turkey having been brined, there's less risk of the bird drying out during the cook. Place the turkey pan opposite the heat (coals or burner, depending on your cooker), place the temperature probe in the turkey (again, you do have your digital thermometer, right?) and shut the lid. Check the bird every 30-45 minutes to make sure it isn't drying out. If so, you can either spritz the bird with apple juice or baste it with butter. Once the internal temperature of the turkey hits 165, pull the bird off the cooker. If the skin isn't quite up to the crisp texture you're looking for, raise the temp of the cooker to 375 and cook for 10 more minutes.


Once the turkey has rested for about 10 minutes, transfer it to a cutting board. Look at that turkey. Smell the turkey. Know that the turkey is going to be delicious, but you can't tear into it just yet. If you made the gravy, grab a spoon and scoop the spent vegetables and turkey bits out to the trash. If you have a fat separator, pour the gravy in that and remove the excess oil and fat from the gravy. If not, use a spoon or ladle and skim off as much of the fat as you can.

Using a carving or chef's knife, remove the breast meat from the turkey carcass and begin to slice. If you want to try to carve the breast the traditional way, go ahead. But by removing the breast meat then cutting it, you'll make sure each piece has that nice crisp skin we're worked for. The remaining meat on the carcass can then be pulled with your hands (or just eaten right then and there, depending on how hungry you are.