Monday, November 30, 2009

El Kabong2 (or making my first arcade stick) Part 3 – It Lives!

The next step in the build was one of the more tedious. It was time to start wiring everything together. There were 11 buttons and 4 contacts on the joystick to wire up, which meant I needed a total of 30 wires to cut, strip, and crimp connectors to. Joy of joys. I grabbed the black spool of 24 gauge wire I bought and cut 15 wires about 10 inches in length each. I would cut them down to size once I figured out exactly how they needed to be run. I did the same thing with the green spool of wire. Now I had a set of wires for the ground and a set for the signals. I went and crimped the connectors on the signal wires, since they would go from the switches on the buttons and joystick to their corresponding places on the axisadaptor. The ground wires would take a bit more planning, so I saved them for later.

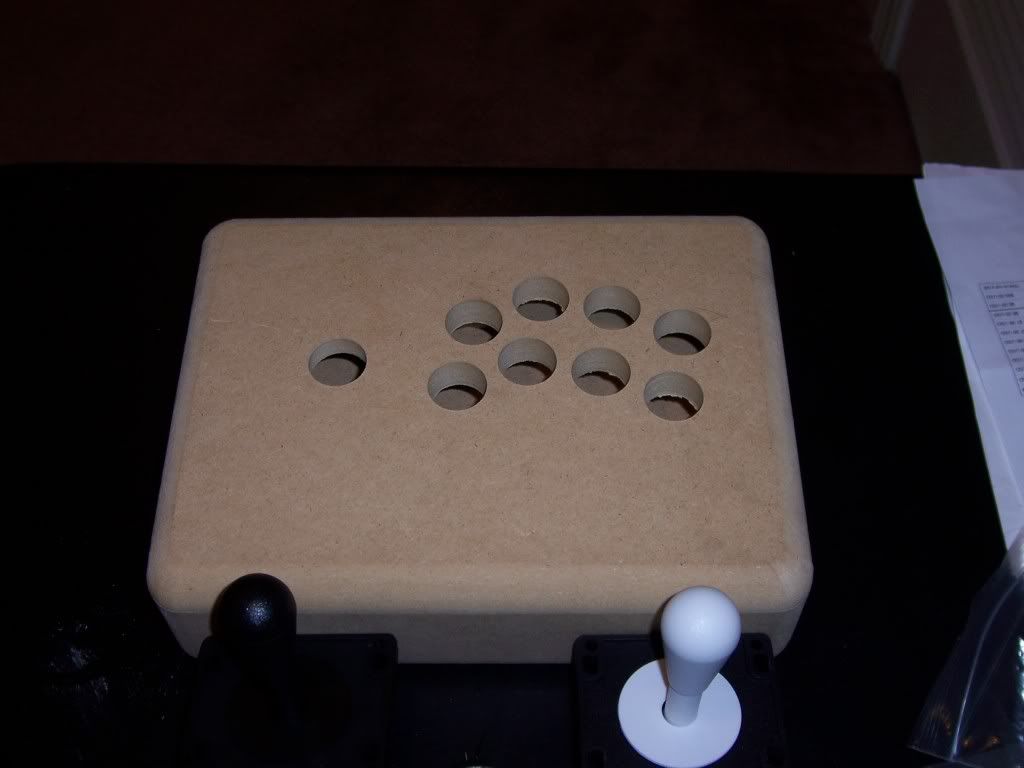
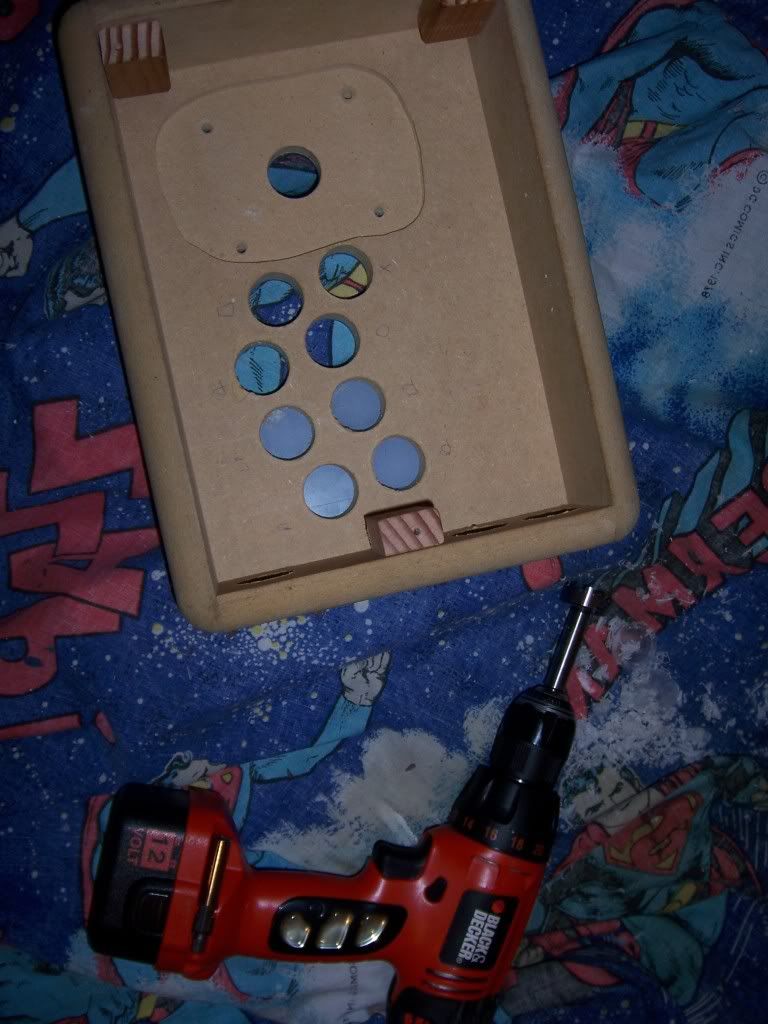
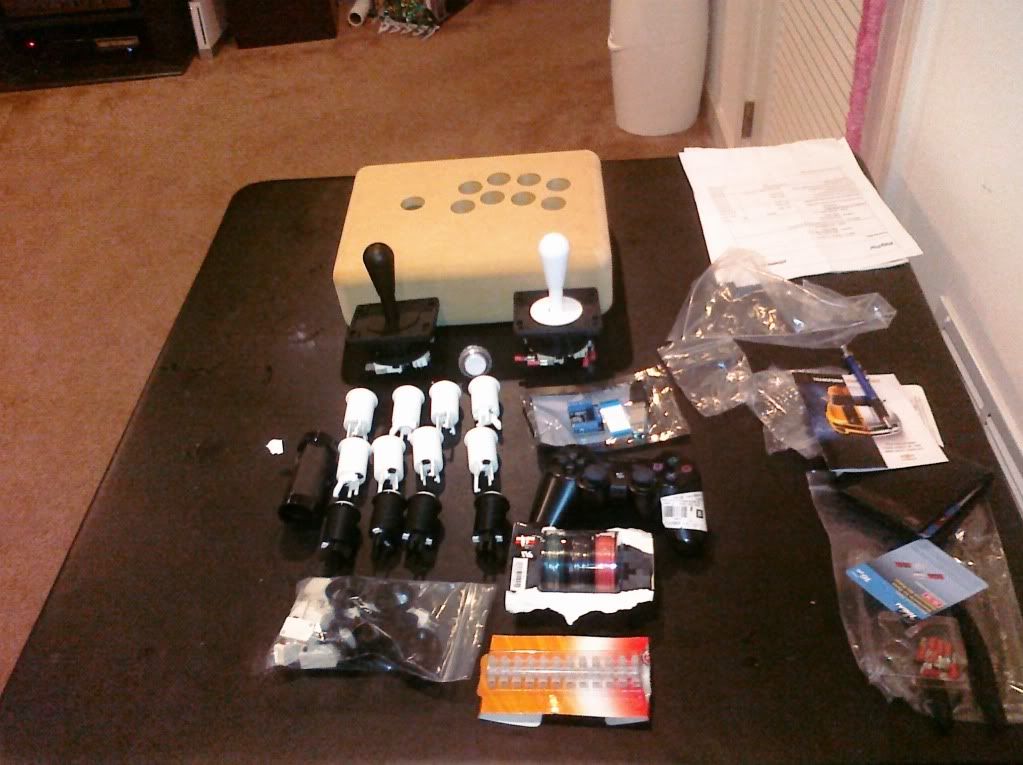
Before I cut anything else I decided I'd better figure out the best place to mount the PCB from the Sixaxis and the axisadaptor.This took longer than I expected. I spent 30 minutes turning and twisting the sixaxis PCB and the axisadaptor trying to find the optimal position to allow easy access to the wires on the axisadapter and to have the USB cord attach to the connector of the sixaxis PCB. After much headscratching, I found the only way to make everything fit and get the bottom back on the case was to stack the axisadapter on top of the PCB, folding the short ribbon cable onto itself and sticking the adapter to the unused left analog stick with some double sided tape. This would give me enough clearance to mount the whole contraption against the edge of the case, with enough room for my USB cable to connect to the PCB without interfering with any of the buttons. I also made a mental note that the best place to drill the hole for other end of the USB connector would be the top left corner of the box. Too bad I didn't actually mark anything, as it would come back to bite me later...

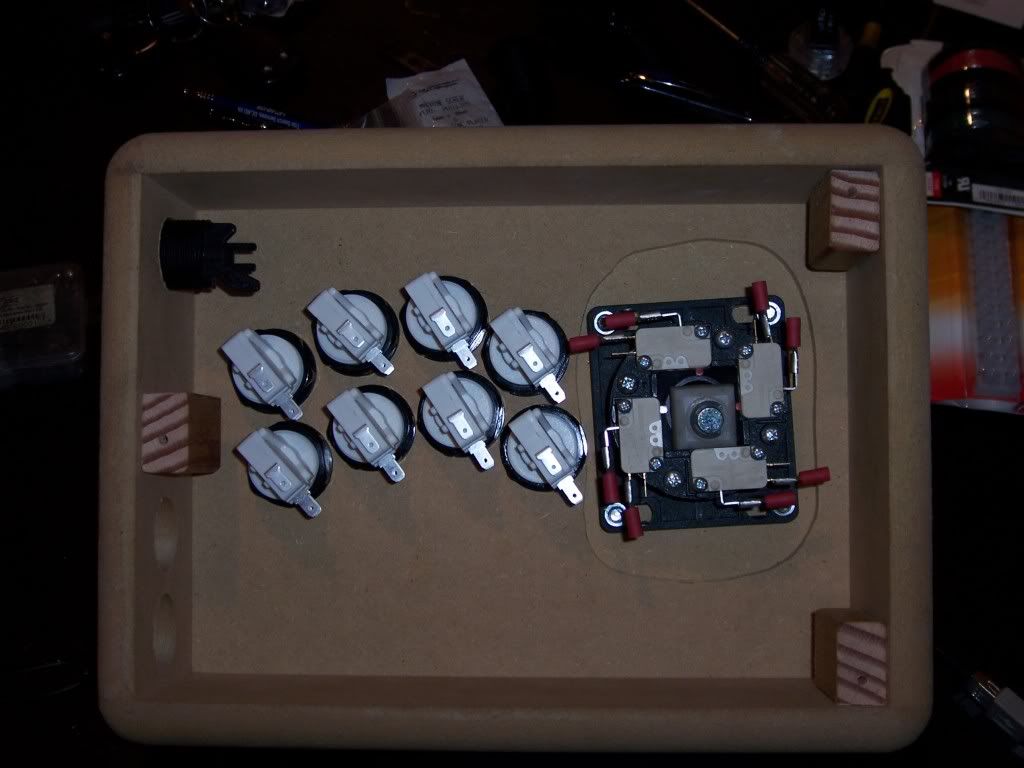
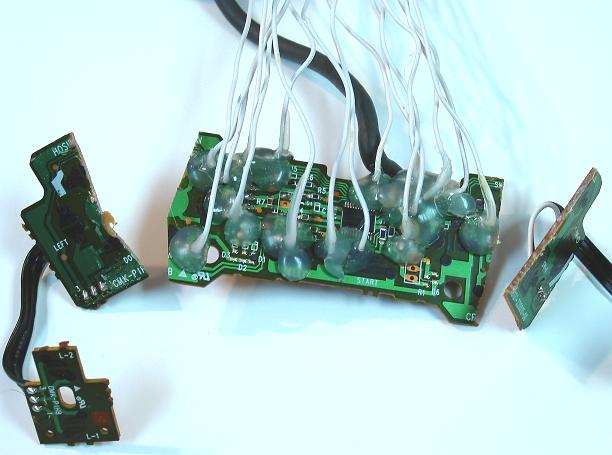
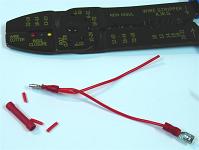
With that out of the way I tackled the ground wiring. The PCB for the Sixaxis is not a 'common ground' board. Without getting into too many technical terms that I can't explain, I'll just say this: with a 'common ground' board, I would be able to daisy chain every ground from every switch to one common ground on the PCB. The design of the Sixaxis PCB  wouldn't allow this. It turns out that there are 3 separate 'grounds', more or less, that correspond to 3 sets of buttons: the directional pad, L1 and L2 as one group, the circle, square, triangle, X, R1 and R2 as one group, and the select, start and PS button as one group. Instead of having one long chain of grounds, I would end up with 3 chains. Not the end of the world, but a little more involved. (For a much better explanation and small wiring diagram, look HERE). I marked which button was which on the underside of the box and started my chain. I began with my joystick, crimping one end of the wire with a connector, which I attached to the first switch in the chain. Next, I ran that wire to the next switch in the chain and trimmed the wire, making sure to leave a few mm extra for some cushion. I then grabbed another wire, placed both ends together and crimped both wires to one connector, which was then connected to the switch. This was repeated with each switch in the chain. For the last switch in the chain, I ran a length of wire to the axisadaptor's screw terminal.


This is a chain. Now to do 25 more...

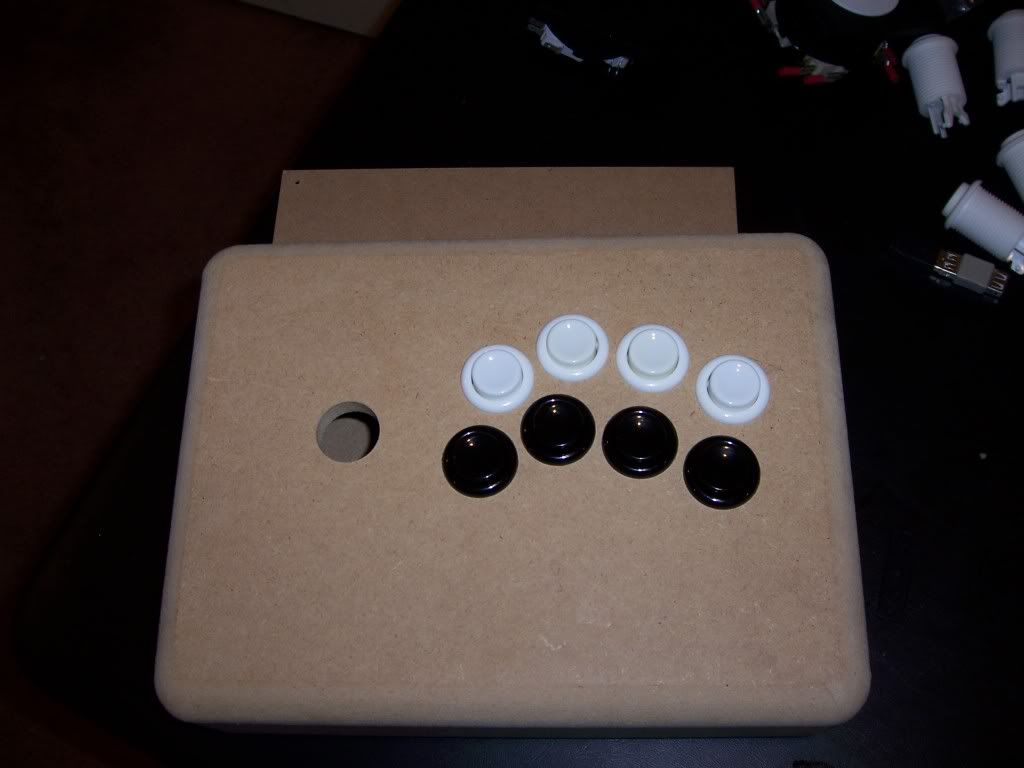
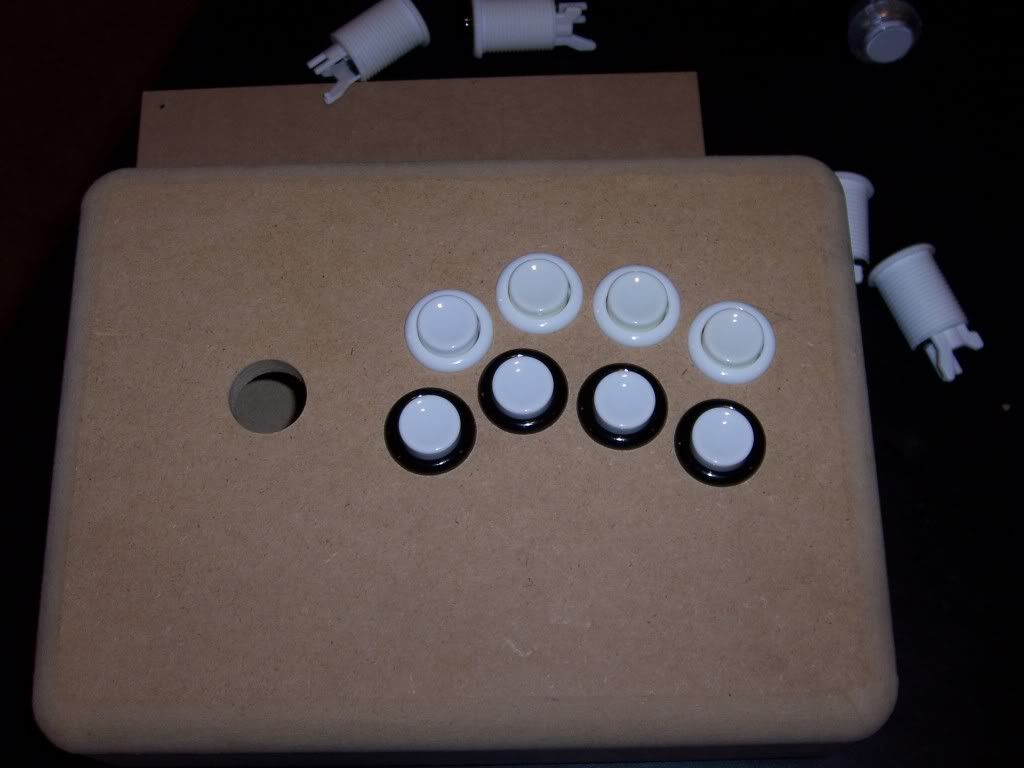
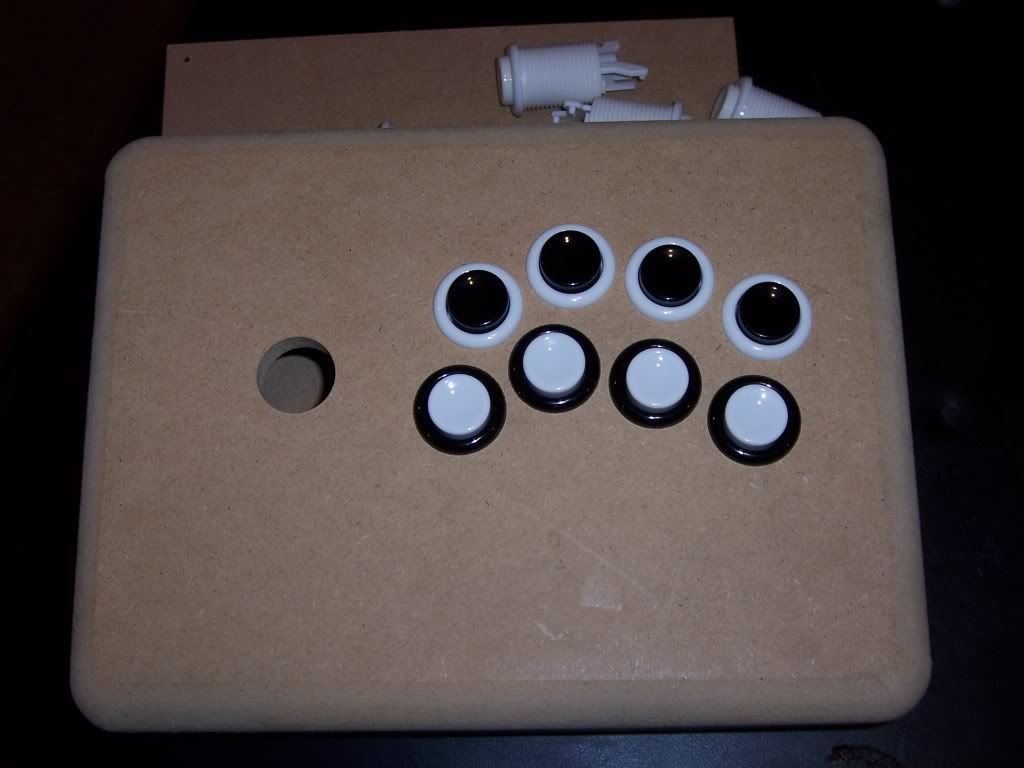
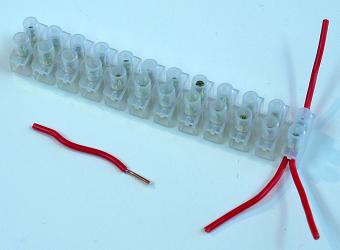
I repeated the process for each of the 3 groups of switches, making sure not to cut the wires too short and making sure the crimped connectors were nice and tight. No good having a loose connection in the middle of a fight and losing all your kick buttons. I turned the buttons so that all the switch terminals faced the top of the case with the thought that the majority of the wiring would run clockwise from the switches to the PCB and adapter. After an hour or two of tediousness, I had everything wired up and ready to test for the first time.


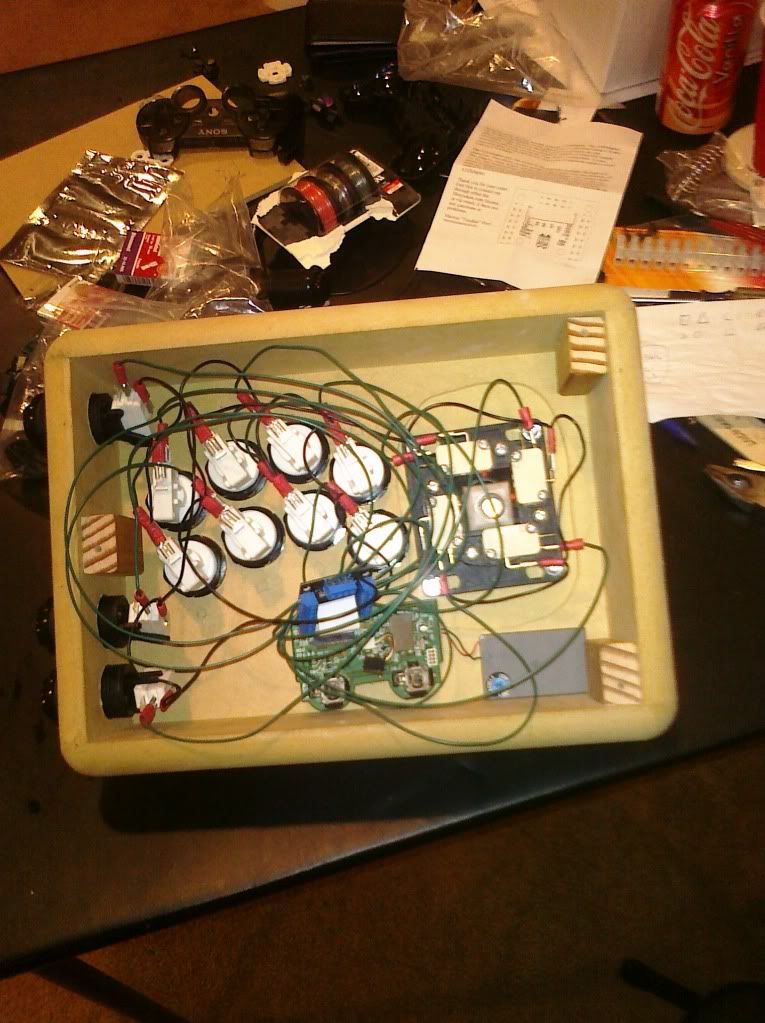
Quite the rat's nest, isn't it...

I was a little nervous at this point. While plenty of people had made custom sticks before using the same parts, I still didn't know how this thing would work. Plus, the stick I got the PCB from was classified as defective. While I had synced and charged the Sixaxis when it came in the mail, would it really work for this application? I needn't have worried. I pressed the PS button on the side of the case and my PS3 sprang to life. I moved the stick around the XBM  making sure that all directions worked, still marveling at the 'click' the cherry switches made that I hadn't heard or felt in almost 2 decades. I fired up Street Fighter IV and configured the buttons like the arcade, using the buttons on the end as my throw (eliminating the craptacular 2 button throw scheme) and my focus attack (even though in practice it's very easy to just hit strong/forward with one finger). After a few rounds against the computer, I was happy to report 2 things:

1. IT WORKED!!! There was no hangup from the stick in any direction, the buttons were nice and tactile and there was no input lag whatsoever. I was able to pull off Chun Li's super and ultra move with no problem at all, which I had found impossible to do over the many variations of Street Fighter and Street Fighter Alpha playing with a pad. With the exception of the curved layout, it was exactly like playing in Time-Out arcade 19 years ago.

2. I was WOEFULLY out of practice using a stick. Having used a pad for so long, I found it difficult to adjust to moving my whole left hand instead of just my thumb. Likewise, combos that I was used to tapping with my right thumb needed to be input with 3 fingers spaced over an unfamiliar layout. Also, with the 8 button setup instead of the classic 6, at times I found myself positioning my hand over the wrong button column.Trying to hit the fierce button and going for a throw will only get you punched in the face. While everything felt familiar, it was like coming out of a 15 year coma trying to ride a bike.

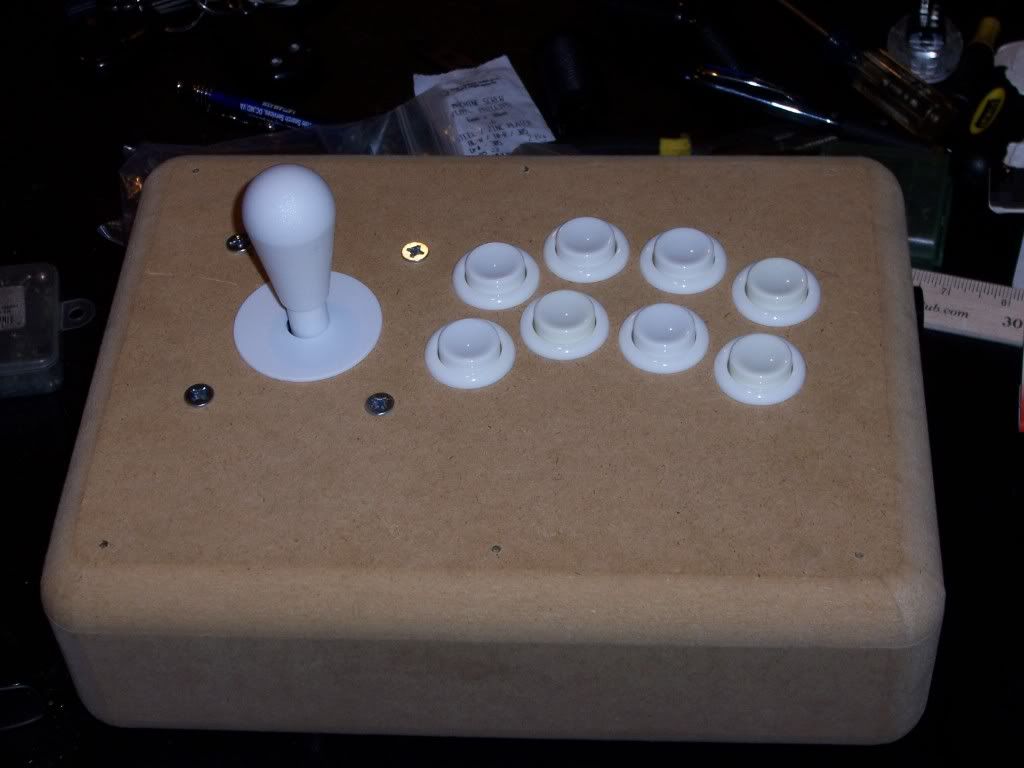
Now that I had 'proof of life', I was determined to make this contraption look good. n the end, this would entail a good week of noxious fumes, dust particles, a few trips back to Home Depot and Autozone and elbow greese. LOTS of elbow greese....

Wednesday, November 25, 2009

El Kabong2 (or making my first arcade stick) Part 2 – Time to Build


So, I finally had everything to build my fight stick. More or less. Looking at the box, there were a few items that needed to be addressed. First, I wanted to put some art on the top of the stick, which meant I would need to buy some plexiglass and cut it to fit. While I was at it, I could get a piece for the bottom to show off the wiring, assuming it was neat enough. Next, I noticed there weren't any holes drilled for the joystick, which meant I needed drill bits and bolts to screw the stick down.

This is going to take some work...

 So, it was back to one of my favorite stores as a homeowner, Home Depot. I picked up 4 1-¼” screws with nuts and lock washers, a slab of lexan for the top panel and a piece of plexiglass for the bottom, assuming I wanted the insides to show once I was finished (for the difference, check this link: ACRYLIC GLASS AND POLYCARBONATE). Since I never picked up paint, I grabbed can of Rustoleum primer, gloss black lacquer and clearcoat lacquer. I also needed to figure out a way to cut 9 holes in the lexan for the buttons and joystick. The holes needed to be 1-1/8”.


R to L: forstner bit, Hole saw, Spade bit


I could have used a hole saw, but I’ve seen and heard bad things about those and plastic. I could have gone with a spade bit, which would have got the job done well, but I decided to go with a forstner bit instead. It would give me a nice clean cut and if I ever decided to make a box from scratch, a forstner would be the way to go to cut holes in wood or mdf. Finally, I had been thinking of a way to hide the screw heads in the top panel. I decided a countersink would do the trick, but wasn’t sure of the size. I picked up a set of 4 and called it a day.
 
Never know if I'll need them again...

Now that I had everything (I thought) I could now start on assembly. I got home from work, flipped on MNF and set to work. Since the ‘Skins were playing the Eagles, I know I wasn’t going to miss anything while working. My first task was to get the cutting and drilling out of the way. Cutting the lexan wasn’t that hard. I measured the area of the case where the top lexan would sit and transferred the measurements to the lexan. Using a straightedge as a guide, I scored the lexan with a lexan cutter (which is basically a handle with a sharp edge; you could probably do the same with a box cutter or something similar). After about 10 passes, I placed the lexan on the table, with the scored line hanging just off the edge of the table. Holding down the piece on the table, I pressed down on the edge that was hanging off. SNAP! One nice smooth cut. I repeated the process for the width. After a few passes with some sandpaper to take the sharp edge off, I checked it against the case. Perfect fit.

Next, I turned my attention to mounting the stick. The Happ competition stick has a plastic mounting plate that bolts to the control panel. The switch mounting plate then screws onto that.


I unscrewed the two parts, placed the mounting plate on the case, and marked the holes where the screws would go. Afterward, I chucked a bit in the drill and fired 4 holes thru the case. I then put the screws I bought in the holes and tried mounting the reassembled stick. To my horror, only 2 of the screw holes matched up exactly. One of them would fit if I forced the stick on, and the other would only fit if I screwed it in at an angle. Since I was planning on hiding the screws, this just wasn’t going to work. After a few minutes of cursing, drinking, and watching the Redskins actually score a touchdown, I decided that 2 screws would have to do the trick. Fortunately, the screws that worked were diagonally apart from each other, so the stick would be somewhat level and evenly secured. To hide the screw holes, I grabbed the countersink bit. I found the size that fit the size of the screw head and drilled into the mdf until the screw heads were just below the surface.


Now you see them, soon you won't...

I then put some glue (construction adhesive I had around the house) in the hole to make sure the screw didn’t move, dropped the screws in, and snugged the nuts on the other side to make sure the bolts were set against the bottom of the hole. With some spackle over the holes, I would have a nice smooth surface and no one would know how the stick was mounted. Score one for the kid!

Now to get the holes drilled in the lexan. Since the case wasn’t originally designed for lexan on top, I had to figure out how to have the holes in the case and lexan aligned. Flipping the case upside down and drilling holes in the lexan from the bottom made the most sense. The holes in the case would act as a guide for my forstner bit, so I wouldn’t have to worry about the holes not lining up. But I had to make sure the lexan didn’t move while I was cutting it. I grabbed the tap and die set I had, made some measurements for where the screws should go, and drilled 3mm holes in the case and the lexan, which I then tapped threads in and used 3mm button head screws . Now, the lexan wouldn’t move, the screws wouldn’t back out, and once the art was in place the screws would make sure the lexan would not come loose (even though the lexan would be held in place by the buttons).


With the lexan firmly attached to the case, I was ready to cut the holes. Since I have no workbench to speak of, I had to improvise. I grabbed 2 blocks of wood I had laying around the house to use as support. I then placed a cloth on top of those to keep from scratching he lexan or the case, then placed the case upside down. The wood blocks were positioned with just enough space for the hole I was drilling to make sure the lexan would remain flat and tot vibrate or bend while I was cutting. With nice even pressure, the forstner bit cut thru the lexan, leaving a trail of plastic bits in its wake. After a minute or two, I had a perfect circle cut in the lexan.


2 down, 7 more to go....

Unfortunately, I only managed to get 3 holes finished before my drill died. Why I didn’t recharge all my tools I’ll never know. No matter. It was late and I was getting tired anyway. I put the battery on the charger and finished the next evening.


The day after..

Before quitting for the night I decided to dry fit the stick and the buttons just to see what it looked like and maybe get an idea of what button combination I might use. I tried a few different combinations based on the buttons that I had and the combinations I could make from them:


All white. Classic...


6 white, 2 black, a la Mad Catz TE stick


White punch, Black kicks. Ehh..


I really like the white on black...


Love the kick row. Punch row? Not so much...

After about 20 minutes of rearranging buttons and swapping plungers and rims, it occurred to me I really couldn’t settle on what color buttons would work best until I actually painted the stick and chose what artwork I was using. Trying to decide beforehand would be futile. Muttering to myself and taking another shot of Crown and Coke, I decided to just go with the white on white for not for simplicity’s sake. So I bolted the base of the joystick on, put in the white buttons and snugged down the mounting nuts. I then attached the switches to the bottom of the buttons to get an idea of which way the terminals needed to face for the wires to run cleanly.


Nice backshot....


When all was said and done, it looked like this:


I could have stopped here, but I spent too much on other stuff...

The buttons clicked just like I remembered, as did the stick. The layout felt a little funny, as it was the slanted, ‘Astro City’ layout that’s almost standard in many arcades in Japan, not the straight row of buttons used in US arcades. That said, my fingers did line up with the buttons juts right, so I figured it would be something I could get used to. Exited things were starting to look like an actual stick, I decided to call it a night.

Tuesday, November 17, 2009

El Kabong2 (or making my first arcade stick) Part 1 – Prep Work


Now that I decided on making my own stick, I had to figure out how to do it. First up, I needed the buttons and stick. Since I was going for the old school American style arcade, happ parts were the only choice I had.


They're like Skittles with switches
 
The buttons themselves were pretty easy. Happ has a convex button and a concave button, but since I was going arcade style, concave was the only way to go. Finding the parts was no problem. Ebay, as usual, is your friend, and there are a number of online shops that specialize in arcade parts. The only choice I had was the color. Would I go red/white/blue like the arcade? Should I do a monochromatic scheme? How about translucent buttons? And what color stick? These and other stylistic choices plagued me for days. Since I hadn’t even begun to think about art for my control panel, I decided to keep it simple. I needed a total of 11 buttons square, triangle, circle, x, L1, L2, R1, R2, select, start and the PS button) so I placed my order with the good folks at Lizard Lick Amusements. I ordered 8 white buttons and 4 black buttons. This would give me a bit of flexibility on layouts, if I wanted all white buttons on the panel, a white row of punches and a black row of kicks, or to mix and match button parts (black plunger/white rim, white plunger/black rim). At $1.55 a piece, I couldn’t really go wrong.


Ol' Faithful...
 
I also picked up a white joystick and a black joystick, since I couldn’t figure out which would look better depending on the button scheme I went with. The black stick was $7.95, the white $9.95. Just for giggles I also bought a clear Seimitsu button to see if they felt like I thought. At $3.95, it’s twice as expensive as a happ button. For what I was looking for, it didn’t equal twice as good. I also bought a retaining nut wrench and a harder tension spring for the joystick. With shipping, I made it under $50.
Next up, I needed a case. I toyed for a while with the idea of making my own case. The only problem is, I have no tools. While I could have gone to my folks house and got a hacksaw, circular saw, and made a mess of my garage, I’m pretty sure that would have ended in a massive FAIL and cost more than buying a custom stick outright. I could have gone the route of some who have made sticks out of tupperware containers, suitcases, and shoeboxes, but that wasn’t something I was going to be overly proud of (although the plastic container deal would be funny in a pinch). So, I looked into a premade box. The majority of the boxes I saw had one of three problems. First, the majority of the cases were designed for Sanwa or Seimitsu parts, which don’t need the same mounting depth as happ parts. Second, many of the cases only had a 6 button layout on the control panel. While I could have got used to this, and it was more in line with the true sprit of a Street Fighter cabinet, having 8 buttons would make mapping some moves a bit easier. Third, the boxes were more than I wanted to pay for. $65 for a rather plain (or downright ugly) case, to $125 and up for a case made from maple, walnut, mahogany, zebrawood, etc. Don’t get me wrong, some of them looked like pieces of furniture, and a lot of work went into making them. But I wasn’t about to spend that much on just the case. Besides, they wouldn’t fit my parts anyway, so the temptation to get one just wasn’t there

Pretty Boxes.....


After a bit of research, on the SRK forums, I stumbled onto the guys over at QCFGaming. They were offering budget sticks made from MDF
starting at $19.99, with the holes already drilled for the buttons. They offered 6 or 8 button layouts, AND they had a box that would fit happ parts. SCORE! So for $25 plus shipping, I had the case. I figured a little bit of paint and the case would look fine. Little did I know how much work that was going to be…

With those two items out of the way, I needed to work on the brains of the box. Most of the fight sticks available were of the wired variety. That could have worked, but I didn’t want to have 15 feet of usb cable running on the carpet of the basement. Besides, my PS3 pads were wireless, so why couldn’t my fight stick be wireless too? Back to the SRK forums for the solution. For years people have been ‘padhacking’, the process of taking the guts from a working joypad, soldering wires to the pcb and connecting them to their pushbuttons. The process takes the right kind of pad and some soldering skills.


Yeah, I wasn't about to do that...

Unless, of course, you have a PS3, that is. It turns out that the design of the PS3 pad (and the PS2 pad) is such that soldering isn’t necessary. The membrane that has the connection points for the pad buttons is actually plugged into the main pcb. So, a few industrious and skilled electronic wizards cooked up this:


This is what makes it all run

The axisdapter plugs into the connector port for the membrane, allowing you to wire your buttons to the adapter without soldering a thing. The good folks at gamingnow.net will sell you one for $27 (although you may find it for $25 if Lizard Lick has them in stock). All I needed now was an old PS3 SixAxis controller. A search online found a spot selling defective pads for $9.95. The cause of the defect ranged from sticky buttons to broken analog pads. I took a gamble on one, figuring the only thing I wanted from the pad was the pcb board, which shouldn’t be affected by any of those defects. I probably could have found a used, working one for under $20.

Next up were assorted odds and ends. I needed some small gauge wire for the buttons, so it was off to Radioshack for a pack of 24 gauge wire. The 3 pack was less than $10 and I have enough to rewire my stereo if I needed to. I wasn't too sure on exactly how much room I'd need or have for running the wires, so I picked up a junction block for $4 to be safe


Comes in handy for cleaning up wiring
.
The trickiest thing to find were the quick disconnects for the buttons and switches. I figured they sell these things ar Radioshack, Lowes, Home Depot, Autozone, Advance, etc. There should be no problem finding them, right? WRONG. The smallest size most places had were 1/4" (.250), not 3/16" (.187). I was stunned Radioshack didn't have them. I mean, if you're going to start a nerdy wiring project like making your own fight stick, they would seem the natural place to get nerdy supplies. But no. I was about to give up hope and squeeze a bunch of 1/4" connectors to fit when I decided to check out the Ace Hardware close to my job. Wouldn't  you know it? They actually carried them! $4 for a pack of 10, and I needed 30 to cover everything. I got 4 packs to be safe.

Who would think THIS would be the hardest thing to find?

Now, if I were a smarter man, I would have picked up a bunch of them when I ordered the buttons and the stick, where they would have gone for $0.10 a piece. Oh well, live and learn.

The last thing I needed to figure out was how to sync and charge the stick. Since I was using the pcb from the sixaxis, all I had to do was figure out how to make an extension from the usb purt on the pcb to somewhere on the body of the stick. Most people use an adapter like this:

Neutrik USB gender adapter

However, I wasn't sure I would have the room  on my case. That, and just about every online shop was out of stock at the time. So, after some more head scratching, I went over to the guys at Monoprice. I picked up a USB A Male to Mini 5 pin (B5) Female Adapter and a USB A Female to A Female Coupler Adapter for less than $2.50


After about 2 weeks, everything was finally here. The fun part was about to begin...


Monday, November 16, 2009

El Kabong2 (or making my first arcade stick) - Prologue

Over the next few days (or weeks, or whenever I get around to it..), I plan on documenting my trial and error build of my first arcade style joystick. There will be plenty of pictures, instructions, and tips along the way, but I figured some background on what I'm doing, why I'm doing it this way, and why in the world I'd name it 'El Kabong!' in the first place was necessary. If you don't wish to read my ramblings (and I probably wouldn't blame you), go on down to Part 1, assuming it's even posted. For those of you that want some insight (or if I haven't posted Part 1 yet), read on...

I've played some form of Street Fighter II for the last 19 years. My friends and I have spent so much money on that game in the arcade that we probably could have bought our own machine twice over. We would scour the county trying to find a machine that, not only wasn't packed with no technique, no honor having players (a entirely different post), but one where ALL the buttons worked, the stick didn't hang or get stuck in any direction, etc (which after a while became harder to do, since people had no pride in their machines, as my buddy would put it). When the game finally came out on the SNES, we got it first day.


Wow, that art was bad...
The thing is, even with 6 buttons on the SNES pad, it felt strange for a while. We were used to arcade controls - US arcade controls - and the pad just felt, well, WRONG. A bat joystick, 3 punch buttons in a row, 3 kick buttons in a row, all with that 'clicky' sound and feel to them - that was what we were used to, what we spent so much time and money honing our skills on. So we looked for an alternative.

Even when I was young I found out the importance of 'you get what you pay for'. Sometimes a name brand item will cost more, but in the end it's worth it. So we already know not to trust any knock off Mad Catz anything (this was the early 90s, after all and they're bad reputation was very well earned). When Capcom announced they were making their own stick, we figures 'what could go wrong?' I mean, it's a fighting stick made by the company that made the greatest fighting game to date. It should be perfect! Sadly, it was not to be. My brother saved up his cash and came home with this

I wonder what happened to that stick...

This was NOT what we had in mind. The stick was a ball, not a bat (which wasn't so bad) but was extra loose and nearly impossible to get used to for any moves. Not only were the buttons slanted at a weird angle, but they were convex instead of concave and felt like mush. There was no 'click' to them either. My brother dubbed the stick ‘El Kabong!', which to this day I don't quite understand. After a few games, it went in an unused drawer, never to be seen or used again. So, we stuck with the pad, which is what I've used for the past 16-18 years, from SNES, to PS1 to PS2, from all versions of SFII to the Alpha series (I just could not get into SFIII or the vs. series. Sue me). I'm still using it now. But that's about to change.

With the release of Street Fighter IV came the Mad Catz release of the SE and TE arcade sticks. The SE uses stock parts but can be upgradeable to real arcade parts. The TE comes standard with real Sanwa arcade parts right out the box. The only problem? These were Japanese style arcade parts, which are very different in feel than the American style sticks I was used to. This wasn’t going to work. I toyed with the idea of getting a custom built stick, but the wait times were too long for me to even bother with. When SFIV hit, turn around time for any custom stick was at least 8-10 weeks. So, it was back to playing with the DualShock3. After a few months, frustration set in. With the play mechanics in SFIV the way they are, some moves or button combinations were much more difficult that they needed to be. 2 button pressed for a throw or focus were a pain, True you could map either to a single button, but you would lose the 3xp or 3xk, which is needed for supers and ultras (and not easy to hit on a pad). And while quarter circle movements have been perfected with a pad (and why there are legions of dragon punching Ken players across the globe now), back/forward/back movements stymied me for years, limiting my use of some characters super moves unless I hold the pad in a totally retarded manner. So, it was back online for more research. After a while, I found out the difference between Sanwa, Seimitsu, and Happ/iL parts. I saw the different button layouts used in arcades by different region and on fight sticks. I took a look at a lot of custom sticks and how they were built. I read up on padhacking, case building, custom pcbs, artwork, LEDs, online shops…the works. Turns out there’s a robust cottage industry for fight sticks for those that don’t like the offerings from Mat Catz, Hori, and a bunch of other knockoff companies. After a while, my inner nerd and handyman kicked in. So, I set out to build El Kabong2.

Now, I’m pretty sure some of those terms were totally foreign to some of you. If I tried to explain all of them this post would never get finished, Plus, others have done a much better job. So, here are some links for you to look at for more info and inspiration (I'll post more as I find them):

www.slagcoin.com
Everything you wanted to know about building a joystick, but were afraid to ask. This site is like a joystick builder's bible. From button layouts, PCB diagrams, wiring diagrams, detailed descriptions of happ, Sanwa, and seimitsu buttons and joysticks, tools of the trade, and 3 detailed joystick builds, there's more to learn here than a lottle bit. Definitely the first place I would check.

http://forums.shoryuken.com
This message board is full of hardcore fighting fans. Any popular fighting game or specific character usually has their own writeup with strategies, move lists, combos, etc. The Tech Talk thread is an invaluable resourse for builders. A few helpful and constantly updated threads include:

http://forums.shoryuken.com/showthread.php?t=201537
"Check Out My Arcade Stick" Thread. A number of custom and semi custom sticks. From modded MadCatz sticks, modded Hori sticks, custom built sticks and art of all sorts, this is a great place to get inspiration on what is possible with a fight stick

 http://forums.shoryuken.com/showthread.php?t=118289
The Sanwa and Seimitsu FAQ. All you could ask on Japanese style arcade parts

http://forums.shoryuken.com/showthread.php?t=141741&highlight=happ%2FiL
The happ/iL Information thread. Info on American style arcade parts


http://forums.shoryuken.com/showthread.php?t=170294
The Axisdapter thread. If you want a wireless PS3 stick, here's all you need to know...

http://forums.shoryuken.com/showthread.php?t=162026
The Cthulhu Board thread. Interested in a stick that can be used on yor PS3 and Xbox 360? There's a thread for that...

Thursday, November 5, 2009

Alow Me To Introduce Myself...

Hello World. Thank you all for dropping into my little corner of the world. Over the next few weeks and months, I'll be posting up various things that I've been getting into in the hopes that maybe someone else may learn something, like something, or just waste some time in their day. I'm not sure how often posts will be up, since after working on a computer at work all day the last thing I want to do is turn the computer on once I get home, but time will tell. Enjoy!

SLC