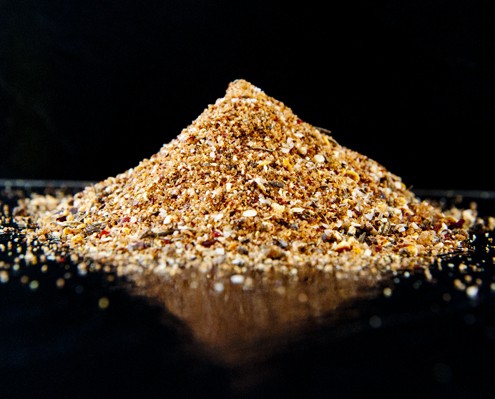
Now that the chicken has sat in the brine for a while, its time to season and cook the bird. First, remove the chicken from the brine and discard what's left of the brine (if you notice, you will have much less brine in the container than when you started, meaning the chicken absorbed all that flavorful moisture). Rinse the chicken under cold water and pat dry with paper towels. Next, grab your favorite rub. It can be something from the store, something from a BBQ shop, something you put together yourself, or simply salt, pepper and a touch of garlic. For a great all purpose BBQ rub, try this:
2 tbsp kosher salt (not iodized or table salt)
2 tbsp paprika (sweet or Hungarian if you can find it)
1 tbsp dark brown sugar
1/2 tbsp regular sugar
1 tbsp chili powder (remember, if you can make your own, do it!)
2 tsp ground chipotle chile
1/2 tsp cumin
1/2 tsp black pepper
1/4 tsp cinnamon
No matter what you use, it's probably gonna look like this
As mentioned in an earlier blog post, it doesn't matter what secret combination of herbs and spices you put on your food if your technique is not sound. Don't get too hung up on the exact measurements or ingredients of the above example, or one you try to make yourself. Feel free to add a touch of cayenne of you like your chicken with more kick, or rosemary and garlic for a more savory feel. The most important parts of this cook is brining the chicken and properly grilling the chicken, which we're getting to.
With your rub in hand, generously season the chicken. You can add the rub to a plastic shaker and go to town, making sure both sides get a good dusting of rub. Lift the skin up and shake a bit directly on the meat as well.
Mmmmmm....good stuff
If you have a good amount of rub, and another gallon bag, you could also try seasoning the pieces this way: mix 1/2 cup of extra virgin olive oil (EVOO for you Rachel Ray fans) with 1/2 cup of your rub until you have somewhere between a slurry and a syrupy consistency. Add the chicken to the bag, pour the mixture over the chicken, seal the bag, then shake to evenly coat the chicken.
Looks like spicy syrup
You'll go through plenty of bags doing BBQ. It's worth it though
However you season the chicken, let it rest for 30 minutes or so while you get your cooker set up. For a chicken cook, I always set up the cooker for indirect cooking between 325-375 degrees. This will give pretty even cooking and a nice crispy skin once all is done. Using my chimney starter, I use a full load of coals and get them red hot and ash over. Once they are ready, the coals are piled to one side of the grill, making a high heat zone. I like to add a nice chunk or two of hardwood (hickory, pecan, apple, etc) for some extra smoke flavor. The chicken will go on the opposite side of the grill, where they will get the heat from the coals, skin side up, but not be directly on top of them to keep from burning. If you have a lot of chicken to cook, place a layer of fresh coals on the bottom of the grill before pouring the lit coals. They will ignite as the lit coals burn down and keep the heat going.If you are using a dedicated smoker, set your vents so that the temperature in the smoker climbs to the 350 degree range. If you're using a gas grill, light one or two of the burners (depending on your setup) and have the chicken on the side of the grill with the unlit burner. You can either use a foil packet with soaked wood chips over one of the lit burners or if you have a dedicated smoke box, use that.
Coals to one side folks
Don't forget to oil the grates!
The charcoal could be piled higher on one side to give me more room
I let the chicken cook for 45-60 minutes, depending on if I've got light or dark meat on the grill, turning the chicken over maybe once during the cook. Depending on how your coals are set up, you may want to rotate the chicken once, moving the pieces closer to the coals a bit further back, and those that were already back a little closer to the heat. Some people like to place the chicken skin side down directly over the coals for a minute or two to get the skin extra crispy and extra grill marks for presentation sake.
Those thighs look GOOOOOOOD
That's a lot of wings...
If sauce will be added to your chicken, start brushing it on (or dip the chicken in sauce and place back on the grill) within the last 10-15 minutes of the cook, and keep an eye on it. If you brush it on earlier you run the risk of the sugar in the sauce burning, which we don't want . Use your thermometer to check the temperature of your chicken to know if it is done. We're shooting for 170 degrees at the thickest part of the chicken. Please DON'T just use the old adage of cooking the chicken 'until the juices run clear', as the chicken still may not be done. If you go over that target temperature, don't worry too much. Since the chicken is brined, you seriously reduce the chances of overcooking and drying out your chicken. Once done, pull the chicken off the grill and let it rest for a moment or two. Then, dig in.
BBQ chicken isn't hard to do folks. As long as you find a rub you like, cook indirectly and brine your chicken, you are guaranteed to turn out chicken you can be proud of and have people clamoring for more. Enjoy!
Chicken has to be one of the most versatile pieces of meat around. You can bake it. Broil it. Fry it. Boil it (though, yuck!). Trim it into pieces 9 ways to Sunday. Season it with every spice known to man. One of my favorite things to put on the grill is chicken. A good piece of BBQ chicken can change your life. Well, maybe not that serious, but it sure is a wonderful thing. Cooking that good piece of BBQ chicken, though, requires a little bit of effort. You could easily turn out chicken that is undercooked, burned, dried out, or just plain bland. But with a few simple techniques and a bit of patience, that's not going to happen. This post is focusing on bone-in, skin on chicken. Some of the techniques are the same whether you have bone in or boneless, but there are a few differences with the actual cook for boneless that I won't spend too much time on. Shall we begin?
Note: For the cooking professionals, there is a difference between 'BBQ' and 'grilling'. BBQ is usually low temperature (225-250, possibly 275 depending on who you ask), indirect heat, with lots of wood smoke. Grilling is usually at temps 300-375, and can either be indirect heat or direct heat. Technically this post would be grilled chicken, but many people use the terms interchangeably, so that's what I'm going to do here. Any problems, contact my manager
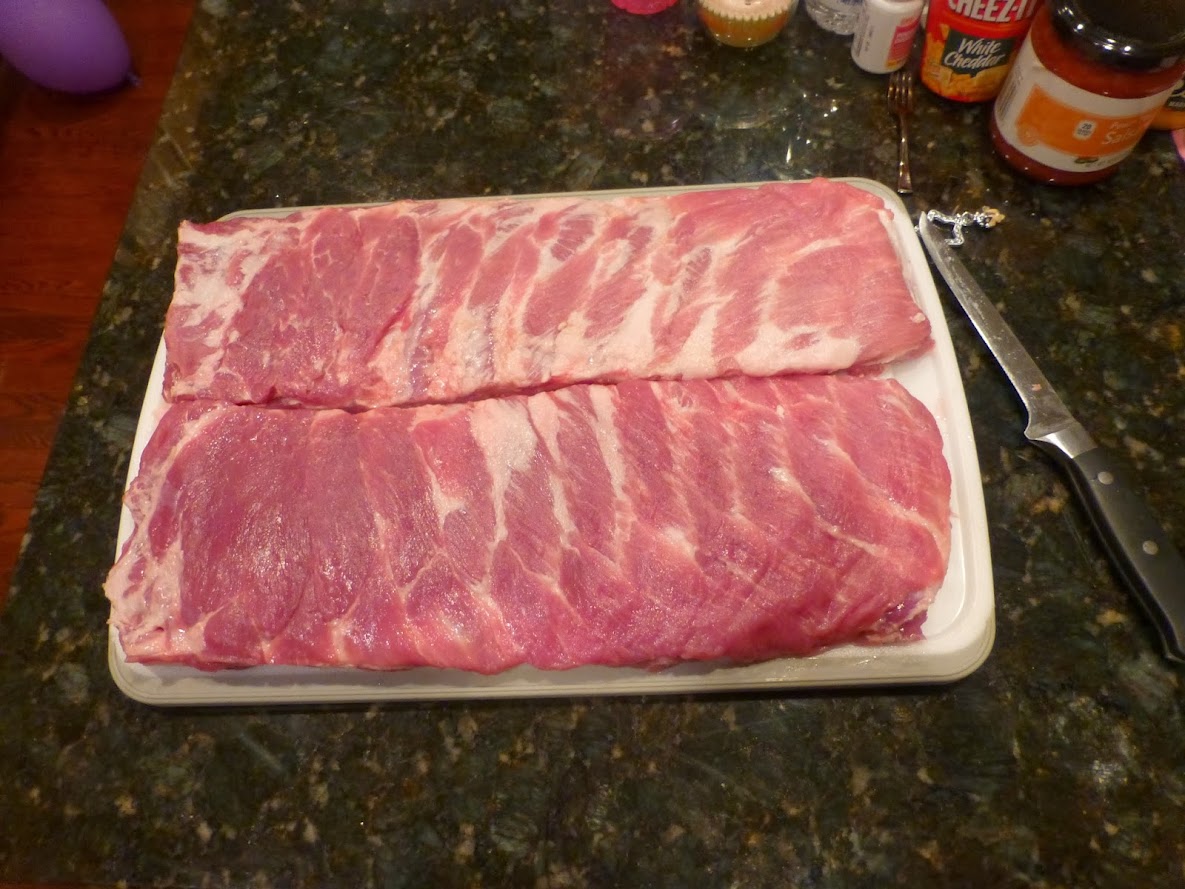
- First things first. Get yourself some chicken. Doesn't matter if it's drums, wings, thighs or breasts. Preferably the chicken is at least refrigerated (fresh is good, but not necessary) but not frozen. Personally I prefer thighs, but whatever floats your boat.
This pack came from Sam's Club. Perdue usually has quality chicken
The one thing I don't like about thighs, though, is how they are cut before they are packaged. Often there's a lot of extra skin and fat that may be still attached to the thigh, or pieces of cartilage from the joint when the bird was cut apart. Now, you could just give the pieces a quick rinse and call it a day, but I like to trim the thigh into something a little more presentable. I set up my work area with my cutting board, the pack of chicken, and a container to put the trimmed pieces in once they are done.
Next comes the messy part. Each piece of chicken is laid on the cutting board and inspected. I lay the skin side down and try and spread the skin out so I can see exactly how much needs to be cleaned up.
With a sharp knife, I cut off any really big pockets of fat and square up the skin so that it looks a little cleaner. Any bone or cartilage fragments are also removed. Once finished, the thigh looks like this:
The thigh then moves to the container and is repeated for every piece until the pack is done. There's going to be a nice size pile of nastiness that can be tossed. It's a little time consuming, but it's worth it
On the competition BBQ circuit,the preparation is even more extreme. The thighs are usually trimmed so that the piece is as close to symmetrical as they can get it. It cuts away good portions of meat, but it makes the presentation to the judges better. The skin is then peeled back from the thigh, sometimes totally removed, and scrapped with a sharp knife to remove all of the fat on the underside of the skin, then wrapped back around the trimmed pieces before they are cooked. This is quite time consuming and extremely messy, but it does help achieve the 'bite through' skin the judges are looking for. Since this isn't a competition cook, I wouldn't bother with this step.
Of the parts of the chicken, the thigh is probably the most time consuming to clean up. If you rather not have that much work in store, cook some wings. Most of the time all that would be needed for those is to trim some of the extra skin around the drum part of the wing.
Cover the chicken and place it aside for the moment in the fridge or cooler. Now it's time for probably the most important part of the chicken prep: BRINE YOUR CHICKEN. Do not pass go, do not collect $200, do not skip this step. Why is it so important? Brining your chicken does 2 things. First, it adds moisture to the chicken. That way, the meat will not dry out during the course of the cook. Dry chicken breasts are now a thing of the past. Second, a brine can add flavor to your chicken, be it spicy, savory, slightly sweet, or anywhere in between. 'Well, why not do a marinade instead?', you may ask. Yes, a marinade is a quick way to add flavor to your meat. However, while a marinade uses acid (vinegar, wine, citrus juice, etc) to break down some of the proteins in the meat, it does very little to add moisture to the food. Also, a marinade penetrates just the top part of the meat, while the flavor a brine can introduce will penetrate all the way to the bone. A marinade can also start to break the meat down and make it mushy if the meat is left in too long. The biggest downside to using a brine is time: the chicken needs to soak for a few hours to be effective. The benefits just can't be beat, so the extra time is worth it, in my opinion. If i don't have time to brine my chicken, I won't grill chicken. Once you tried it yourself, you may share my sentiment.
So, what is a brine anyway? At it's most basic, it's a mixture of water and salt. Sugar is also found in your most basic brine mixtures. Why does brining work? The ratio of salt in the brine mixture is greater than the ratio of salt in the meat. Through osmosis, the meat will absorb the brine until the ratio of salt and water is equal inside and outside the meat (who said you'd never use grade school science in the real world?) A good ratio to start with is 1 tablespoon each of kosher salt and sugar to 2 cups of water. Even if you left the brine with this basic mixture, you will greatly improve the juiciness of your chicken. But why stop there? You now have the opportunity to add further herbs and spices to your brine, which will carry into the chicken. Go for some peppercorn, paprika, garlic, poultry seasoning, honey, chili powder, etc. Let your tastebuds be your guide. You can also find premixed brine seasonings like THIS, which I have tried and have had great success with. One of my personal favorites is a spicy apple chai brine, which has been my go-to brine for the last few years. Leave a comment or e-mail me and I may send the recipe to you to try. Depending on your ingredients, you may need to bring the brine to a boil in order for everything to dissolve. If so, let it cool before you add it to the chicken. You don't want to cook the chicken just yet! You can also make the brine before time and sit it in a container in the refrigerator until you need it. Just be sure to have the container marked, lest someone grabs a glass of salty spicy brine instead of apple juice (like my father in law once did!)
I wouldn't recommend drinking this. Leave that for the chicken.
With the brine done it's time to soak the chicken. One of the easiest ways to do this is by placing the chicken pieces in a gallon (or larger) sized freezer bag, then pour the brine over the chicken, making sure all the parts are submerged. Squeeze the bag slightly as you close it to push as much of the air out as you can, then pop the whole thing the the refrigerator for at least 2 hours (I prefer at least 4, or even overnight if I have the time). If freezer bags aren't handy, you can also add the chicken to a large bowl, pour the brine over the chicken, cover the bowl with plastic wrap then place in the refrigerator.
Let the chicken soak in the brine for at least 2 hours, longer if you have the time. Next step? The actual cook. Stay tuned...
Now that the ribs have been prepped and the grill is heated up, it's time to put the two together. Take the ribs and place them bone side down, on the side of the grill away from the direct heat (be it your coals on a charcoal grill or the burner on the gas grill). Some pitmasters will add an additional water pan on the upper grate close to the ribs (but not directly over the fire, as we don't want to boil the water). If you have enough room on the grill, go for it. If not, don't sweat it too much. the pan below will do just fine. After that, close the lid and walk away. We're in for the long haul.
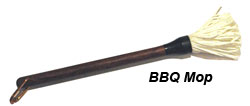
Let them be for the first hour. After that, it's time to check on them to be sure they are not drying out. This is usually done by spraying or mopping the ribs with something. It can be as simple as apple juice or a combination of juices, oils, vinegars and spices. Usually I will end up using one part apple juice and one part cider vinegar, sometimes with a bit of rub dissolved in the mix. Use a spray bottle or a a brush (the silicone brushes work, but the cloth/string mops like THIS are even better for this task). Add enough to keep the ribs from drying out, but not enough to wash the rub off.
Close the lid and repeat every 45 minutes or so until the ribs have been on for 3 hours.
At this point, you could continue to let the ribs cook until they are done in another hour or two. However, a number of pitmasters, especially in competition, will use the 'Texas Crutch', whereby the ribs are wrapped in foil with a bit of liquid to help tenderize and flavor the ribs further. Is it necessary? Probably not. Should you give it a try? Depends on how much time you have. For this cook, I did, with a twist. Using grill tongs, pull the ribs off the grill, place in a pan and bring them inside. Using heavy duty aluminum foil, pull a sheet 1 1/2 times as long as the ribs. Now it's time to gather your materials for the ribs:
The Parkay will help tenderize the ribs even further while inside the foil. The brown sugar and honey will add a layer of sweetness that will go between the spice from the rub and the sauce that will be used later. Place the ribs in the middle of the foil, lengthwise. Sprinkle a bit of the rub used on the ribs. Next, squeeze a line or two or Parkay on the ribs. Add a hand full of brown sugar, and follow up with a line or two of honey.
Bring the edges together above the ribs, then fold/crimp them together lengthwise so it is sealed. Do the same for the ends of the foil so that the ribs are now sealed. Alternatively, if you did not want to go the sugar/honey/Parkey route, that is perfectly fine. Wrap the ribs in foil as described above. Before crimping one of the ends of the package, add a bit of juice (apple, orange, pineapple, etc) into the foil packet, bone side down, then crimp the end tight. Once the ribs are done, place them back on the grill for another 45 -60 minutes with the lid closed. Pull them off the grill and remove from the foil packet. Be careful, as the steam may burn like a bag of microwave popcorn. When done, return to the grill for sauce
After 4+ hours, we're just about ready to eat. At this point, the meat should be starting to shrink back from the edges of the bones. The bones should twist just a bit, but should not fall out of the ribs. When held with tongs, the ribs should have quite a bit of give, but should not break in half. We can now add our sauce. What kind of sauce really depends on your preference. Homemade or store bought, mass market or bouquet, whatever tickles your taste buds. Using a brush or mop, add the sauce to the ribs. If the sauce seems too thick, or you prefer a thinner glaze on the ribs, just thin the sauce with some apple juice. Close the lid and let the sauce set for about 30 minutes. After that, it's finally time to pull them and get ready to eat.
The ribs should be tender, but with a bit of pull. The meat should be nice and moist, with a balance of spice sweet and a hint of smokiness. Contrary to popular belief, the ribs shouldn't fall off the bone, which is a sign that the ribs were overcooked. How you serve them is entirely up to you. You can take a knife and cut them into individual rib bones, or serve half or the entire slab at once.
That's it folks. The technique isn't really that complicated, but it does take time. Trust me, your patience will be well rewarded. As stated in the prologue, I am far from a professional. Every pitmaster may not follow the same exact steps as mentioned on these posts. After you try it yourself, you may want to tweak a few things more to your circumstances or liking. Have at it. As long as you can properly prep your ribs and keep a stable temperature you will be fine. Now go out there ans make yourselves some ribs people! Let me know how they turn out.
With the ribs cleaned, skinned, trimmed, and rubbed, it's time to talk about the grill. Charcoal grills and smokers. Gas grills and smokers. Electric grills and smokers. Pellet grills and smokers. Kamado grills/smokers. UDS (Ugly Drum Smoker). Prices that can range from under $100 into the thousands. Grills big enough to cook for 2 people or for a small army. What grill is best then? Honest answer: whichever one works for you. When cooking ribs, I want my cooker to do 3 things:
1. Be able to cook the ribs indirectly (away from the flame)
2. Be able to produce smoke
3. Be able to reasonably maintain a consistent temperature
I am not going to get into whether charcoal or gas is a better method for your cook. Both have their pros and cons. Of the 3 items listed above, a charcoal grill will give you better smoke, while temperature control is much easier on a gas setup. While each type of grill has it's own particular tricks and tweaks to be made, either can be used to cook a fine rack of ribs, or anything else you'll want to cook. I'm also not going to go much into depth on what type of grill, be it kettle, off-set, water smoker, or whatever. You can spend $1500 on a heavy duty Lang smoker with 1/4" steel panels and your food may not taste nearly as good as someone with a $100 Webber kettle (which, in all honesty, is one of the best, most versatile grills on the planet). Remember, it's all about the technique.
With that out of the way I'll introduce my setup at home. While I've got no issue with gas grills, I'm a member of the charcoal coalition
In the back is my Char-Broil barrel style grill, which has seen it's share of cooks in the past 4 years. In the front is my Char-Griller Akorn kamado style cooker, which has become my main cooker for longer cooks like brisket and pork shoulder. While I could use either to do my ribs, I'm using the Akorn for this cook.
Now let's talk heat sources
Here I have charcoal briquettes, lump charcoal, and a mixture of hardwood chunks, all in 5 gallon buckets. The small 1 gallon bucket holds soaked wood chips. Each have their use, depending on what food I'm cooking and what grill I'm using. It has been argued that lump charcoal burns hotter than your charcoal briquettes, and possibly burns longer. Lump also produces less ash than briquettes. On the other hand, lump is also more expensive than briquettes, isn't carried in as many stores and unless used properly can be less consistent temperature-wise because of the varying sizes of the pieces of lump. With briquettes, they are always readily available, less expensive, and burn extremely consistently from bag to bag. You will find people that champion either form of charcoal with a diehard fervor. While I don't know if there is a 'best' in this battle, I do know my Akorn (and other kamado smokers) recommend using lump charcoal, mainly because of how these cookers are designed. With my other grill? Either works fine. What brand? More than a few pitmasters say it really doesn't matter. You can find Kingsford practically anywhere. Royal Oak is also pretty popular and available across the country. I've used Stubbs lump briquettes (not sure if that's really a thing or just marketing, but whatever...) for the last few years. Whatever you do, please DO NOT use those MatchLight briquettes or any charcoal that has been pretreated with fluid!!! It takes forever for those chemicals to burn off the charcoal, if it ever does. 9 times out of 10 your food will be left with a nasty taste, and is one reason some people don't care for charcoal grills. There are much easier, safer, and better ways to light your coals, which we will get to in a bit.
While the charcoal will provide it's own smoky flavor, we'll need some more for the ribs. That's where the wood chunks come in. Hickory and mesquite wood chunks are usually easy enough to find at the store. However, some pitmasters prefer the smoke from fruit trees, like cherry, apple or peach. Oak, maple and pecan are also popular on the cooking circuit. You'll find some that say apple wood goes good when cooking chicken, or cherry goes well with pork. You'll also find those that believe you really can't tell the difference. Most do agree, though, that mesquite can provide too heavy of a smoky flavor to your food. My take? Try a few and see what you like. My bucket has a mix of apple, cherry and pecan wood chunks that have served me well. As for the chips, those I will use when grilling foods that will cook much faster, like seafood. The chips are usually soaked in water first, since they will burn much quicker than chunks, then put directly over the hot coals. For the chunks, they don't need to be soaked.
Let's take a second to talk about how to light your fire:
My favorite way to light charcoal, hands down, is with the chimney starter, shown on the orange bucket. The charcoal goes in the top. Next, 2 crumpled pieces of newspaper go in the bottom. Set the chimney on a fireproof surface or one of the grates of your grill, light the newspaper, and wait 10-15 minutes. The paper burns long enough to ignite the charcoal at the bottom of the chimney, which then lights the other coals. No muss, no fuss, no lighter fluid, and it only cost 2 pages of the sports section.Personally, I believe every charcoal grill should be sold with one. Two other really good options are shown to the left or the right. The Weber lighter cubes, or other similar paraffin lighters, work really well. Simply arrange your charcoal in your grill, add the cube inside the middle of the charcoal pile (you can use more than 1 cube or break the cube into pieces as well) and light the cube. The cube will burn between 8-10 minutes, igniting the charcoal in the process. Fire Liters are popular with those who have a fireplace in the house, and work similarly to the paraffin cubes (though they don't burn as hot, they do burn a bit longer than the cubes). There are other ways to light your coals, like an electric starter (an electric coil that heats and ignites the coals) or a weedburner (a modified propane torch), but these shown have worked for me without fail.
Now we can move onto getting the grill going. The grill is going to have to burn for 3-5 hours depending on your grill and the ribs you're cooking. The ribs will be cooked indirectly, meaning the they will not be directly over the fire. The grill will also be kept at a relatively low temperature (225 - 250 degrees). The type of grill that you have will determine what setup you will need. Here's what I have to do for my Akorn (other kamado style grills are similar):
One of the benefits of a kamado style grill is it's efficiency. It can maintain a constant temperature without using a whole lot of charcoal. Rather than filling up the entire grill, I fashioned a small basket of sorts with some expanded steel and metal zip ties, which I put in the center of the grill and fill with lump charcoal and a few chunks of apple and cherry wood for smoke. Next, I placed a Fire Lighter brick in the center of the coals and lit it.
After about 20 minutes, enough of the coals were lit to finish setting up the grill. Since the ribs were going to be cooked indirectly, I needed a shield to go between the fire below and the upper grill grate. I have found using a regular, 14" pizza pan wrapped in aluminum foil generally does the trick. Usually kamado grills will have a ceramic plate that can be used as both a heat deflector and a heat sink, helping to stabilize the temperature in the grill (it can also be used as a pizza stone when cooking pizzas on the grill). When I first bought the grill, the ceramic plate wasn't available at the store, and I never bothered calling Char-Griller to order one. At some point I will get one for my kamado. For the time being, the pizza pan has worked just fine.
After the deflector is in place and the upper grill is installed, it's time for one of the most important tools in my arsenal: a digital thermometer. Yes, many grills have thermometers embedded in the lids. However, by and large these thermometers suck. At best, the position of the thermometer is such that you can't get an accurate reading on how hot the grill is at the grate where the food is. What the thermometer will read is the temperature of the air near the top of the dome, which at best will still be inaccurate. With a digital thermometer, you can set the probe much closer to the grate and the food, giving you a much more accurate reading. My personal choice (and choice for numerous other pitmasters) is the Maverick ET-732. The Maverick comes with 2 temperature probes, so you can set one probe up to monitor the grill temperature, and have the other inside the meat to measure it's temperature at the same time. There is a wireless receiver as well, so you can monitor the temperature while doing something else around the house, which is extremely useful for a long cook. An alarm can be set for either probe to alert you when the target temperature has been reached (or if the temperature is too high or too low, if you chose). You can generally find these online for about $50-$60. It will be money well spent, trust me.
When cooking ribs, I will set the Maverick up with just the temperature probe, which I place close to the grill grate. Then I shut the lid, adjust the vents, and wait until the temperature stabilizes at 250 degrees. Since I've got the receiver on hand, I don't have to keep running back outside to check the temps.
As mentioned earlier, your setup will vary depending on your grill. If you're working with a gas grill, it's pretty simple. Light one of the burners on one side of the grill, and place the ribs on the other side where the burners aren't lit. Maintaining the temperature is as easy as turning the burner up or down. In order to add smoke, toss some chunks of wood (or wood chips that have been soaked for an hour or so) in aluminum foil, then fold the foil into a pouch. Poke a few holes in the foil and place the pouch over the flavorizer bars (or lava rocks, depending on your grill). There are also smoker boxes (small metal containers where you can add wood chips) specifically made for gas grills that you can find at your local hardware store if you so choose.
With a charcoal grill, adding smoke to the proceedings is a snap. Maintaining a steady temperature over the 3-5 hour time period is the hard part. The most effective way to do this is to use either the Minion method or the Snake method. The idea behind both methods is to have a large load of charcoal set up in the grill, but only light a few of those coals initially. Those coals are then placed on top of the unlit coals (for the Minion method) or at the beginning of the chain of coals (for the Snake method). The lit coals will then slowly ignite the rest of the unlit coals over the course of the cook, keeping the temperatures relatively stable. A detailed explanation of the Minion method can be found here. A thread detailing how to set up a grill for the Snake method can be found here. For those of you that are visual learners, you can get an idea of the minion method here:
For the snake method, check this out:
Once the coals are set up the temperature is then set and maintained through the vents on the grill. A fire needs fuel (charcoal, wood, etc) and air to burn. The more air the fire has, the hotter it will burn. The less air, the exact opposite. Opening or closing the vents on the grill will control the temperature. A much more detailed discussion on controlling the grill temperature with your vents can be found here.
Once the fire has been started, there's one last thing to be set up: the drip pan. There's going to be a lot of fat rendering off during the cook, which will drop to the bottom of the grill. Now, if you don't mind cleaning up the mess after the grill is cooled down, be my guess. a much better way would be to place a metal or aluminum pan beneath the part of the grill you will have your ribs on. Filling the pan with water will give you two additional benefits. First, the steam from the water will add additional moisture to the ribs, helping tenderize them. Second, and more technical, the water pan will act as sort of a heat sink, which will help stabilize the temperature of the grill over the course of the cook.
One of my favorite things to eat are BBQ ribs. Over the last 2 years or so I've done quite a bit of reading, cooking and taste testing to come up with a baseline technique to make tender, juicy ribs that people will come back for. One thing to note: While the prep work doesn't take that long, cooking the ribs does - between 3 to 6 hours depending on your grill/smoker setup and a few other variables (weather, wind, how many racks are cooking, etc). Do not try and rush this. Since the food is cooked over low heat and smoke, it is going to take time for the fat and collagen in the meat to warm up, render off, and offer up it's juicy goodness. Any attempt to rush the process will turn out tough, bland meat that has to be hidden by sauce (rather than enhanced by it. There is a difference). And please, please, PLEASE, for the love of all things holy, DO NOT PARBOIL YOUR RIBS!!!! If you're making stew, fine. If you're making 'que, absolutely not. One website I look at said if you parboil your ribs the terrorists win. Not sure I'd go that far, but you get the point. Let's get started, shall we?
NOTE: As mentioned in the prologue, many things in BBQ are variations on a theme. This applies not only in a micro sense (what ingredients are in the rub or sauce, etc) but on a macro level as well (what steps almost everyone takes, and what steps vary from situation and pitmaster). Those steps, and the discussion on those steps, will appear in italics.
- I cook either spare ribs, cur 'St. Louis Style' (whereby the spare ribs are squared up with the rib tips removed, leaving a flat, rectangular slab) or loin back (baby back) ribs, which don't have quite as much meat on them as the spare ribs, but seem to be more tender. The cooking time changes a bit (Baby backs cook a little quicker than spares), but the prep and cooking technique doesn't really change. Since I haven't found a butcher shop just yet, I head to the local grocery store and see what they have in the case (or if their butcher is out, I can ask then). While you can choose to save some money and trim your spare ribs yourself (for a good breakdown of that, look HERE), it's easier for me to just find them already cut for you. In my area, either Whole Foods or Wegman's is a solid choice.
- Once the cryovac bag is opened I rinse the ribs in the sink then pant the slabs dry and lay them on the cutting board (if I'm cooking a number of ribs, I'll place them in a plastic container to work on them one by one).
- There are two things that need to be done to the backside of these ribs. First, the diagonal flap of meat that's attached needs to be removed. You can cook it separately if you like or use it in a stew, or toss it if you don't mind being a little wasteful. There's nothing wrong with the meat at all; it just gets in the way of the ribs:
The next step is removing the membrane from the rib, the shiny looking skin that you see in the picture above. The vast majority of pitmasters, from novice to professional, remove the membrane. It's a rubbery, chewy 'skin' that won't render off when the ribs are cooked and keeps any rubs from sticking to that side of the meat. There are a few people that say it doesn't matter, or at the bare minimum will score the membrane with a knife to let some of the rub get through. However, it's not hard to remove at all, so I suggest just pulling it off. Here's how: Start with a bone near the end of the slab. Using a butter knife, spoon, or other flat utensil, slide between the membrane and the slab, and pry the membrane away from the slab. Then, just grab a paper towel and pull the rest of the membrane down the length of the slab, removing it in one piece. The membrane may tear, which is fine. Just go back and remove it separately. After a few times doing this you may not even need to utensil to get the removal started. Here's a video showing how it's done as well:
When your finished, the backs should look like this:
- Next, we flip the ribs over and inspect the front for any trimming that needs to be done. Some pitmasters will trim off any large pockets of fat that may be on the ribs. Others leave the fat alone, figuring the fat will render off during the long cook and impart some level of flavor to the meat as it does. For me, it depends on the slab and how much time I have. Most of the time the ribs look fine, but cutting back some of the large pockets of fat never hurt.Use your knife to square up the ribs as needed (sometimes there may be a bone sliver or really loose piece of meat at one of the ends that could stand to be cleaned up).
- There are some pitmasters that will use a 'pre-rub' at this stage. The pre-rub is usually a light rub with some salt, pepper, garlic, onion, and a few other spices. Some have used packets of ranch seasoning. Some have used a dry marinade like THIS to add to the meat. And some don't even bother with using a pre-rub in the first place. One thing to note: If a pre-rub is being used, be mindful of the salt content. If there's a good deal of salt in the pre-rub, reduce the salt in the main rub. I'm on the fence on a pre-rub for ribs, so there's a 50/50 chance I will use one or not. For this particular cook, I used a pre-rub.
One of the rubs was a store bought rub (Texas T-Bone seasoning), which went on the top rack of ribs. The bottom rack of ribs were pre-rubbed with a homemade mix of salt, pepper, onion powder, garlic powder, sage, and cumin. The pre-rub went on both sides of the ribs
- Next up is the rub. Which rub you ask? There's really no wrong answer. Almost every rubs have some combination of salt, sugar. pepper, and various spices (paprika, cumin, some chilies, mustard, onion and garlic powder, etc). Some rubs may be spicier than another, some sweeter, some earthier than another. Some recipes may have 10 or more ingredients, some may only have 3 or 4. One pitmaster won an event with a simple salt, pepper and garlic rub. At some BBQ competitions, some pitmasters have secret homemade recipes that have supposedly been handed down for generations. Johnnie Trigg, a well known and successful pitmaster from Texas, has said he has no time to mix up batches of rubs and will buy one particular rub that has the flavor he likes that has given him success. The main takeaway here? In my opinion, there isn't one specific rub that's better or worse than another. You may prefer ribs that have a bit of a spicy kick. Your friends or customers may like their ribs with a sweeter note. If you're in a BBQ competition, they may be looking for a balance. So there may not be one specific rub for your target audience. More importantly, if your preparation and cooking techniques aren't sound, it doesn't matter what you put on the meat. A tender, juicy rack of ribs that only used a few spices is going to be worlds better than a tough, dry rack of ribs that used your great great granddaddy's super secret spice rub.
Now that I got that out of my system, we can get back to the cook. Usually I will use a rub that I make myself, which leans a bit to the spicy side of things thanks to the homemade chili powder that I use, which varied depending on which dried chilies I have on hand (I will say if I have the choice of a store bought chili powder and a homemade one, go with the homemade powder every time. I've had really good results with my man Alton Brown's chili powder recipe found HERE. The chili peppers can usually be found in the Hispanic aisle of your local grocery store) . For this cook, however, I was fresh out of homemade rub, and didn't feel up to mixing a batch. No matter. I had 2 other rubs I got from the store that would work just fine.
I had used Lambert's Sweet Rub o' Mine before. It's got a nice sweet flavor with just a bit of heat from the spices in the rub. It also has a nice reddish hue (likely from the paprika) that makes the ribs look good too. The Booty Rib seasoning is similar to a rib I had used before (Three Little Pigs Memphis Style BBQ Rub), which doesn't have a lot of sugar, but a nice balance of peppers and a hint of Worcestershire powder. Even though it doesn't have the color of the Lambert's, at the end the ribs will still look (and taste) great.
- Once you decide on what rub is going to be used, it's time to figure out if you are going to use a 'binding agent'. Some pitmasters will simply shake the rub on the meat, making sure there's good coverage, maybe even pressing the rub into the meat as well. Others will rub a coat of oil on the ribs first, then apply the rub. Still others swear by using regular yellow mustard then applying the rub. The reasoning behind using mustard or oil is that it will help the rub stick to the meat moreso than if it was put on without it. Oil has the additional benefit of helping dissolve some of the spices that wouldn't dissolve in water.
My take? It really doesn't matter that much either way. If mustard is used, it will NOT impart any mustard flavor to your ribs. Will either help the rub dissolve into the meat any better than not using anything at all? Hard to say. Does the rub stick better with a binder on the ribs? It seems like it, but it's far from a requirement. So, if you have some on hand, feel free to use it. If not, don't sweat it. The ribs will rest for a bit anyway while you get the grill going, so the spices will have a chance to set in the ribs. For this cook, I used mustard on one slab of ribs and olive oil on the other.
- Now grab your rub and liberally sprinkle on both sides of the slab, making sure to get good coverage.
The top slab of ribs has the Lambert's rub over mustard, the bottom has the Booty Rub over olive oil. Once done, put them in a container and set aside, or cover with foil or wax paper until it's time to go on the grill.
How long the ribs should rest with the rub on (pre-rub or the main rub) varies depending on who you ask. Some pitmasters apply the rub and let it sit long enough to get the grill or smoker heated up. Others will let rubbed ribs sit in the fridge or cooler for a few hours before starting the cook. The extra time does allow the spices to act as a dry marinade of sorts. That being said I haven't found that it will make or break your ribs. If you have time, go for it (provided the rub isn't too salty). If not, I wouldn't sweat it.
Anybody that knows me (or has stalked through some of my Facebook posts) knows I like to grill. Day or night, summer or winter, beef, pork, chicken, seafood or other (on occasion I'm forced to put a vegetable on the grill grates), I've got the reputation of someone that knows his way around a grill. And with good reason: I know my way around a grill. I can do a brisket, pork shoulder, ribs, steaks, chicken, either in parts or the whole bird, ham, dogs, brats, burgers...you get the point. I've got standing orders from some people for wings and thighs. I brought some pulled pork to work one week and told 3 people about it, with the suggestion they share with others in the office. None of them did, opting to eat it all by themselves. Go figure.
I'd love to say this was all natural talent, but honestly, it wasn't. Over the past few years I have read numerous books, magazines, web articles, videos, blogs, etc, from backyard cooks to world champion pitmasters and everything in between to figure out how to grill and smoke food to have people coming back (or at least not to embarrass yourself when you present it to them). 3 basic things stood out:
There is a bit of difference in competition BBQ and BBQ for family and friends
Most recipes are variations on a theme. There really isn't one super secret ingredient that's going to make your food much better than everyone elses.
More than anything else, it's all about your technique. Not your spice rub, not your secret sauce, not what you're cooking with. If your technique is sound you can cook on anything and for anyone.
With that in mind I figured I would write a series of posts showing some of the foods I like to cook on the grill and the smoker. The title of the post (Semi-Pro) is indicative of the techniques I've read, tried, and use. That and the fact that I am far, FAR from a professional, and I am in no way suggesting how I do it is the right way or the only way, but what makes sense for me and seems to work based on the food I've cooked. Along the way, I will try to point out what steps the professional BBQ circuit pitmasters may use and where it may or may not be necessary or practical for what you or I chose to do for the cook at hand. I will also try to explain some of the reasons behind the techniques and products used, and share some links to resources that you can look at on your own.
Myron Mixon, multiple grand champion pitmaster, has said BBQ is really a humble food that, while it does take time and attention to detail, isn't that complicated. Anybody can cook on the grill, and do it well, regardless if they're using gas, electric or charcoal. And honestly, there's not much better than watching others enjoy that hot batch of food that just came off the grate, then having some yourself. Hopefully, the posts will encourage someone to try. Let's go!
Now that the upstairs portion of the convention center was done it was time to head downstairs where most of the import cars were set up.
Lexus has been trying to revamp their corporate image and styling, moving away from the soft, luxurious, sterile confines they have perfected and into something with bit more dynamic character, visually and behind the wheel. The results? Quite mixed.The LS, GS, and ES all look extremely similar. I walked past the GS twice thinking it was another ES. Lexus is dead set on spreading their 'spindle' grill across their entire line. Some are inoffensive, as on the ES (and rightfully so, since that is their bread and butter model). The LS, however, looks like a huge vacuum has been slapped on the hood. While very well made, almost tailored, the GS has been redesigned to....indistinct, which is a shame. The previous GS models stood out from the other Lexus models, especially with their 'bubble eye' headlights. This one doesn't have nearly the presence, which is likely to hurt sales overall.
The exception to that blase styling would be the F Sport models, which are the standard cars with a body kit. It works well on the GS, which wakes the car up (though it also makes it look like a late model Infinity). On the LS, the additions are more restrained, but quite pointless for such a car. I mean, would you take an S-Class and put ground effects and a wing on it? Now that I think of it, I'm sure plenty of people would, so Lexus did it for you. Class can't be bought, I suppose. For the record, there isn't a wing on the LS
The wild child in the bunch would be the IS-F, a 416HP, RWD, tire shredding 4 door gunning for the likes of the M3, S4 and C63 AMG. With all the diagonal creases and slashes it won't be mistaken for another car in Lexus's portfolio, that's for sure. Car and Driver is quite taken to it, choosing it above the last gen M3. Altezza fans will be quite pleased.
I think the CT-h would fare much better if they didn't insist on giving Lexus their own Prius (actually that would have been the HS, which was such a hideous cash grab Lexus did the honorable thing and euthanized the car rather than trying to relaunch it). It's a nice little hatch that's begging for a potent engine and better chassis tuning. It really deserves better
Last year the LFA was on display. Apparently all 500 copies of the limited and now quite rare supercar have been sold, so there wasn't much reason to bring one to the show. Pity. I do hope their next foray into the world of ratified metal won't take as long or be delayed nearly as much (swapping from aluminum to carbon fiber really threw a wrench into their launch plans)
The less said about the IS convertible the better. How Lexus managed to make a convertible worse than the SC convertible of yesteryear I'll never know. That takes some serious dedication. Or quaaludes....
My Audi fetish continues unabated. I don't care that the cars aren't RWD like their competitors. I don't care that 4WD won't give you the same driving sensation or on throttle oversteer you can get out of a 'traditional' layout. Their design language is clean and expressive without being boring. They managed to pull off the wide frame grill look, while other makers are still trying to sort their front ends out (looking at you Lexus, Acura, Lincoln...). And their interiors are second to none in their respective class.
The upcoming S3 was on display. This car is the spiritual successor to the original S4 from '96, which really set off the Audi fetish for me (which was cemented with the TT concept). Size and power it's the perfect car for 'just dad'. The kids can come for a short trip, but that's about it. If I had disposable income (or if my wife had a bigger car to be deemed the 'family' car) I would cop one without thinking twice.
The A5 is a seriously understated, but beautiful coupe. The BMW 3 series coupe never had anything on it. I will say the new 4 series is extremely impressive, and I wouldn't be mad if someone gave me the keys. But if I'm paying the note on one of them, it would have to be the A5. The shape is so right it doesn't even need to be a S5 or RS5 to look stunning.
The worst things you can say about the A8: (a) It looks like a plus sized A4, which isn't a great thing for a car that starts north of $75k; and (b) It's not a Mercedes S Class, which is still the standard for cars of this stature. The A8 has always been an understated limo, focusing on it's aluminum construction, manicured interior, and excellent infotainment center. It will never do S Class numbers (or 7 Series numbers, though it should), but it's a worthy vehicle nonetheless.
Very little looks as evil as a matte blue R8 V10 Plus. While the supercar (or junior supercar, depending on who you ask) is due for a refresh, the R8 forced automakers, even it's cousin the Gallardo, to figure out how to make a super car you can use every day with few compromises that still manages to make the hairs on the back of your neck stand up. Not a bad way to spend $175k
The only thing to look as evil as that R8 would be the metallic blue RS7 that sat next to it. With 560HP coming from a twin turbo V8, it will outrun a R8 V8. Talk about sibling rivalry. Loaded out at around $125k, it could be considered the inverse of the R8, an everyday supercar.
There were no TTs on display. Odd that.
Seemingly following Audi's lead, BMW has taken to splitting it's model lineup with even and odd numbers - even numbers for coupes, odd numbers for sedans. Why? To justify the premium having a car with 2 fewer doors has? Maybe, if you're being cynical. To confuse their buyers? Possibly, although Infinity has them beat (more on that later)
The 6 Series Gran Coupe is probably the prettiest car in their portfolio. BMW's take on the 4 door coupe (which is really a stupid description, but that's a semantics discussion) arguably looks better than the CLS that started it all or the A7. The M6 Gran Coupe turns things up to 11 with a 560HP twin turbo V8. Most reports tend to knock the big car, and most products not the 3/4 Series, for dynamics that seem not quite up to snuff from BMW's prior works. No matter. I'd have one in matte white please and thank you. Too bad it's more expensive than a fully loaded RS7.
Strange thing about that 6 Series Gran Coupe. It has 4 doors. Wouldn't that make it a 5 Series then? Or is BMW really pushing that coupe thing? See, confusing (or semantics)
Looking at the 7 Series, I really start to miss Chris Bangle. Yes he sent the BMW faithful in a frothing rage with the E65 7 Series from 2001. I always liked the car, even the 'Bangle-Butt' rear end. Couple that with the first iteration of iDrive and there was mad for days. I think the problem was they pushed the envelope so far design wise and tech wise in a car that only older people could afford and wouldn't appreciate or understand. I understand why they did (or any other manufacturer would do): trickle the tech down your product range and spread out the costs, and give yourself a halo car. In the end, I think that car was well received and Bangle's design trickled down the range as the years went on. Why am I dwelling on the old car so much? Because the new one looks like a plus sized 5 Series (much like the A8/A4 lookalikes. Must be a German thing) It's a nice car, probably a nice drive, but just doesn't move the needle for me.
The 5 Series GT is an ugly, ugly car. Supposedly a mashup of a SUV, sport sedan and a GT car, it only succeeds in looking awkward at best and Quasimodo on wheels at worst. The worst part is this will end up replacing the 5 Series Touring wagon. Why? Because people here in the US don't buy wagons. Or hatchbacks. Or like dual clutch transmissions. I tell you, I'm moving to Europe...
For the life of me I'm still trying to figure out exactly why the X6 exists. Not as much room as either the X5 or the 5 Touring for either passengers or cargo, and looks dumpier than a AMC Eagle. To make matters worse, there's a M version. At least the twin turbo in that one makes the X6 go like stink. Unfortunately, it can't outrun it's ugly. I get that it's more an 'image' car, more than a practical one. I've got no problem with that at all. Just make it an image worth looking ar. BMW should kill off both it and the low end X1 and just stick with the class defining X5
The new 4 Series coupe, on the other hand, looks fantastic. Even though I'm not too fond of the black paint on the cooling vents on the front quarter panels (blame it on countless knock off stick-ons that people insist on putting on their 2004 Malibus), it's a very chiseled car, with strong character lines running down the sides and a creased bonnet (that gives way to a nice 'power dome' on the M3/M4) that has more than a little hint of Z4 to it. I'm not sure if I like the look better than the E46 from 2001, but I already like it better than last gen's E90/92, which did grow on me after a while. The M3 has always been considered the benchmark for a sports sedan. I don't see things changing with this one
The BMW i3 was also on display. It's a curious looking thing, to be sure. Almost like a life sized Automoblox model with an electric motor. Made with carbon fiber reinforced plastic and having the option of a petrol engine as a range extender, it should make for an interesting city car. I can see a slew of Hollywood celebs and hybrid posers switching to this. Not that it makes things any better, mind you.
Even with my Audi fetish, if I were forced to pick one car to do everything I needed for the rest of my days, I's likely give a long, hard look to the M5. Even without the V10(!) that the E60 M5 used, the twin turbo V8 is a bit faster with more torque and more fuel efficient. Not quite a fan of the synthetic engine noise piped through the speakers, though (and BMW isn't alone in the fake-me-out sound department either).
Upon further review, if I had one car to choose for the rest of my days it would likely come down to either the E61 M5 Touring or the C6 RS6 Avant (twin turbo V10). And yes I know, either BMW or Audi's V81 are more efficient than their V10 efforts, but where else are you getting a V10 in a wagon?
Continuing on from thought on the Washington Auto Show, dealer by dealer that I visited
Make no mistake, Toyota is still The House That Camry Built. Although there were a rack of Priuses (Prii? who knows what the plural for Prius is...) for the hybrid crowd. I do understand the hybrid tech, but the cars do look woefully depressing and pretentious at the same time. The Prius C manages to just look cheap, which is surprising. Somehow I think if I had a choice between driving a Prius and getting lower mileage from a regular petrol powered car I'd be cursing every time I go to the pump, but enjoying the ride leaving the station.
As far as the Camry, it's still one of the most boring cars on the planet. Having driven one for a weekend (in rental spec white, no less), I can see why it sells in the droves that it does. It goes where you want it, stops when you want it to, goes around curves (provided you're doing 8/10ths), has a decent infotainment setup, room enough in the back and the trunk and is generally a well made, tidy place to be. And for a large majority of the US, that's all they really need or want. Styling is far lower on the list of things they need, as the car is a styling snoozefest. Anyone that says the car feels 'grounded to the ground' as the lady in that commercial says is sorely deluded. Still, I'd recommend one to my sister in a heartbeat, provided she doesn't care about cars.
As a sign I'm getting old, the Avalon is probably my favorite car in Toyota's stable. Stylish exterior, stylish interior, plenty of room...everything the Camry should be. Maybe in the next model. One of my favorite features in the Avalon? A built in Qi wireless charger. That's tech going to the masses. The thing is, I'm willing to bet there are a lot more iPhone users that would buy this car (or any car, really because it's an iPhone) and it doesn't natively support wireless charging. Heck, most Android phones don't do wireless charging. But I'm getting a Nexus 5, so this would be right up my alley. It's not a game changer, and probably not a big deal to most people when deciding what car to buy, but I'm glad to see it as an integrated option as more phones, tablets, etc will likely go that route in the future.
On the other end of the styling spectrum we have the Corolla. How they can redesign it and make it look worse than the 80's era Corolla/Geo Prism mashup is beyond me (come to think of it, I wanted a Prism back in the days...). The front clip with the wall of black plastic looks like a bad placeholder for an intercooler (which, given this is a Corolla, would never ever happen) and the rear quarters look like a last gen Civic, which isn't saying much. Every time I see that stupid commercial for the car I have to wonder who in their right mind would get t hat exited over this thing. Then again, Toyota sells as many of them as they can make, further reinforcing the fact that most people just want reliable transportation with good gas mileage and a few bells and whistles, nothing more. I do hope they fixed the seats. I was forced to drive one a few years back when my car was in the shop and it was a most uncomfortable experience. I had to get out to see if someone had accidentally stuffed a football back there (since the car didn't have adjustable lumbar support that couldn't have been it). While the Avalon shows there is some hope in the Toyota styling department, cars like the Corolla show they still have a lot to figure out. That extends to their luxury division too (more on them later)
I can understand the Highlander, which is a nice SUV, and one I'd definitely cross shop with the Explorer. But I'm still a bit unsure why they still build a Tundra. I don't care if one pulled the Space Shuttle, it's never ever going to get the sales traction that the Big 3 have, even if one out of every 5 of their cars spontaneously combusted. Save that money and invest it in your design and vehicle dynamics department, please...
The Charger is like the new Caprice Classic or Crown Vic. Big, RWD, and can come with a Hemi. I've seen more than a few of these in the hood. The new model probably won't change that one bit. Although you're likely to see one with a V6 and loud pipes instead, as that V8 isn't exactly cheap or super great on gas. The revised rear lights with the individual LEDs is starting to grow on me, even though they also look like someone stuck a Lite-Brite in the trunk
I've got a soft spot for the Challenger. While bigger and heavier than the Camaro and Mustang, and a much older chassis under it, the big bruiser is still proportioned better than either, IMO. Kudos to Dodge for having the cojones to offer the car in Header Orange and Plum Crazy purple. Now if they bring back Sub-Lime Green as a limited edition option I'd really clap for them.
The Dart is the new wave Neon. Actually that's not exactly fair either, as the Neon was a POS. The Dart actually has some Italian in it's blood, for what it's worth. Built on a modified Alfa Romeo Giulietta chassis, the car should drive better than it has a right to, and has more interior room than the Focus, Civic. Mazda3, or Corolla. Interesting tech package too. Probably needs a bit of suspension and engine tweaking, as they just aren't selling in the volume as they hoped, even with Tom Brady hawking their wares.
Of the cars on the stand, 2 didn't need to be there. First, who is still buying Durangos? Even with Ron Burgandy pitching them, you still get the feeling that it's only worth pitching the glovebox. Love those commercials, BTW. As for the Avenger? The less said about that sad little car the better. It kind of sat at the back of the lineup. Unnoticed, unloved. I wouldn't be surprised if the keys were in the car, just waiting for someone to take the car away. No word on whether the 200 will have a mate yet.
In all black, the Grand Cherokee SRT is one evil, evil SUV. Do I need a 6.4L Hemi, 8 speed transmission and launch control in a SUV? Probably not. Do I want a 6.4L Hemi, 8 speed transmission and launch control in a SUV?Very much, please. The interior won't keep Land Rover up at night, but it's a very nice place to be. Those drivers behind the wheel of that Camaro or Mustang won't know what hit 'em
The V10 in the Viper is humongous. While the quality has greatly improved over the original car, there's still an air of 'kit car' to the proceedings. Still, it's a V10. Not too many of those around in anything this side of a supercar or a truck. Come to think of it, the Viper's V10 was put in a Ram truck at one point as a competitor for the F-150 Lightning. That being said, the Viper V10 isn't a truck motor, as is often thought.
The Verano proves you can make a silk purse from a sow's ear. Actually, that's probably a bit too harsh. The Chevy Cruze is a decent, if understated, car. The Verano just looks and feels a bit more upmarket, even though being built on the same chasis. With the new 250 hp turbo engine the car should have some zip. Since it's a Buick, let's not get too exited by the handling, though. Still, it definitely gives the car a leg up on, say, the Acura ILX.
The Regal received a nip and tuck as well, making the stock Regal look a bit more like the GS, which is a good thing. What's also good is the Turbo motor is now standard, giving some zip to the proceedings. The GS is still the performance tuned trim, with the big 20" wheels, summer tires and Brembo brakes. It's not quite as the Vauxhall Insignia, which the car is based on, but it's got enough to give the Acura TSX a run for it's money. Too bad they didn't opt for the sport wagon version, which remains a European only model.


.jpg)