OK, the last 2 months have not been fun guys. I'm 2 completed fightstick projects back, have 3 more on deck, still have to finish my NBA story and have a few other things kicking around I need to get posting up. I haven't even had the chance to post up a funny video. My bad.I'm hoping to get back on track in the next week or two with some of the bigger projects. Hopefully, I'll get a jump on some stuff this weekend.
Keep Hope Alive!
Spen
Thursday, September 30, 2010
Tuesday, July 27, 2010
Berserker Barrage: The Marvel Vs. Capcom Stick Saga - Epilogue
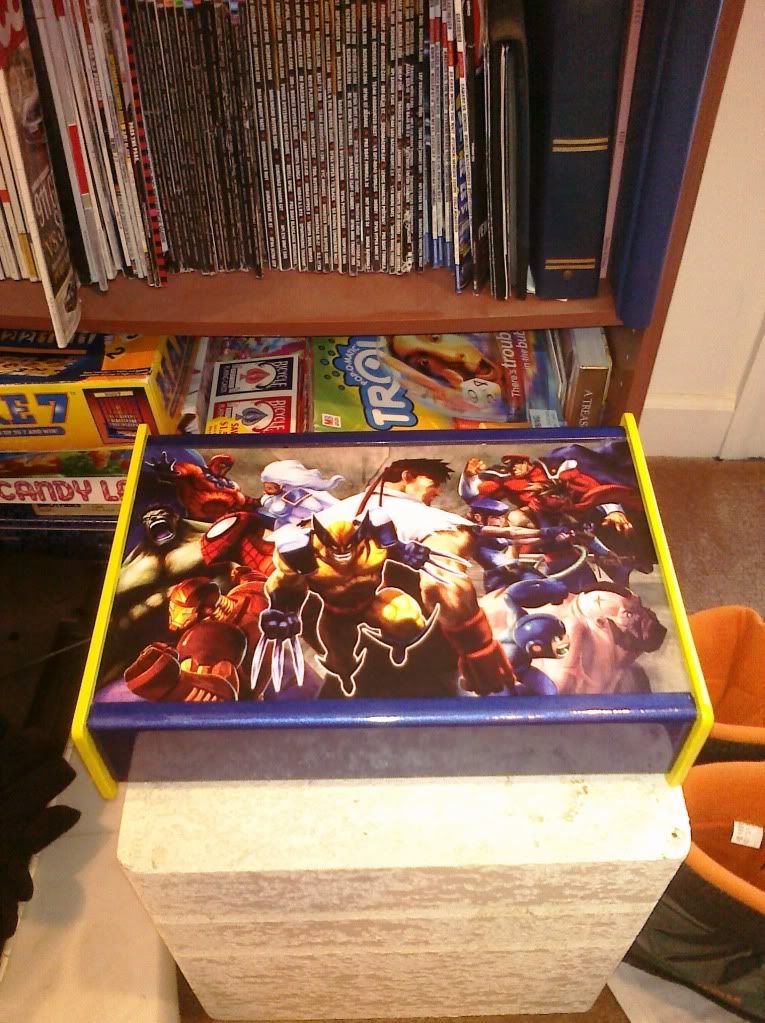
The project is finally finished. My goal was to go use this as inspiration

And build a stick with Happ/iL based parts with the same theme:
I say: Mission Accomplished! Then again, I did put it together, so I may be a little bit biased. I definitely learned a few things with this build. First, a wireless dual mod is not for the faint of heart. While it's not the most complicated thing in the world, it does involve a lot of wire, a lot of soldernig, a lot of planning and a lot of time. If you want lights, you're looking at even more soldering and more time. You want it to look neat? Add to the time. Will it take as long as my project took? Probably not. Being a family man, I wasn't able to devote hours at a time to cutting, crimping, soldering, and sheething that would be needed to finish faster. That said, unless you work with electronics as a job, or have done a lot of soldering work in the past, don't expect to knock something like this out in 2 hours.
That's to say nothing of the work I had to do on the case. I'll admit, if I wasn't as dumb I probably could have shaved at least a month off the paint and prep time getting the case to look like I wanted. Not paying attention to whether I was using enamel or lacquer paint, and not ordering the vinyl dye sooner, really slowed things down. The wet sanding, while providing a fantastic finish, is very tedious and time consuming no matter how you look at it. Modifying the case itseld to accept the switches and larger buttons was childs play in comparison. I did have to order some different parts than I planned, but the end result was worth it.
If I had to give some advice to anyone trying a similar project, I'd tell them 3 things. First, Don't be afraid to screw up. Most likely, something is going to go wrong with a custom project like this. Sometimes it's a small thing, like soldering a lead tothe wrong spot. Sometimes it can be major, like inadvertantly frying your PCB. Whatever, it can usually be fixed or replaced. Second, don't be afraid to ask for suggestions or help. Since I still don't have access to the tools needed to make my own case, I had to outsource that. I had to ask a myriad of questions to make sure I was wiring everything correctly. Some questions were intelligent, others, not so much. And there is no way the art would have come out like it did if I didn't ask. Third, get your Bo Jackson on and Just Do It. Roll up your sleeves, heat up the soldering iron, and get to work. It may take a while, and it may not look like other projects you've seen that other more skilled people have done, but with some determination and effort, you can do this. As I said with my first build, nothing quite feels like using a stick you put together yourself.
I must give a shout out to a few people that helped get this project done. I need to thank Physh for building ans shipping the case. The design was wide and tall enough for everything to fit, and the design gave it some flair, making the color choice really work. A huge shout and thanks goes to Gummowmed for designing the leo board in the first place and answering the many questions I had during the course of the build. I actually got a chance to meet him at a tournament in Ashburn, VA and I brought the stick, I should have had him autograph it! And a big, BIG shout to d3v for all the help with the artwork. Everyone that's seen the stick online and in person has been extremely impressed. While I can take the credit for the paint finish, without that custom art it would not have been complete. In fact, d3v and I have collaborated on two other sticks, which I'll probably get around to posting in a year from now, knowing my schedule...
Berserker Barrage: The Marvel Vs. Capcom Stick Saga Part 11 – All Together Now
Now that the artwork was done all that was left to do was put Humpty Dumpty back together again and present the stick to Nick. There were a few small modifications I wanted to make to the case before wiring everything up. In an effort to hedge my bets against that JLW, I wanted to drill holes in the control panel to fit a Happ joystick. That way if the JLW just didn’t feel right, I could swap it out for a Competition joystick. I removed the mounting plate from the JLW and screwed it on the top of the control panel. Next, I marked the holes that lined up with the Happ joystick and drilled and countersunk the holes so the screw heads would be flush.

I installed the Happ Competition (yellow, or course) along with the case bottom panel to make sure the joystick shaft didn’t bottom out or scrape the panel. No problems there. I then had to work on the bottom panel itself. I had bought and cut a piece of plexiglass to replace the particleboard that the case came with. I needed to cut a notch in the plexiglass so I could access the switch to turn the LEDs on and off. I taped the switch in the approximate spot I would mount it during assembly and placed the plexiglass on top, marking he space I would need for the switch and the holes I’d need to drill for the feet. Using a combination of the dremel and a hand file, I cut and shaped the notch for the switch, then drilled the screw holes for the feet. Instead of just having clear plexiglass, I used some automotive window tint I still had around the house and covered the inside of the plexiglass, for a 20% smoke tint look.
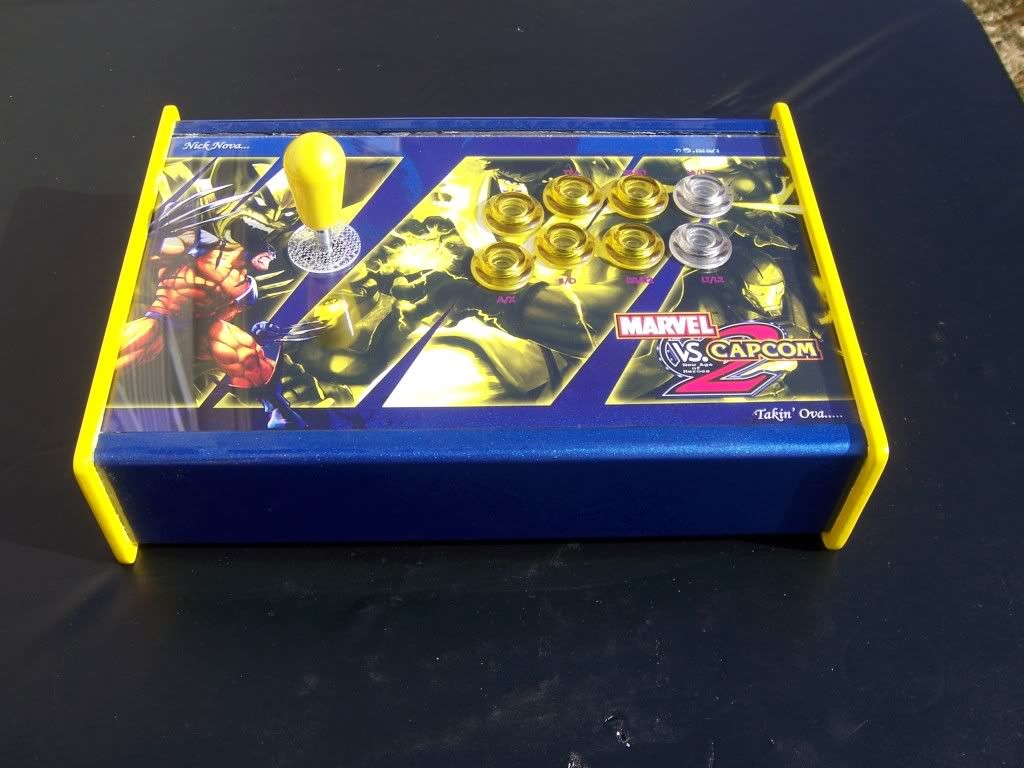
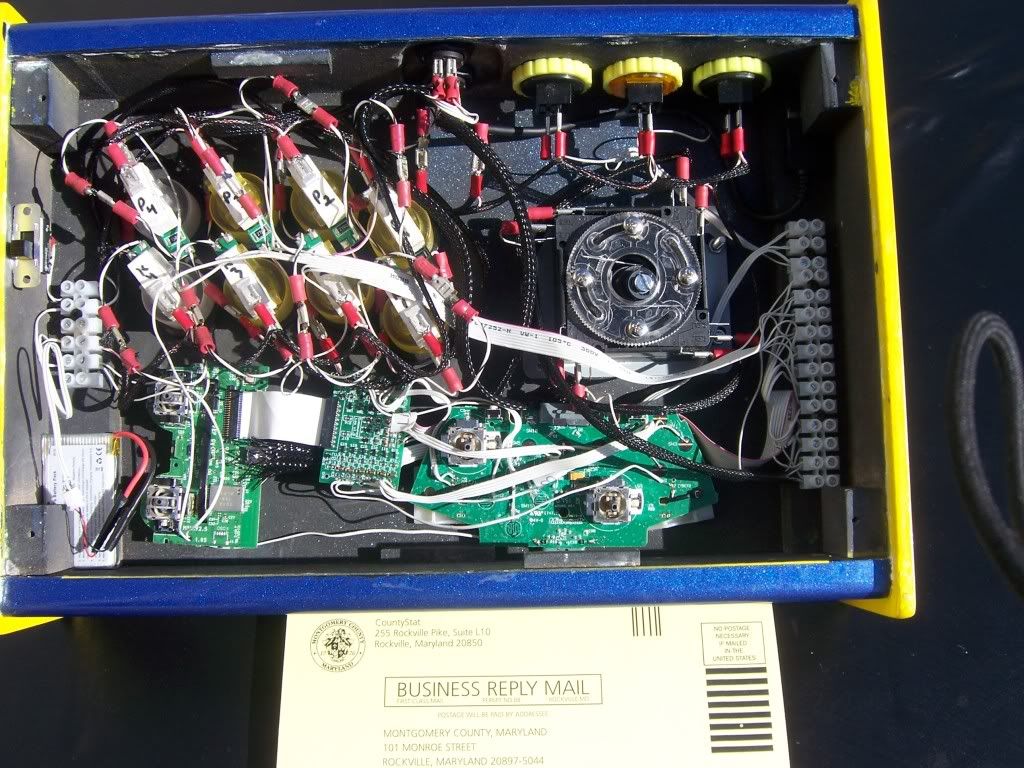
Modifications out of the way, it was time for reassembly. I laid the artwork in the case and put the plexiglass top over it so I could cut the holes for the joystick and buttons. Once I finished that, I removed the plexiglass and artwork so I could access the screws for the joystick. Having reattached the mounting plate back on the JLW, I mounted the joystick to the bottom of the case and tightened the screws. I then replaced the art and plexiglass, and installed the buttons, making sure they were all lined up the proper way before tightening down the mounting nuts. I installed the LED boards and the microswitches, then attached the wiring harness for the ground chain, signal lines and LEDs. I used zip ties and zip tie anchors to hold the sixaxis and 360 PCBs in place, and ran the signal leads from the leo to the junction block. After connecting the button leads to the junction block, I made sure all the data lines and power lines were wired to the correct switches on the back of the case. I used some construction adhesive to mount the LED power switch to the side of the case, then wired up all the ground leads and power leads to the small junction block on the left side of the case. Finally, I attached the battery to the junction block, and attached it to the case with a piece of Velcro. At long last, the project was finished. I gave the stick a quick polish with a microfiver cloth and took the completed stick outside to take some pictures of all the hard work.
Just in case...
Modifications out of the way, it was time for reassembly. I laid the artwork in the case and put the plexiglass top over it so I could cut the holes for the joystick and buttons. Once I finished that, I removed the plexiglass and artwork so I could access the screws for the joystick. Having reattached the mounting plate back on the JLW, I mounted the joystick to the bottom of the case and tightened the screws. I then replaced the art and plexiglass, and installed the buttons, making sure they were all lined up the proper way before tightening down the mounting nuts. I installed the LED boards and the microswitches, then attached the wiring harness for the ground chain, signal lines and LEDs. I used zip ties and zip tie anchors to hold the sixaxis and 360 PCBs in place, and ran the signal leads from the leo to the junction block. After connecting the button leads to the junction block, I made sure all the data lines and power lines were wired to the correct switches on the back of the case. I used some construction adhesive to mount the LED power switch to the side of the case, then wired up all the ground leads and power leads to the small junction block on the left side of the case. Finally, I attached the battery to the junction block, and attached it to the case with a piece of Velcro. At long last, the project was finished. I gave the stick a quick polish with a microfiver cloth and took the completed stick outside to take some pictures of all the hard work.
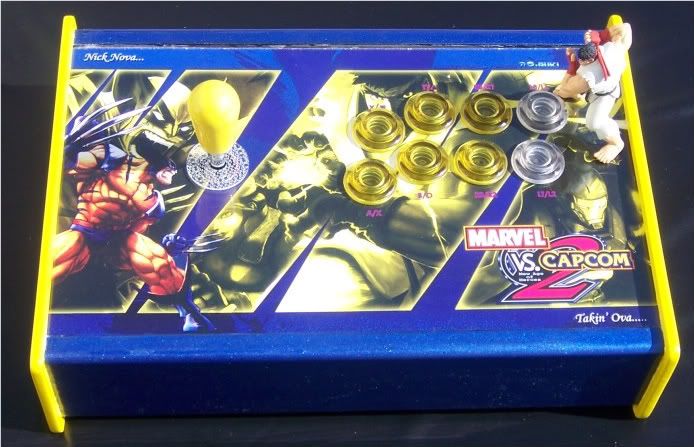
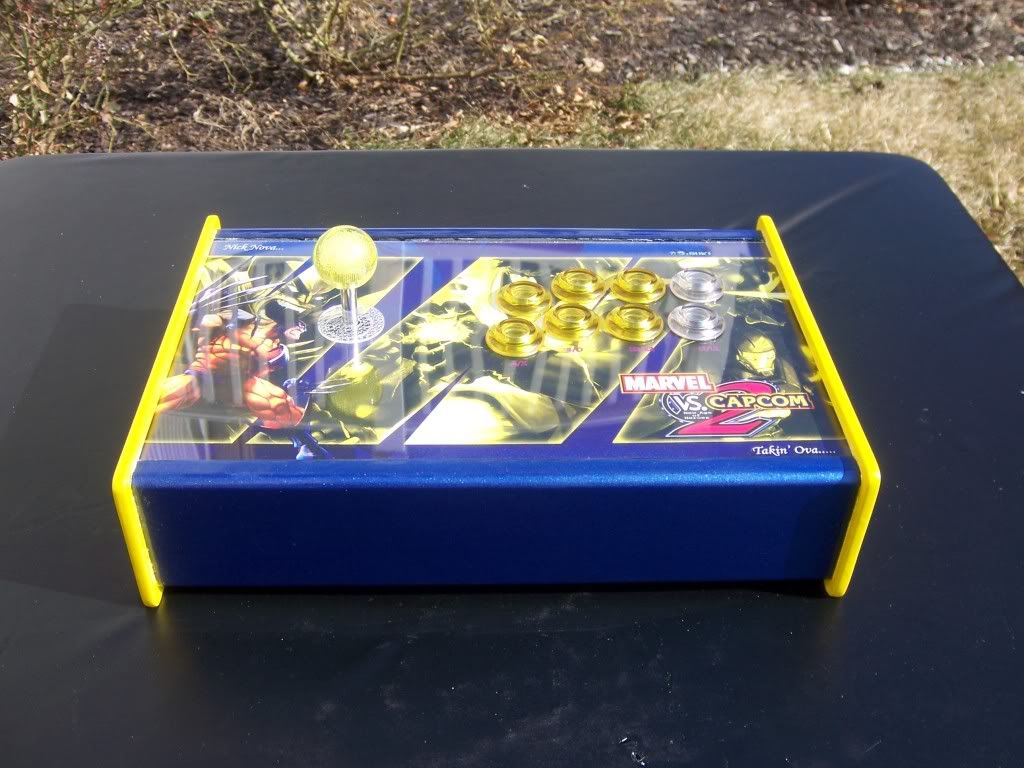
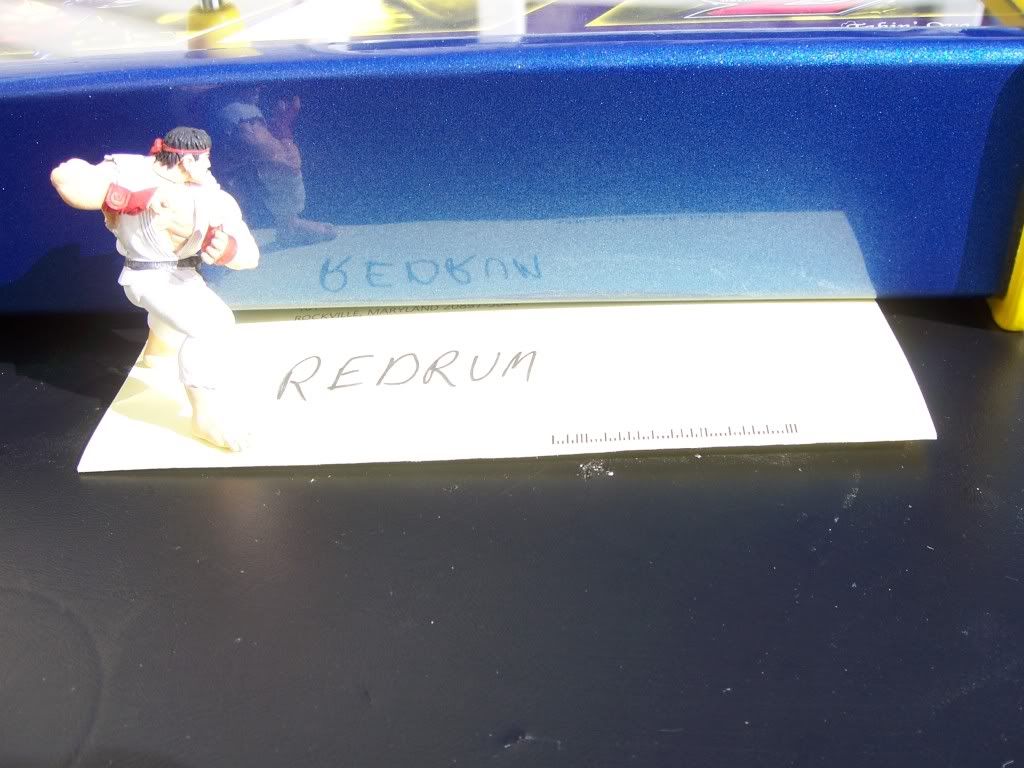
All Done! Ruy doing his Vanna White impression...
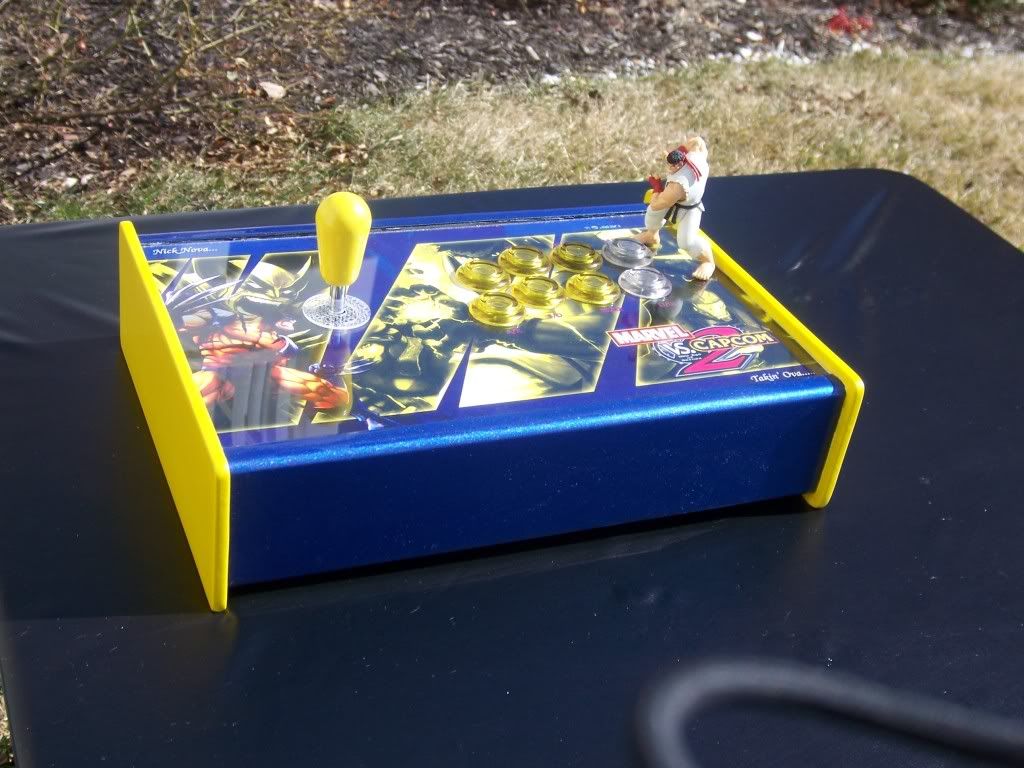
Wider angle shot
It took almost a month, but it was worth it...
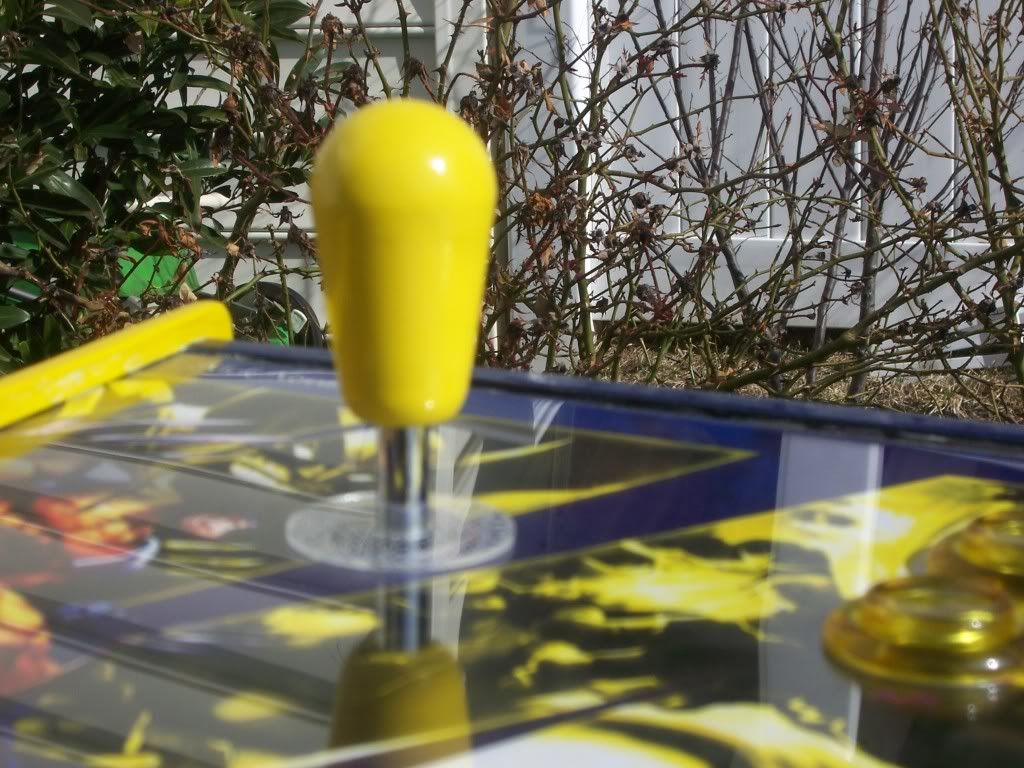
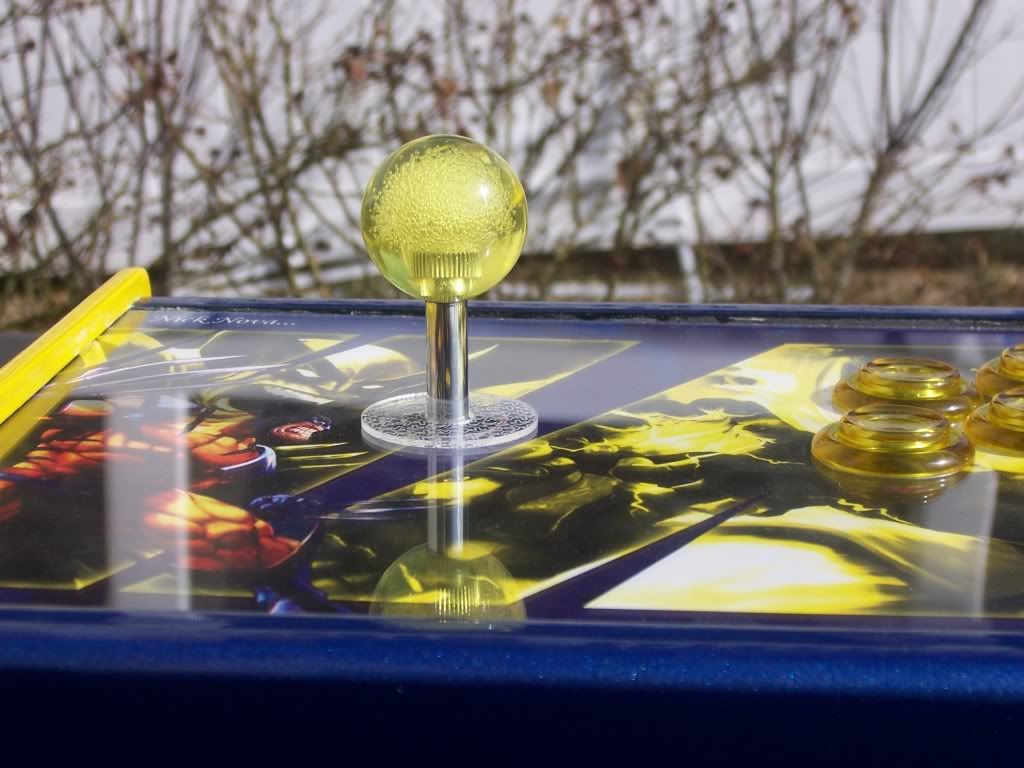
This shot was with the yellow bubbletop, in case Nick wanted a balltop
Doesn't exactly match the buttons, but it works
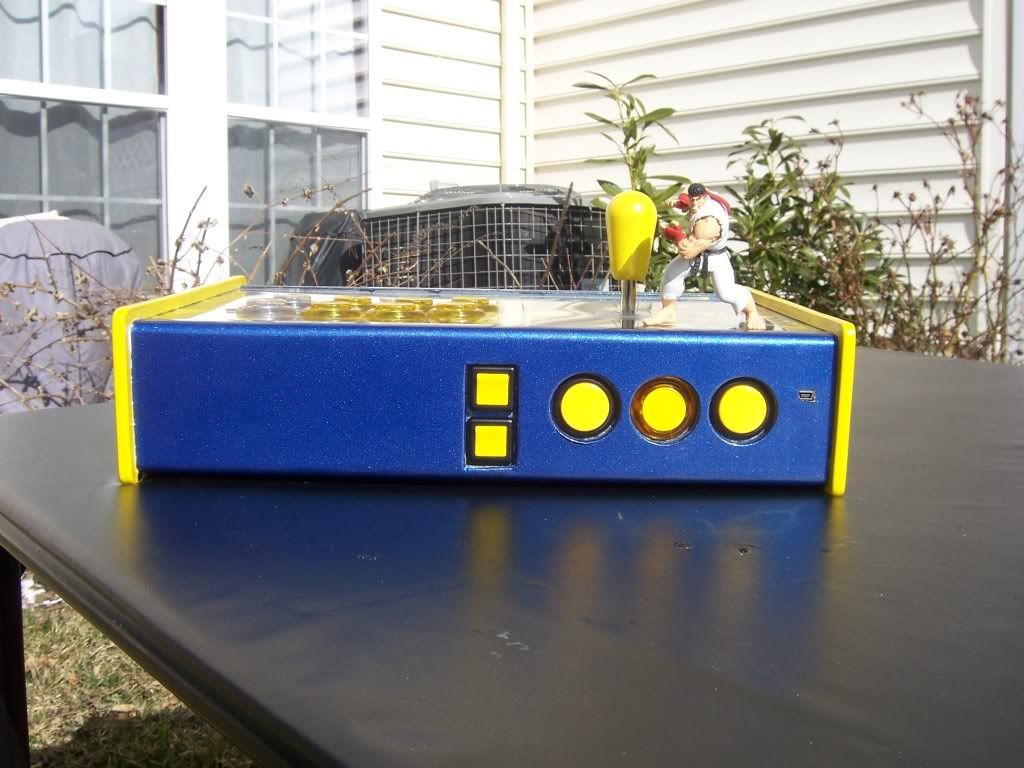
Rear shot showing painted switches, start, home (clear yellow) and select, and USB connector
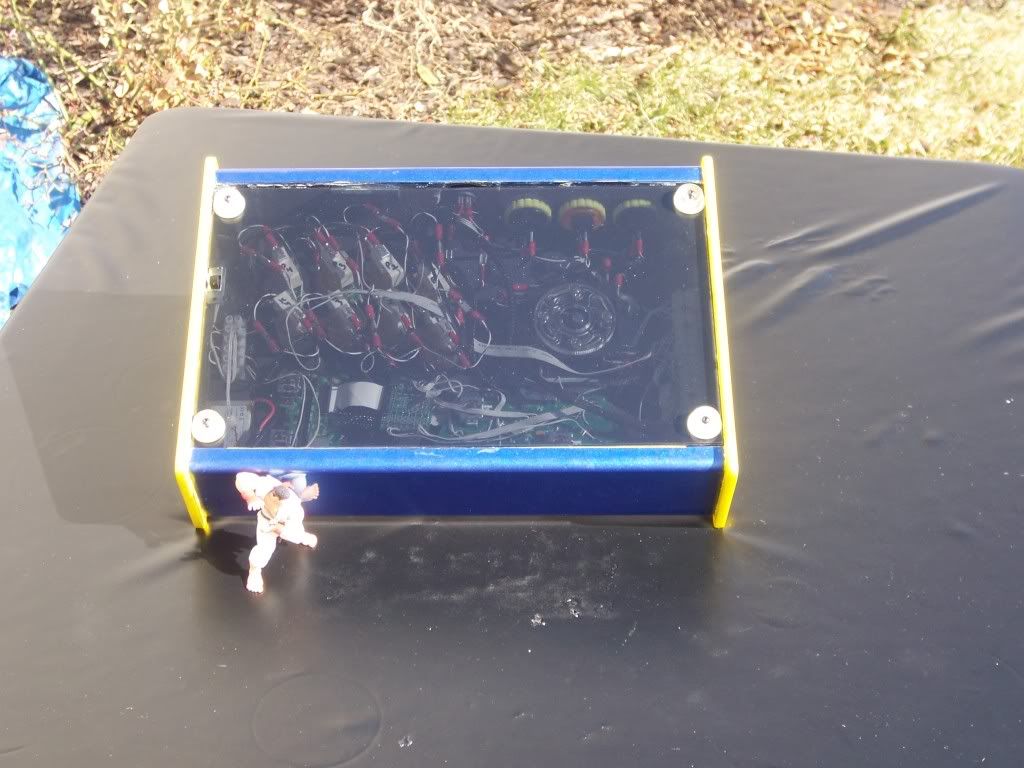
Bottom plexiglass panel with tint. Ryu scaring away ants...
All the soldering, crimping, and sheething, in it's naked glory
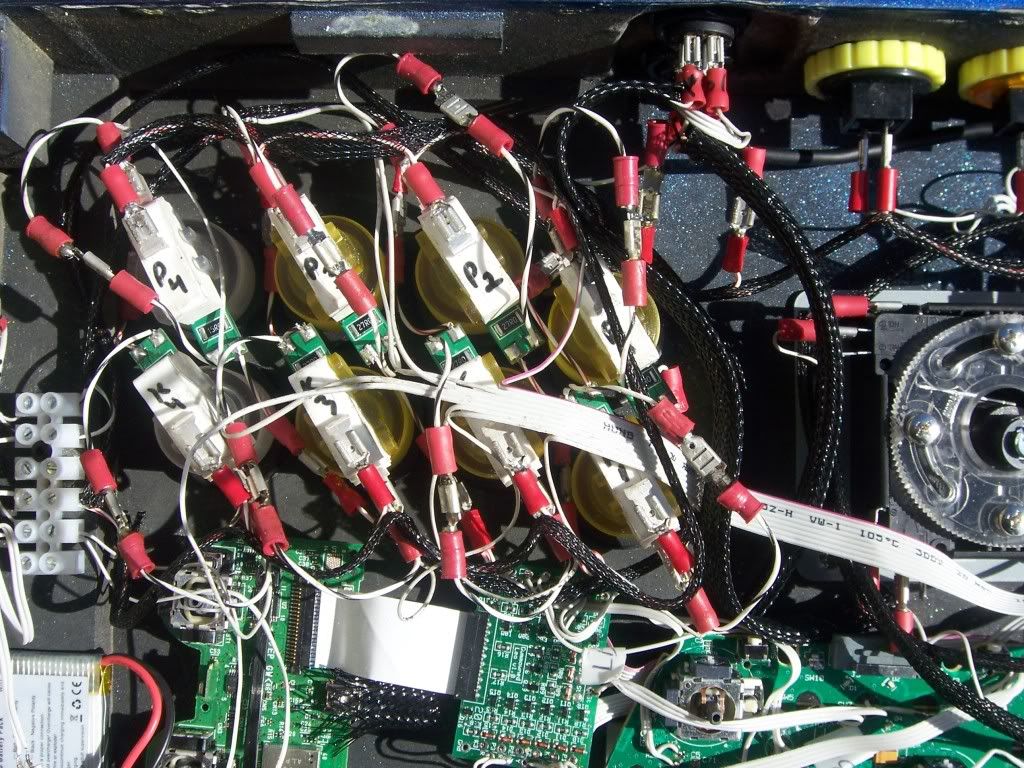
All the signal lines and LED lines. The power junction block is on the left
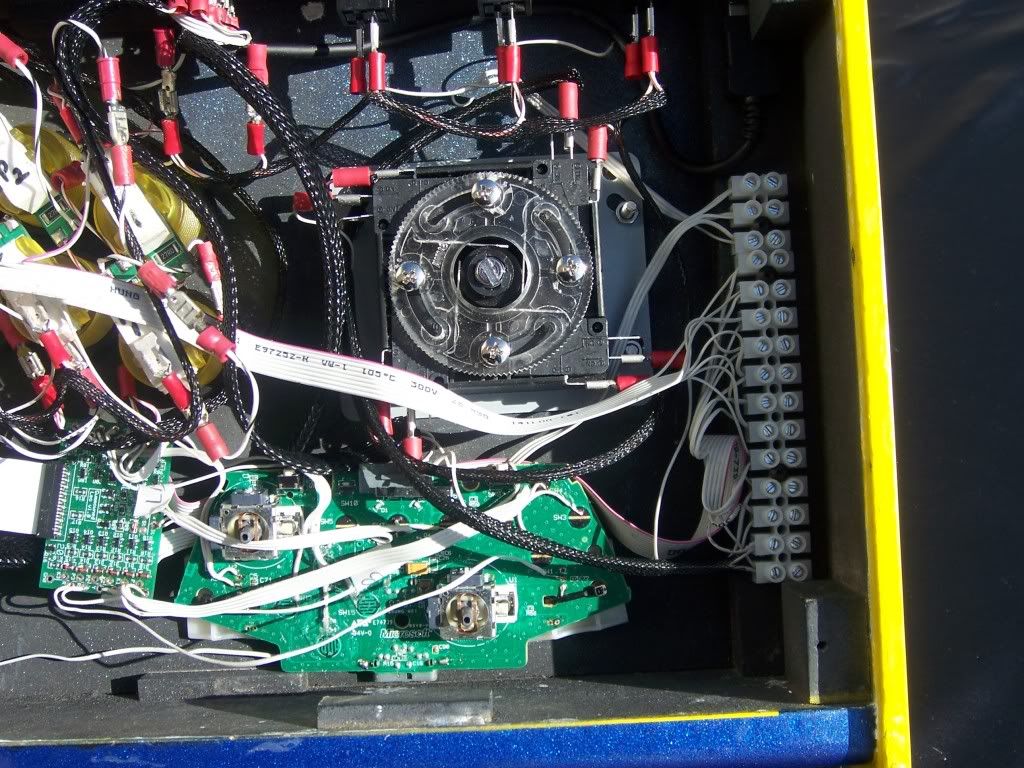
The signal line junction block, leo board and 360 PCB
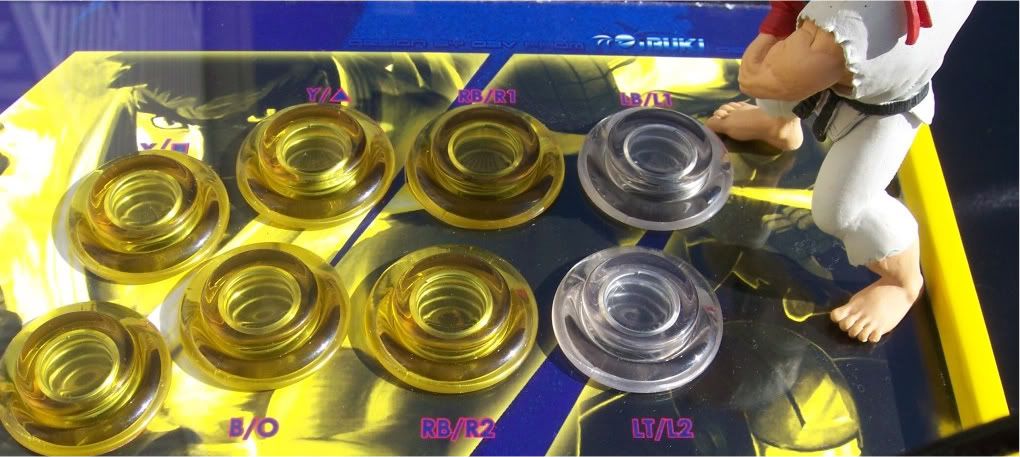
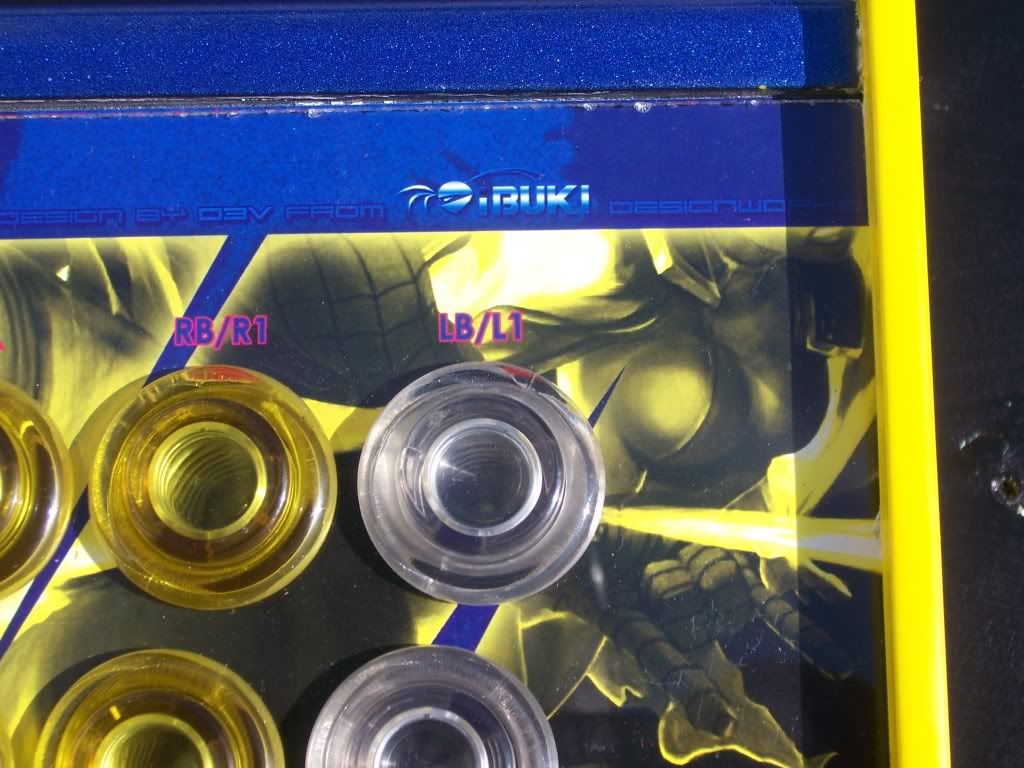
Closeup on the buttons with the labels
d3v's logo. First time on a custom. Huzzah!
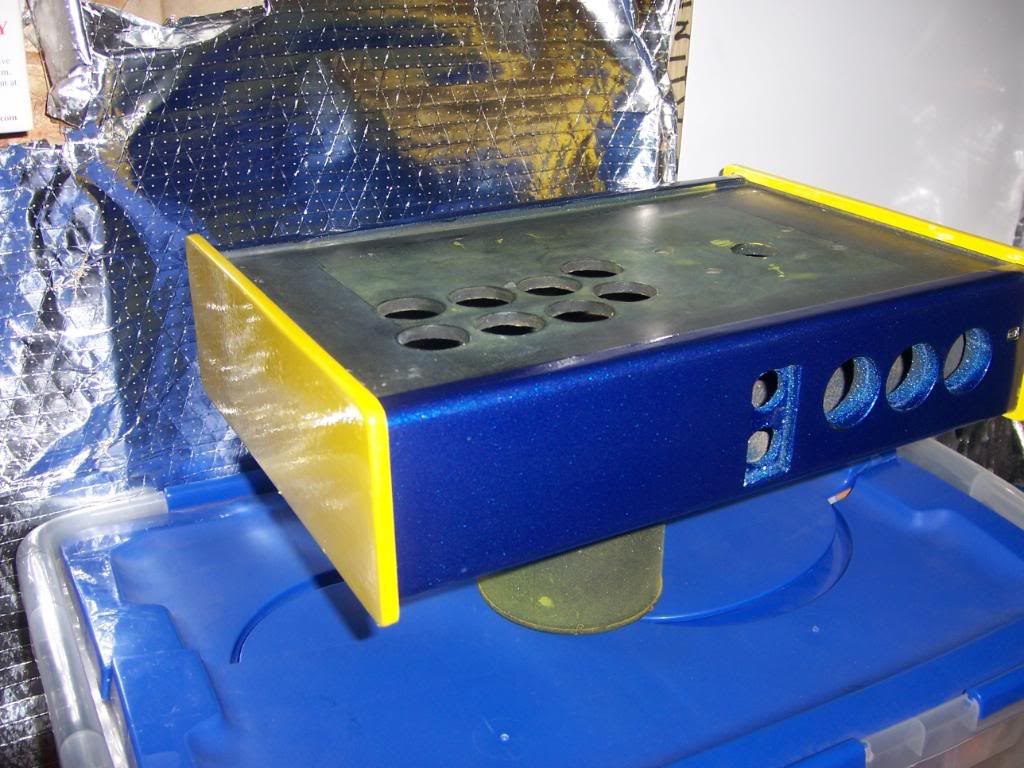
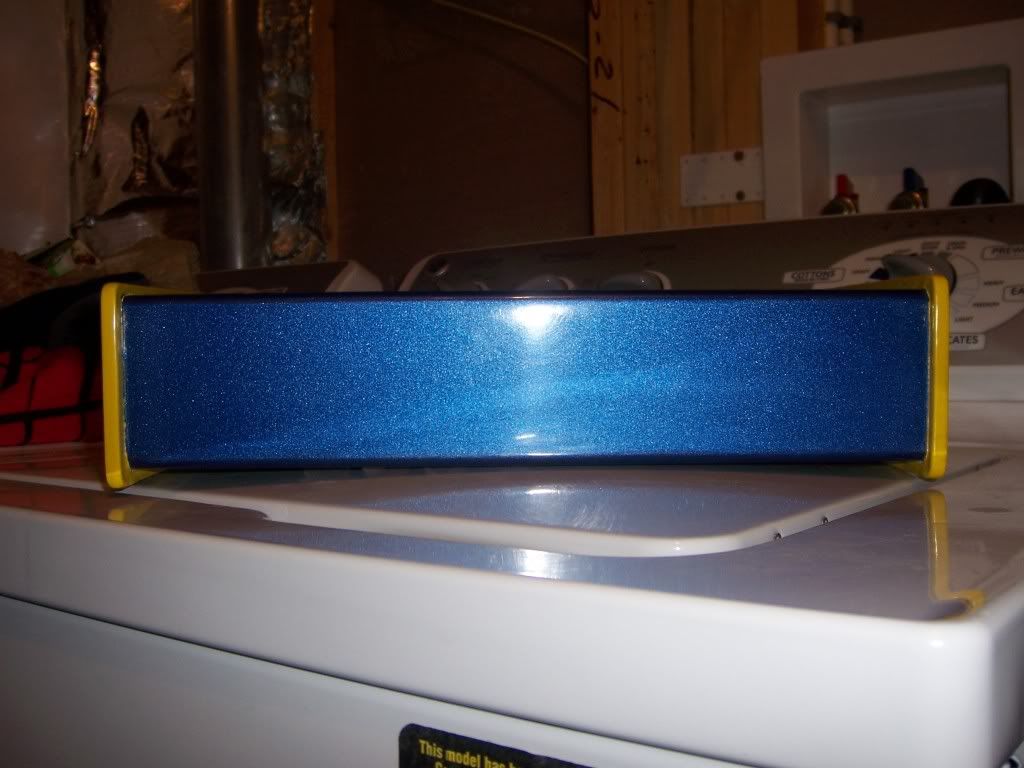
Yellow paint. Polished to a mirror shine. Took long enough...
THIS is what happens when you take the time to wet sand. Looks better in person
All that left to do no was deliver the goods. I gave Nick a call to tell him his stick was finally ready. He showed up around 8:30 with his Xbox ready to go. After showing off Mass Effect 2 for an hour, he finally opened the box and had a look at the finished product. After admiring the art and craftsmanship, I had him fire up the PS3, which worked with no problem. At this point he didn't realize the buttons lit up. After a few rounds of MvC2, I had him flip the switch to turn the lights on. Needless to say, he was impressed. We then hooked the 360 up to take a quick video of everything in action:
Nick decided he liked the feel of the bubble top more than the bat top, so I made the switch for him. After all it took to get that bat yellow in the first place! I tell you.... But it's his stick so I'm not complaining. We played Mvc and SFIV until our fingers cramped and called it a night.
Monday, July 26, 2010
Berserker Barrage: The Marvel Vs. Capcom Stick Saga Part 10 – Pretty Pictures
One of the more troubling aspects of this build was getting the artwork right for the control panel. The artwork on the MadCatz stick was quite impressive, and really worked with the buttons and bezel they used. For my MvC stick to stand out, I needed some good art. The hard part would be making sure the artwork went along with the color scheme and the button layout. Turns out, finding the art wasn’t easy either.
When I purchased the case from Physh, he was able to print out 3 pieces of art for me to use on the control panel. The catch is, I’d have to figure out how to label the buttons myself. The first piece of art was created by Joe Vriens from Udon for the official release of MvC2 on XBLA and PSN:
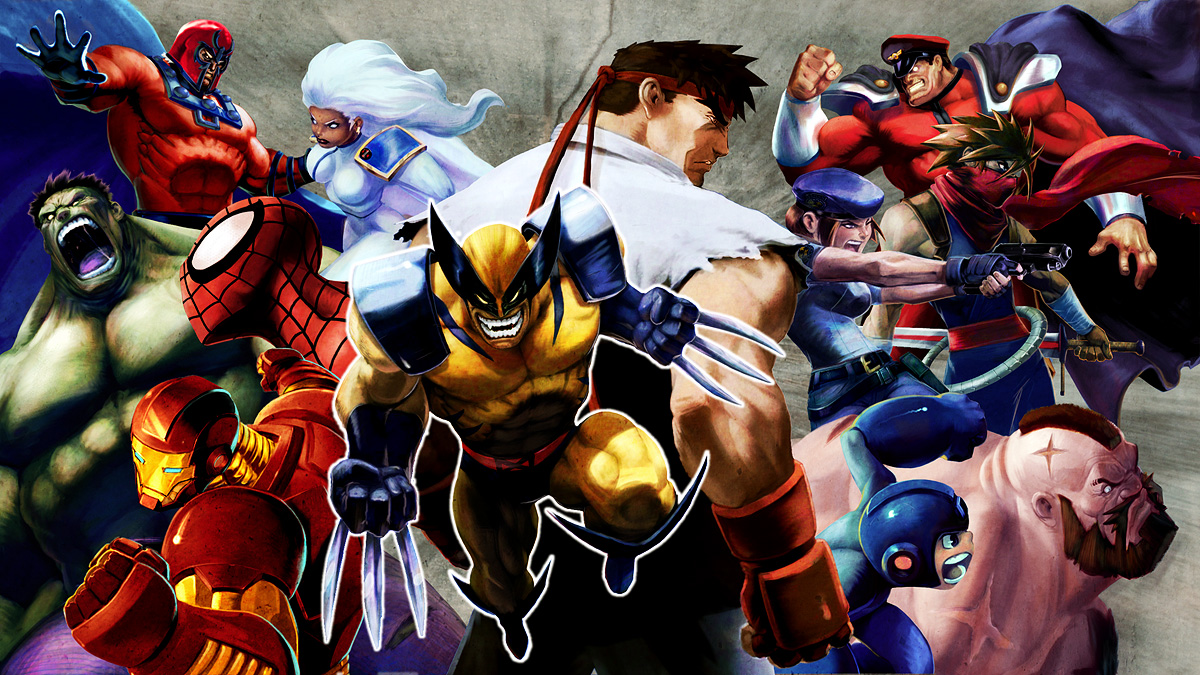
This one looked very nice, and featured Wolverine quite prominently among the vast cast of characters. However, I didn’t want to use it for three reasons. First, the colors in the artwork didn’t exactly blend very well with the blue and yellow on the case. Second, too many characters would be obscured by either the buttons or the joystick. Wolverine, in particular, would have been cut off by both considering where he is positioned on the art. Third, I’d seen a few sticks that used the same piece before, and I wanted something more original. So, that one sat out.
The second piece I had printed was a little more interesting. It was another work by Joe Vriens used as a promotional poster for MvC2. Someone had taken 2 copies of the same image and combined them, giving it an interesting mirror wall effect:


This one worked a little better with the case, given that the artwork is quite dark. While a lot of the characters are still covered by the buttons, since the artwork is mirrored on the left, you still get to see a good bit of them. Wolverine wasn’t as covered, but Ryu got the short end of the stick on either the left or the right, where he was either totally obscured by the buttons or beheaded by the joystick and its dust cover. If I could figure out how to label the buttons, this one could work. But it would be settling for something instead of being what I truly wanted.
The third piece I knew I wasn’t going to use, but I liked the wallpaper so much I decided to have it printed just for kicks:

This one took me back to the arcade for a minute, as I can still hear Spidey’s ‘Web Swing!’ and Strider’s swords slicing and ‘schwing!’ing away while waiting in line for my crack at Street Fighter Alpha 3 (or whatever SFII variant was available). While I really loved the clean look of the art, this one was never seriously in contention. Nick doesn’t use Spiderman or Strider, and the buttons cover up Strider’s entire top half of his body. Still, the picture was cool enough that I sent it to his Xbox and made it his wallpaper, just because…
I decided to give the mirror image art a shot. Placing the art on the case and cutting the holes for the buttons and joystick was pretty easy, and besides a number of characters being hidden, it didn’t look too bad. The main issue was figuring out the button labels. The ideal thing to do would be to make a template in Photoshop showing where the buttons and joystick were, positioning the button labels on the template, and printing them on a transparent sheet. The sheet would lay on top of whatever artwork I ended up using, and could be reused if I chose to swap the art at some point. The only problem with that was there wasn’t any legal size transparent paper readily available at any stores in my area. I then considered making the Photoshop template, importing the artwork, making the labels and printing it myself. The problem with that was the case was a non-standard size. The artwork needed to be a little less than 13 7/8” (not a problem) and slightly bigger than 8 ½” (a much bigger problem). I could have gone to Kinko’s and had it printed, but that would be a lot of time and money for some trial and error printing. I thought about simply printing the button labels in reverse on regular clear labels, cutting them out by hand, and sticking them on the inside of the plexiglass so they wouldn’t peel off, but making the cuts perfectly even and lining the labels up evenly didn’t work very well. It was becoming apparent I’d have to outsource the art. The big question was who I could get to do it. My buddy Laz had helped out with El Kabong2, but our schedules were conflicting and I wanted to come up with something better than our first attempt (although I would miss out on the gin and tonics).
So, back to the SRK forums I went. Finding someone good at making control panel art wouldn’t be too hard.. The forums have threads dedicated to the Madcatz TE and SE sticks and to Hori’s HRAP line of sticks that have more art than you can shake a stick at. At the time of this writing, the Madcatz template thread is over 561 pages long! However, while template and assistance are readily available for those mass produced sticks, finding someone to do a custom template would be a bit trickier. Often, those requests are directed to the ‘Image Mishmash’ thread. However, as with any online forum, some threads are more receptive than others. After about a week with no response, I decided to take a chance and go the direct route.
D3v4st4t0r, or d3v for short, is known on a few boards such as SRK and Capcom-Unity as one of the most prolific designers of TE templates around. He has done numerous character specific art for almost every SFIV character in the roster. One of the things I admired about his work was that it was more than just resizing some wallpaper and adding some lens flare. The templates had a fine balance of size, color and weight. All of the elements fit together, and obstruction by the buttons and stick were minimized. He’s even gone thru the process of recreating a number of old school and new school Sega arcade control panels, customizing them to fit the character and button color combination at hand.


The thing was, most of the templates I saw him work on were for either the TE, SE or a Hori stick. I hadn’t seen any ‘custom’ work. Well, the only thing I could do was ask. So, I sent him a PM on the SRK site, explaining my situation, asking for his assistance and offering to compensate him for his work. If he told me to piss off, so be it. A day later, I got his reply - ‘Let me see what I can do’. We sent a few more messages back and forth to square up a few things. He wanted to make sure the colors matched, so I sent his some pics of the case and the Duplicolor and Rustoleum websites with the links to the paint I used in case the pictures didn’t come out very well. After a few more days, d3v sent me a test picture. I was a bit nervous before i opened the link. I pretty much gave him carte blanche on creating the template, only giving him the colors and Wolverine to work with. Would it look generic? Overwrought? Totally off base for what I was looking for (even though I didn’t know what I was specifically looking for)? Well, that worry was unfounded...

I found out later that while d3v had done a number of templates for people, I was the first custom project he took on. I’m honored. Really, I can’t thank him enough, as his artwork would really take the project over the top. He’s since started his own blog where he has posted some of his work and details how it was done. If you want to know what he did to put the art together, look here. If you want to see some amazing templates or commission a template for him, visit his site: http://www.d3vlicious.com/. Tell him I sent you…
When I purchased the case from Physh, he was able to print out 3 pieces of art for me to use on the control panel. The catch is, I’d have to figure out how to label the buttons myself. The first piece of art was created by Joe Vriens from Udon for the official release of MvC2 on XBLA and PSN:
Logan is gonna cut somebody...
Looks good for a bottom picture, but not for the control panel on this one
The second piece I had printed was a little more interesting. It was another work by Joe Vriens used as a promotional poster for MvC2. Someone had taken 2 copies of the same image and combined them, giving it an interesting mirror wall effect:
From this...
To this. Cool, huh?
This one worked a little better with the case, given that the artwork is quite dark. While a lot of the characters are still covered by the buttons, since the artwork is mirrored on the left, you still get to see a good bit of them. Wolverine wasn’t as covered, but Ryu got the short end of the stick on either the left or the right, where he was either totally obscured by the buttons or beheaded by the joystick and its dust cover. If I could figure out how to label the buttons, this one could work. But it would be settling for something instead of being what I truly wanted.
The third piece I knew I wasn’t going to use, but I liked the wallpaper so much I decided to have it printed just for kicks:
Didn't have a chance, but it's a great wallpaper
This one took me back to the arcade for a minute, as I can still hear Spidey’s ‘Web Swing!’ and Strider’s swords slicing and ‘schwing!’ing away while waiting in line for my crack at Street Fighter Alpha 3 (or whatever SFII variant was available). While I really loved the clean look of the art, this one was never seriously in contention. Nick doesn’t use Spiderman or Strider, and the buttons cover up Strider’s entire top half of his body. Still, the picture was cool enough that I sent it to his Xbox and made it his wallpaper, just because…
I decided to give the mirror image art a shot. Placing the art on the case and cutting the holes for the buttons and joystick was pretty easy, and besides a number of characters being hidden, it didn’t look too bad. The main issue was figuring out the button labels. The ideal thing to do would be to make a template in Photoshop showing where the buttons and joystick were, positioning the button labels on the template, and printing them on a transparent sheet. The sheet would lay on top of whatever artwork I ended up using, and could be reused if I chose to swap the art at some point. The only problem with that was there wasn’t any legal size transparent paper readily available at any stores in my area. I then considered making the Photoshop template, importing the artwork, making the labels and printing it myself. The problem with that was the case was a non-standard size. The artwork needed to be a little less than 13 7/8” (not a problem) and slightly bigger than 8 ½” (a much bigger problem). I could have gone to Kinko’s and had it printed, but that would be a lot of time and money for some trial and error printing. I thought about simply printing the button labels in reverse on regular clear labels, cutting them out by hand, and sticking them on the inside of the plexiglass so they wouldn’t peel off, but making the cuts perfectly even and lining the labels up evenly didn’t work very well. It was becoming apparent I’d have to outsource the art. The big question was who I could get to do it. My buddy Laz had helped out with El Kabong2, but our schedules were conflicting and I wanted to come up with something better than our first attempt (although I would miss out on the gin and tonics).
So, back to the SRK forums I went. Finding someone good at making control panel art wouldn’t be too hard.. The forums have threads dedicated to the Madcatz TE and SE sticks and to Hori’s HRAP line of sticks that have more art than you can shake a stick at. At the time of this writing, the Madcatz template thread is over 561 pages long! However, while template and assistance are readily available for those mass produced sticks, finding someone to do a custom template would be a bit trickier. Often, those requests are directed to the ‘Image Mishmash’ thread. However, as with any online forum, some threads are more receptive than others. After about a week with no response, I decided to take a chance and go the direct route.
D3v4st4t0r, or d3v for short, is known on a few boards such as SRK and Capcom-Unity as one of the most prolific designers of TE templates around. He has done numerous character specific art for almost every SFIV character in the roster. One of the things I admired about his work was that it was more than just resizing some wallpaper and adding some lens flare. The templates had a fine balance of size, color and weight. All of the elements fit together, and obstruction by the buttons and stick were minimized. He’s even gone thru the process of recreating a number of old school and new school Sega arcade control panels, customizing them to fit the character and button color combination at hand.
On the scene!
Cammy's nice...assets....
One of the funnier pictures I'd seen
The thing was, most of the templates I saw him work on were for either the TE, SE or a Hori stick. I hadn’t seen any ‘custom’ work. Well, the only thing I could do was ask. So, I sent him a PM on the SRK site, explaining my situation, asking for his assistance and offering to compensate him for his work. If he told me to piss off, so be it. A day later, I got his reply - ‘Let me see what I can do’. We sent a few more messages back and forth to square up a few things. He wanted to make sure the colors matched, so I sent his some pics of the case and the Duplicolor and Rustoleum websites with the links to the paint I used in case the pictures didn’t come out very well. After a few more days, d3v sent me a test picture. I was a bit nervous before i opened the link. I pretty much gave him carte blanche on creating the template, only giving him the colors and Wolverine to work with. Would it look generic? Overwrought? Totally off base for what I was looking for (even though I didn’t know what I was specifically looking for)? Well, that worry was unfounded...

Yeah, a masterpiece...
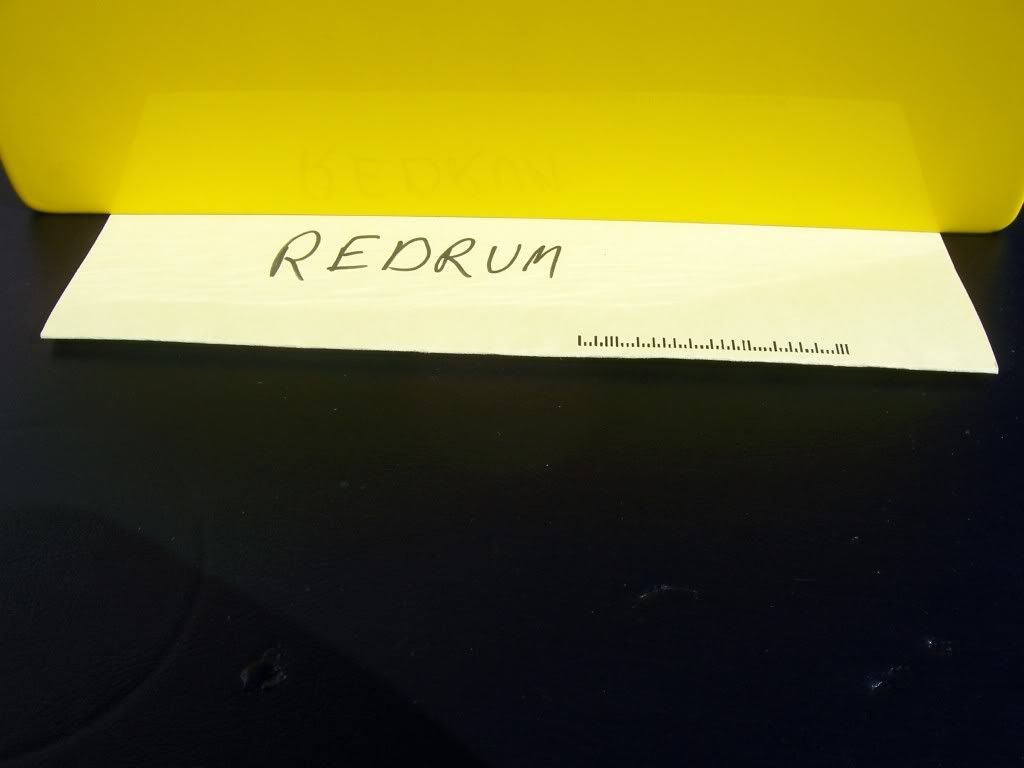
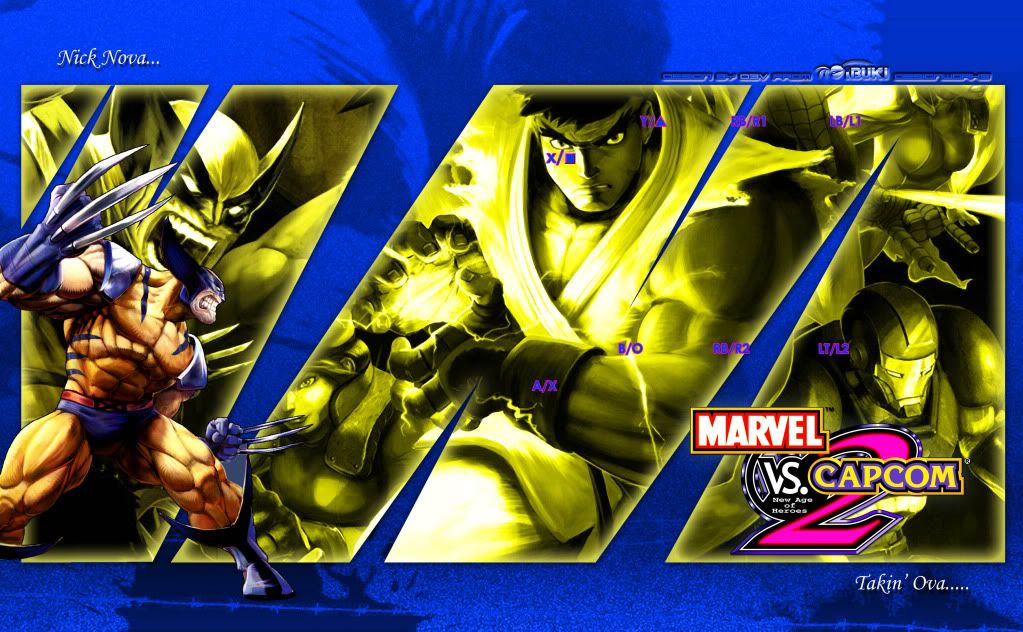
I was literally blown away by the art, which was much better than anything I had seen so far and that I could have created. Wolverine was front and center with the yellow and blue outfit, without any of the buttons cutting him off. The yellow background used the same MvC2 poster I toyed around with, but with a much better effect. Ryu and Wolverine could still be made out even with the buttons and joystick in the way. I couldn’t have asked for more. Before going to print, we made a few tweaks. I asked d3v to change the color on the MvC2 logo from yellow to white, as it felt like there would be a bit too much yellow once the buttons were added. He changed the yellow tint on the background ever so slightly as well. I added button labels pulling some of the colors that were on the template and added one of Nick’s sayings to the template. d3v also incorporated his logo as an added touch :THIS is how to personalize a MvC stick...
With the art finalized I had to get it printed. This turned out to be a little more challenging than I thought. I went to Kinko’s, since I knew I would have to print the art on 11”x17” paper. Since the art was close to 9” wide, I wouldn’t have to worry about anything getting cutoff. The problem is, Kinko’s policy does not allow them to print any copywrited images. With a big picture of Wolverine and the MvC logo, I couldn’t even fight that. Fortunately, it was 2 young guys that were manning the shop that day. I explained what I was doing, showed some of the pictures of the build I had in the phone, and assured him this was for personal use and not for sale (I’m actually losing money on this…). The clerk said they still couldn’t do it… but if I were to use one of the self service computer terminals and printed it out they couldn’t really say anything. So I asked him to put some cardstock in the printer and help someone else while I did my thing. A few minutes and few dollars later I had the print done. I used their trimmer, cut the art down to size, thanked the clerks and drove home for final assembly.I found out later that while d3v had done a number of templates for people, I was the first custom project he took on. I’m honored. Really, I can’t thank him enough, as his artwork would really take the project over the top. He’s since started his own blog where he has posted some of his work and details how it was done. If you want to know what he did to put the art together, look here. If you want to see some amazing templates or commission a template for him, visit his site: http://www.d3vlicious.com/. Tell him I sent you…
Monday, July 12, 2010
No (NBA) Country For Old Men: - My Life Without A Team To Call My Own - Part 1: The Georgetown Hoyas
This is the genesis of any and everything basketball related for me. This is the underlying thread on which players I root for and which teams I like. This is the ONLY team in ANY sport which I will root for without exception or reservation. They can go 33-0 or go 0-everything and I will still be a fan, year in and year out. The only thing I ever ask year in and year out is they make the Sweet 16. If they do, I’m satisfied; if they don’t, there’s always next year. I’ve stuck with them in good times (’84 Championships) and bad times (Victor Paige, anyone?). I was still a fan when Craig Esherick was named the Coach (and honestly, he never had a chance). Until it’s proven that Georgetown is funded by the KKK, I will proudly scream ‘Hoya Saxa!’ come gametime.

The first basketball game I ever went to was a Georgetown game. Back in ’82 or ’83 (honestly I can’t remember which year), a friend of the family Alan Craig Sr. (RIP) took me and a few other young boys to the Capital Center to watch the Hoyas play against Villanova. This was the first time I would see Big John patrolling the sidelines with his signature white towel on his shoulder and 7 foot tall, lanky Patrick Ewing in the paint. The Hoyas won, Villanova lost. So, as a young boy, Georgetown was the team I was supposed to root for, and Villanova was the enemy. I remember in ’84 when they went to the NCAA title game. My father, who is not a sports guy at all, came upstairs to our room. We had to be in bed by 8:00 but the game was on at 9. He pulled up a chair, cut our TV on, and we watched the game. Why he didn’t watch in the living room, I’m not sure. But I got to see ‘my team’ win the championship. I was happy for Thompson and happy for Ewing. My dad would do the same thing in ’85 when they lost to Villanova (yet another reason they are the enemy).

John Thompson is a legend in DC and in the NCAA. Not only does he have the record for the most Big East championships, his graduation rate of his players is impressive as well. His protest and walk off the court in opposition to Proposition 48 is well documented. Off the court, there’s still the infamous meeting he had with drug lord Rayful Edmond (and the beating Alonzo Mourning took for hanging with him in the first place). A number of players he coached became unquestionable stars in the NBA – Ewing, Mutombo, Mourning, Iverson. No, he didn’t have the record of, say, Dean Smith (who he went against in the championship of ’82), or as many notable players as North Carolina. But his teams and the players that came out of it (mostly) had a physical, knock down, drag out, defense brings offense mindset and style of play that was typical of Big East basketball in the 80’s and mid 90’s. It wasn’t always pretty, or high scoring, and there was the threat of a fight breaking out more often than not. And I loved every minute of it.

That’s not to say all was rosy. While the Georgetown teams I watched were defensive minded squads, often anchored by a big center (or not so big, in the case of Othella Harrington, or Jahadi White), they weren’t pretty to look at. You weren’t going to find many spot up shooters to help spread the opponent’s defense. Clog the middle, get the center in trouble, and the Hoyas had problems. Team personnel on the team warranted changes in style of play, for better or worse. Many people still think Allen Iverson stunted the growth of Othella Harrington when he came to Georgetown. In some ways, it’s true, as the offense no longer ran thru Harrington. That said, Othella was undersized for a center (6’9, no matter what his press release said) and a bit soft to play power forward. And when you have someone like Iverson on your team, well, what can you do? The Esherick era was particularly rough, with the team only making it to the big dance once during his tenure and not winning the NIT. Blame his coaching (which wasn’t THAT much different that Thompson’s). Blame lack of recruiting power. Blame Victor Paige, who really wanted to be Iverson but was nowhere close. Bottom line, it was not a fun time to be a Hoya fan. And yet, I stuck with them.

Times are much better now. JTIII, while being in his father’s shadow, figuratively and literally (Big John often watched the home games from his private box, far enough for his son to do his thing but close enough to keep an eye on the program he built)) has been able to make a name for himself, building off the defensive mentality his father instilled in the program and bringing along the Princeton style offense that makes the team a scoring threat. It was nice to see that the sons of two of the biggest figures for the Georgetown basketball progtam, JTIII and Patrick Ewing, Jr., would end up at the same school that their fathers made famous, regardless of the pressure to live up to such a legacy. For me, the defining moment in JTIII’s career here (so far) was the first meeting with then #1 ranked Duke at the Verizon center. At one point they Hoyas had a double digit lead, and eventually won the game. I watched at my parent’s house as fans stormed the court, and I wished I was there. As it was, I screamed and ran around the house like they just won the championship.

I still live and die by the Hoyas. When they played North Carolina for a chance to go to the Final Four, I thought for sure my neighbors were going to call management for all the screaming and shouting I was doing once Hibbert blocked Psycho T and Summers went for the jam to seal the win. I was hoarse the next day. When they lost to Ohio in the tournament this year, I couldn’t watch anything basketball related for the next 24 hours. I think Greg Monroe leaving was a HUGE mistake, but I’ll cheer for him, while hoping the Hoyas can at least make some noise in the Big East tournament. Every year around tournament time I bring my Georgetown shirt and hang it on my office door or cubicle until they lose. My son has his first Georgetown Hoya shirt and I bought my daughter a Georgetown onesie before she was born. I will teach both my children from youth to respect and cheer for the Hoyas, lest they be disowned come basketball season.


This also explains what teams I root for in the NBA. If you came from Georgetown, you get my seal of approval and I will root for your team. Actually, let me check that a bit: if you were a STAR at Georgetown, you get my seal of approval and I will root for your team. If you were a player, I’ll still root for you, but your team? Maybe not. Jahidi White played for the Bullets, but I wasn’t about to buy season tickets. Othella Harrington AND Mike Sweetney ended up with the Knicks, but I still have a longstanding grudge against them (which will be explained). Roy Hibbert is trying to make a name for himself in Indiana, but the ghost of Reggie Miller won’t allow me to root for the Pacers. Jeff Green was a hero of the most recent Final Four squad, but I have never watched an Oklahoma City game (partially because they don’t really show that many Oklahoma City games during the regular season because, while they have Green, Witherspoon and Kevin Durant, they still play in OKLAHOMA CITY).

Using that formula, you can probably figure out which teams I rooted for back in the day. I’ll now go thru each player and his team(s), breaking down some of my memorable highs and lows. That said, the first team doesn’t follow this baseline at all….

You know what time it is....
The first basketball game I ever went to was a Georgetown game. Back in ’82 or ’83 (honestly I can’t remember which year), a friend of the family Alan Craig Sr. (RIP) took me and a few other young boys to the Capital Center to watch the Hoyas play against Villanova. This was the first time I would see Big John patrolling the sidelines with his signature white towel on his shoulder and 7 foot tall, lanky Patrick Ewing in the paint. The Hoyas won, Villanova lost. So, as a young boy, Georgetown was the team I was supposed to root for, and Villanova was the enemy. I remember in ’84 when they went to the NCAA title game. My father, who is not a sports guy at all, came upstairs to our room. We had to be in bed by 8:00 but the game was on at 9. He pulled up a chair, cut our TV on, and we watched the game. Why he didn’t watch in the living room, I’m not sure. But I got to see ‘my team’ win the championship. I was happy for Thompson and happy for Ewing. My dad would do the same thing in ’85 when they lost to Villanova (yet another reason they are the enemy).
This would begin to shape my view of basketball...
When I was old enough to drive, my crew and I went to a few games at the Capital Center ourselves, notably the game they played against Maryland after the Terps came off restrictions. I was so pissed leaving the game, not because they lost, but because there were more Maryland fans there than Georgetown fans!.
Good times were had here...
John Thompson is a legend in DC and in the NCAA. Not only does he have the record for the most Big East championships, his graduation rate of his players is impressive as well. His protest and walk off the court in opposition to Proposition 48 is well documented. Off the court, there’s still the infamous meeting he had with drug lord Rayful Edmond (and the beating Alonzo Mourning took for hanging with him in the first place). A number of players he coached became unquestionable stars in the NBA – Ewing, Mutombo, Mourning, Iverson. No, he didn’t have the record of, say, Dean Smith (who he went against in the championship of ’82), or as many notable players as North Carolina. But his teams and the players that came out of it (mostly) had a physical, knock down, drag out, defense brings offense mindset and style of play that was typical of Big East basketball in the 80’s and mid 90’s. It wasn’t always pretty, or high scoring, and there was the threat of a fight breaking out more often than not. And I loved every minute of it.
This is what he looks like when he's HAPPY...
That’s not to say all was rosy. While the Georgetown teams I watched were defensive minded squads, often anchored by a big center (or not so big, in the case of Othella Harrington, or Jahadi White), they weren’t pretty to look at. You weren’t going to find many spot up shooters to help spread the opponent’s defense. Clog the middle, get the center in trouble, and the Hoyas had problems. Team personnel on the team warranted changes in style of play, for better or worse. Many people still think Allen Iverson stunted the growth of Othella Harrington when he came to Georgetown. In some ways, it’s true, as the offense no longer ran thru Harrington. That said, Othella was undersized for a center (6’9, no matter what his press release said) and a bit soft to play power forward. And when you have someone like Iverson on your team, well, what can you do? The Esherick era was particularly rough, with the team only making it to the big dance once during his tenure and not winning the NIT. Blame his coaching (which wasn’t THAT much different that Thompson’s). Blame lack of recruiting power. Blame Victor Paige, who really wanted to be Iverson but was nowhere close. Bottom line, it was not a fun time to be a Hoya fan. And yet, I stuck with them.
Still Standing...
Times are much better now. JTIII, while being in his father’s shadow, figuratively and literally (Big John often watched the home games from his private box, far enough for his son to do his thing but close enough to keep an eye on the program he built)) has been able to make a name for himself, building off the defensive mentality his father instilled in the program and bringing along the Princeton style offense that makes the team a scoring threat. It was nice to see that the sons of two of the biggest figures for the Georgetown basketball progtam, JTIII and Patrick Ewing, Jr., would end up at the same school that their fathers made famous, regardless of the pressure to live up to such a legacy. For me, the defining moment in JTIII’s career here (so far) was the first meeting with then #1 ranked Duke at the Verizon center. At one point they Hoyas had a double digit lead, and eventually won the game. I watched at my parent’s house as fans stormed the court, and I wished I was there. As it was, I screamed and ran around the house like they just won the championship.
It's a party, and EVERYBODY is invited
I still live and die by the Hoyas. When they played North Carolina for a chance to go to the Final Four, I thought for sure my neighbors were going to call management for all the screaming and shouting I was doing once Hibbert blocked Psycho T and Summers went for the jam to seal the win. I was hoarse the next day. When they lost to Ohio in the tournament this year, I couldn’t watch anything basketball related for the next 24 hours. I think Greg Monroe leaving was a HUGE mistake, but I’ll cheer for him, while hoping the Hoyas can at least make some noise in the Big East tournament. Every year around tournament time I bring my Georgetown shirt and hang it on my office door or cubicle until they lose. My son has his first Georgetown Hoya shirt and I bought my daughter a Georgetown onesie before she was born. I will teach both my children from youth to respect and cheer for the Hoyas, lest they be disowned come basketball season.
But we won't be wearing this....
Or these...
.This also explains what teams I root for in the NBA. If you came from Georgetown, you get my seal of approval and I will root for your team. Actually, let me check that a bit: if you were a STAR at Georgetown, you get my seal of approval and I will root for your team. If you were a player, I’ll still root for you, but your team? Maybe not. Jahidi White played for the Bullets, but I wasn’t about to buy season tickets. Othella Harrington AND Mike Sweetney ended up with the Knicks, but I still have a longstanding grudge against them (which will be explained). Roy Hibbert is trying to make a name for himself in Indiana, but the ghost of Reggie Miller won’t allow me to root for the Pacers. Jeff Green was a hero of the most recent Final Four squad, but I have never watched an Oklahoma City game (partially because they don’t really show that many Oklahoma City games during the regular season because, while they have Green, Witherspoon and Kevin Durant, they still play in OKLAHOMA CITY).
Roy, you my man and all, by I can't root for Indiana. Sorry...
Using that formula, you can probably figure out which teams I rooted for back in the day. I’ll now go thru each player and his team(s), breaking down some of my memorable highs and lows. That said, the first team doesn’t follow this baseline at all….
No (NBA) Country For Old Men: My Life Without A Team To Call My Own - Prologue
Finally, LeBronapaloosa is over. After weeks of speculation, reports, Twitter blurbs, hand wringing, and a shameful 1 hour special, Mr. James is going to Miami to play with D. Wade and Chris Bosh. Good for him. Now we can let ESPN swing from Bret Favre’s nuts while he decided whether to play or not. But that’s another blog for someone else to write… Shortly after the announcement my brother shot me a text:
“So you gonna root for Miami again?”
The quick answer was ‘Not because of James, no’. But it did get me to thinking. At some point I was a pretty big Heat fan, and a lot of my people knew it. I could go back to rooting for the Heat, but that would look a lot like front running, which I can’t stand. Trying to go back to a team I stopped caring about (as much) would be hard to do. The problem is, I haven’t had a team to call my own in a while. This really got me thinking about the teams I rooted for in the past, why I stopped rooting for them, and where I could possibly go from here.
The sad truth is, I seem to be a fan that roots more for a particular player than for a particular team, with one exception that ties everything together (except one team, anyway). Once said player went to his team I pretty much was a staunch supporter of said team. But, when that run was over, so was my fandom. While I still check for them in the standings and hope they do well (mostly), I can’t in good faith call myself a fan anymore. So I decided to have a good long look at the players and teams I was once a fan of, starting in chronological order. Looking back, there were some fantastic times and some painful memories that make me want to kick my monitor thru the wall. This should be fun…
Now, before die hard sports fans start calling me out, please understand: the ‘home team’ for me is the Washington Bullets / Wizards. With all due respect to my man Chris Whitney (holla at me man!), there hasn’t been anything to really cheer about for the last 35 years. Blah blah blah Chris Webber, Juwan Howard, blah blah blah, Jordan, blah blah blah Gilbert, Jamison, Buther, blah blah blah. The truth of the matter is as long as I have been alive they have been LA Clipper level bad at worst, overachievers at best, and pretty much a non factor in the grand scheme of the NBA at the core. Other than saying they’re from my hometown there’s absolutely no reason for me to ever root or care about them. I will make no apologies for this. Even if they do get good I still don’t see me converting and rooting for them (though I wish them and John Wall the best). In the end, if they make it to the second round of the playoffs, that’s as good as they will ever be until something drastic happens to the Eastern Conference. End of story.
Thursday, July 1, 2010
Berserker Barrage: The Marvel Vs. Capcom Stick Saga Part 9 – Wire, Wire, Pants On Fire
So, we have the 360 PCB padhacked, the leo wired up, the LEDs working, and all the buttons and joystick inputs wired to the appropriate places on the junction block. It was now time to tackle the data and power lines for both PCBs and wire up the battery. One of the earlier wiring schematics Gummowned worked up had the d+ and d- USB lines from both PCBs going to one of the dpdt switches, and the +5v USB line and a line from the positive battery terminal from both PCBs going to the other switch. More recent schematics use a 3pdt switch, and have the +5v USB lines chained together (360 PCB, Sixaxis PCB and USB adapter). This is probably the optimal setup, but I went on with the original schematic, for a few reasons. First, while I had managed to solder leads to the USB solder points on the 360 PCB, the solder points on the sixaxis PCB were much closer together, and I wasn’t confident I could cleanly solder wires on the points. Second, I didn’t want to run a chain of wires from all the +5v points, partly for aesthetic reasons, partly because I was beyond tired of soldering at this point.

The plan was to cut one of my unused USB cables, using the mini-b end to plug into the sixaxis PCB, eliminating the need to solder anything for the USB lines. The other end of the USB cable would be wired to the appropriate switch terminals and ground chain using .110” QDs, then plugged into the USB adapter attached to the case. The leads that I had soldered to the USB points on the 360 PCB and the leads from the USB cable attached to the sixaxis PCB would also be connected to the appropriate switch terminals with .110” QDs. Once I had all those wires stripped, crimped and connected, I tackled the power lines. I soldered leads to the sixaxis PCD’s battery terminals and ran them to another piece of junction block, along with the battery terminal leads I already soldered to the 360 PCB. Since I still had the LEDs wired up from my previous test, I connected them to the junction block as well. The only thing left to do now was test and see if it actually worked.
Before going out of town for the week, my buddy Nick dropped off his Xbox for safe keeping. I told him I’d need it to test out the stick anyway, since I still don’t have one myself. I took a few minutes to hook the Xbox up to the plasma TV, then connected the battery pack from the sixaxis to the junction block. Moment of truth time. With the switches in the down position, I pressed the guide button on the stick. As it did before, the PS3 whirred to life. Great. Shut that system off. Now for the Xbox. The joypad that the PCB was taken out of had already been synced to his Xbox, so there shouldn’t be a problem there. Flip the switches in the upright position. Press the guide button and…… the green light on the Xbox came to life. SUCCESS!!! The buttons on the stick lit when pressed twice, then…..nothing. Apparently the battery needed to be charged. No matter. It’s nearly 2am and I need sleep. I’ll just plug it up to the USB cable and recharge the battery overnight. So, I flip the switched back down for the PS3, plug in the USB cable from the charger and…nothing. No blinking lights on the sixaxis PCB. That’s not good. Tried another USB cable. No dice. Disconnected the battery from the junction block and plugged it into the sixaxis. Still nothing. Plugged the charging cable into the sixaxis and...charge lights start blinking as they should. Odd. Wired the battery back to the junction block and plugged the charge cable to the sixaxis. Blinking charge lights again. Obviously, something is off with my wiring somewhere. But it’s now after 2am, and I need to wake up in 4 hours, unless my daughter wakes me up before that to have her diaper changed. So, I disconnected the charging cable, pulled the battery and charged it on my R/C lipo charger and went to bed.
Groggy and bleary eyed at work, I tried to figure out what could be the problem with the PS3 PCB not charging. Obviously something had to be off with the USB connection. So, it was onto the SRK forums to see what I could have done wrong. While I was typing out my problem, it occurred to me what the problem could be. Since I was using the USB cable, instead of leads from the USB terminals on the PCB, the cable would need to be grounded. When I attached the connectors and wired everything up the night before, I didn’t even consider the ground for the USB cable. If I had used the leads soldered to the USB points, I probably would have been OK, since the PCB itself was grounded. But with the separate cable, I would need to ground that as well. Now all I needed to do was make it through the next 6 hours at work to see if my theory was correct.
Once I made it home, I stripped some more of the USB cable to expose the ground wire. I tapped into the ground chain by desoldering the one of the QDs I was using on the ground chain, then adding another lead and soldering the QD to both. I then added a female QD to the USB ground wire and a male to the exposed lead on the ground chain. With the battery pack now fully charged I connected it back to the junction block. This time, the Xbox fired up and the stick stayed on. I played a few rounds of MvC2 on my buddy’s system, looked thru some of his videos, and changed his background, just because I could. This time when I switched to the PS3 and plugged in the USB cable the charge lights started to blink. Time to start doing my happy dance!
Now I was 85% finished with my little project. I needed to tighten up the wiring a little bit with some more wire sheathing and attach and wire a switch to turn the LEDs on and off. My original plan to run all the individual anodes to spots on the junction block didn’t look very clean, so I made one more wire chain, cutting the anodes short, attaching QDs and making a chain just like the one I made for the ground wires. It took another 2 hours, but it looks much neater. The only major thing left to tackle was the art for the control panel. Time to call in some more help…

These are some TINY solder points....
Before going out of town for the week, my buddy Nick dropped off his Xbox for safe keeping. I told him I’d need it to test out the stick anyway, since I still don’t have one myself. I took a few minutes to hook the Xbox up to the plasma TV, then connected the battery pack from the sixaxis to the junction block. Moment of truth time. With the switches in the down position, I pressed the guide button on the stick. As it did before, the PS3 whirred to life. Great. Shut that system off. Now for the Xbox. The joypad that the PCB was taken out of had already been synced to his Xbox, so there shouldn’t be a problem there. Flip the switches in the upright position. Press the guide button and…… the green light on the Xbox came to life. SUCCESS!!! The buttons on the stick lit when pressed twice, then…..nothing. Apparently the battery needed to be charged. No matter. It’s nearly 2am and I need sleep. I’ll just plug it up to the USB cable and recharge the battery overnight. So, I flip the switched back down for the PS3, plug in the USB cable from the charger and…nothing. No blinking lights on the sixaxis PCB. That’s not good. Tried another USB cable. No dice. Disconnected the battery from the junction block and plugged it into the sixaxis. Still nothing. Plugged the charging cable into the sixaxis and...charge lights start blinking as they should. Odd. Wired the battery back to the junction block and plugged the charge cable to the sixaxis. Blinking charge lights again. Obviously, something is off with my wiring somewhere. But it’s now after 2am, and I need to wake up in 4 hours, unless my daughter wakes me up before that to have her diaper changed. So, I disconnected the charging cable, pulled the battery and charged it on my R/C lipo charger and went to bed.
Groggy and bleary eyed at work, I tried to figure out what could be the problem with the PS3 PCB not charging. Obviously something had to be off with the USB connection. So, it was onto the SRK forums to see what I could have done wrong. While I was typing out my problem, it occurred to me what the problem could be. Since I was using the USB cable, instead of leads from the USB terminals on the PCB, the cable would need to be grounded. When I attached the connectors and wired everything up the night before, I didn’t even consider the ground for the USB cable. If I had used the leads soldered to the USB points, I probably would have been OK, since the PCB itself was grounded. But with the separate cable, I would need to ground that as well. Now all I needed to do was make it through the next 6 hours at work to see if my theory was correct.
Once I made it home, I stripped some more of the USB cable to expose the ground wire. I tapped into the ground chain by desoldering the one of the QDs I was using on the ground chain, then adding another lead and soldering the QD to both. I then added a female QD to the USB ground wire and a male to the exposed lead on the ground chain. With the battery pack now fully charged I connected it back to the junction block. This time, the Xbox fired up and the stick stayed on. I played a few rounds of MvC2 on my buddy’s system, looked thru some of his videos, and changed his background, just because I could. This time when I switched to the PS3 and plugged in the USB cable the charge lights started to blink. Time to start doing my happy dance!
Now I was 85% finished with my little project. I needed to tighten up the wiring a little bit with some more wire sheathing and attach and wire a switch to turn the LEDs on and off. My original plan to run all the individual anodes to spots on the junction block didn’t look very clean, so I made one more wire chain, cutting the anodes short, attaching QDs and making a chain just like the one I made for the ground wires. It took another 2 hours, but it looks much neater. The only major thing left to tackle was the art for the control panel. Time to call in some more help…
Thursday, June 3, 2010
Berserker Barrage: The Marvel Vs. Capcom Stick Saga Part 8 – And Still I Solder
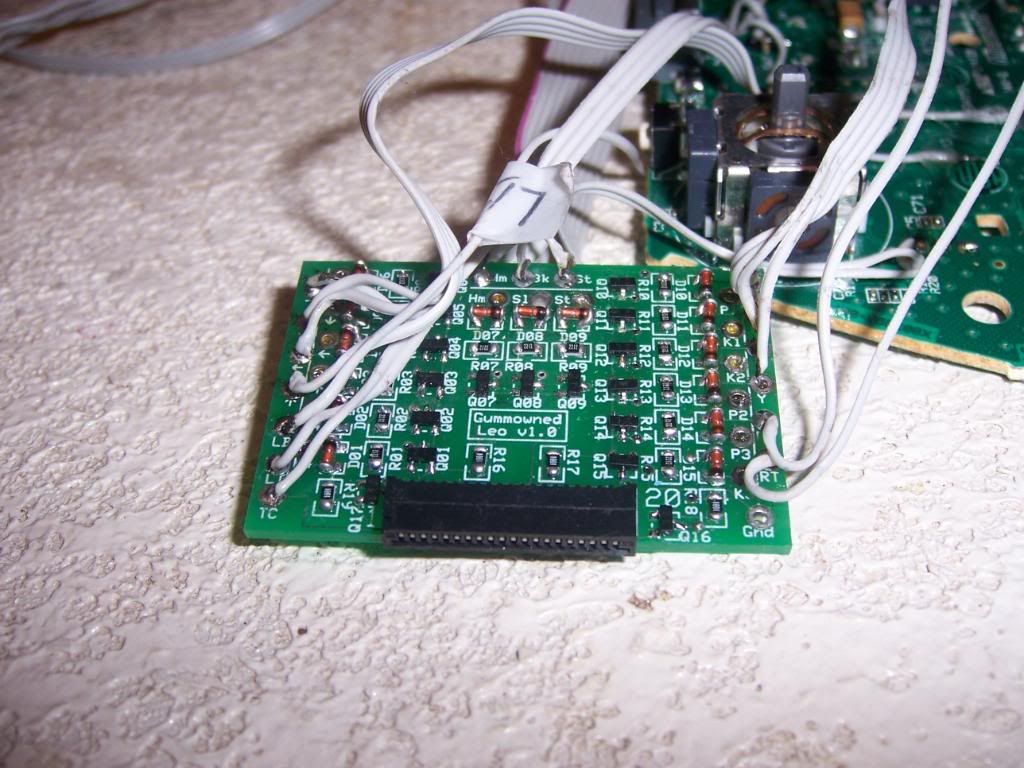
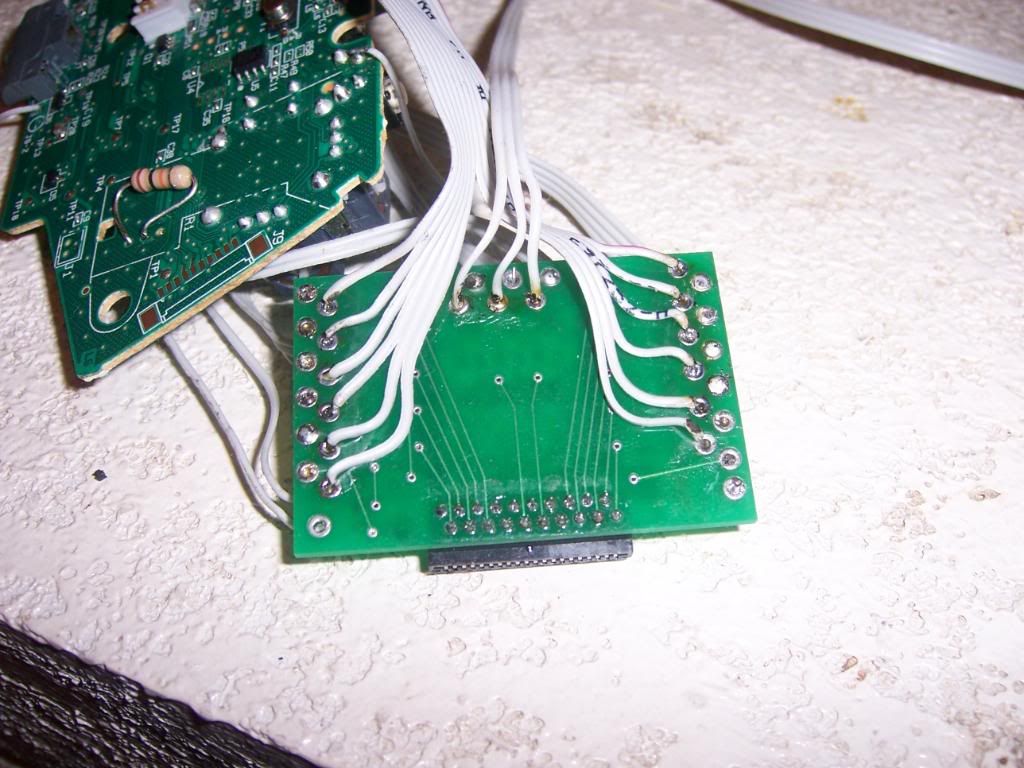
With the case FINALLY finished I needed to get back to soldering. The first task I tackled was soldering the wires from the 360 PCB to the leo. I started with the x/y/a/b button leads. I stripped and tinned the wire for each lead, then carefully soldered the individual leads to the appropriate spot labeled on the outer row of the leo board. I used the ‘third hand’ on the soldering iron holder to hold the leo in place while I added some flux on the solder point of the leo board. Then I inserted the lead into the solder point. A few moments with the soldering iron and the first of 16 wire leads was complete. I then repeated the process for the remainder of the button leads, the joystick leads, the bump and trigger leads, the trigger common line, and the home/back/guide leads. After what felt like an eternity, the board looked like this:
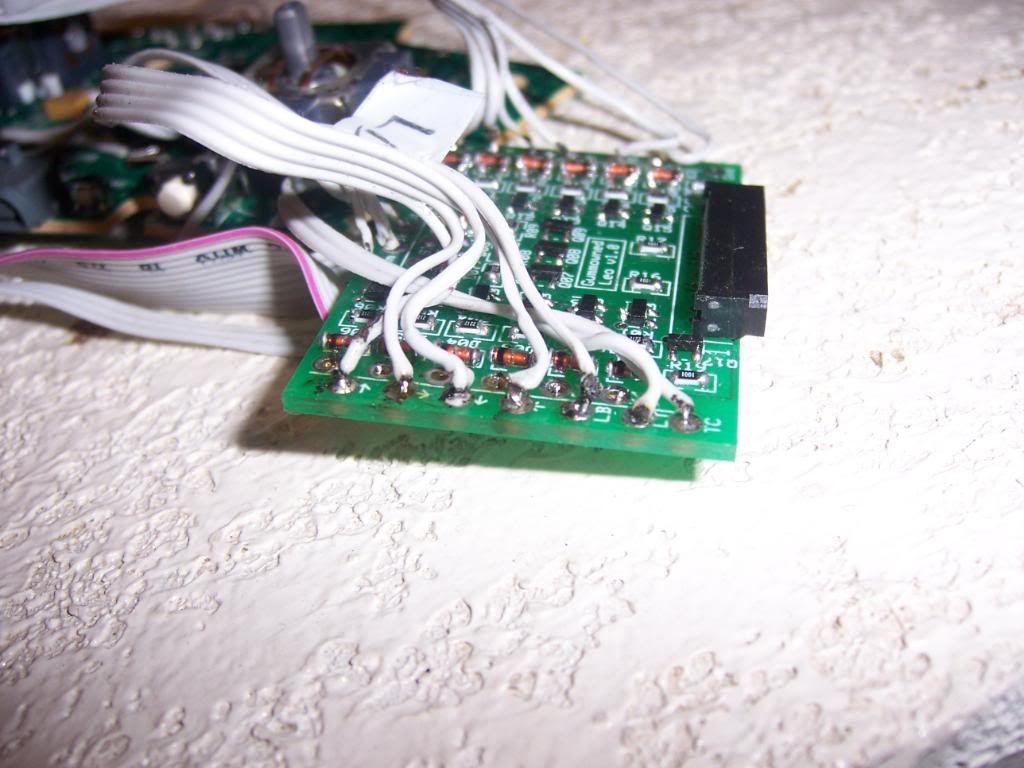
The next task was to solder leads from the leo to the buttons and joystick. I pulled 2 sections of wire from my IDE cable – one 12 wire section for the button and joystick row and a 3 wire section for the home/start/select row. Since I didn’t wan to take a chance on any of the wires touching or accidentally desoldering one of the 360 leads, I soldered the button leads from the bottom of the leo board. Before I started, I wrote down the order of the holes for the leo board on a sheet of paper, then wrote down which wire from the IDE cable section went with each one, starting with the #1 wire (marked with a red line). Then, I soldered the 15 leads just as before. I trimmed the button and joystick leads to length to fit a bit neater on the backside of the leo board (something I failed to do for the 360 leads, but I was learning as I went along, so sue me…)
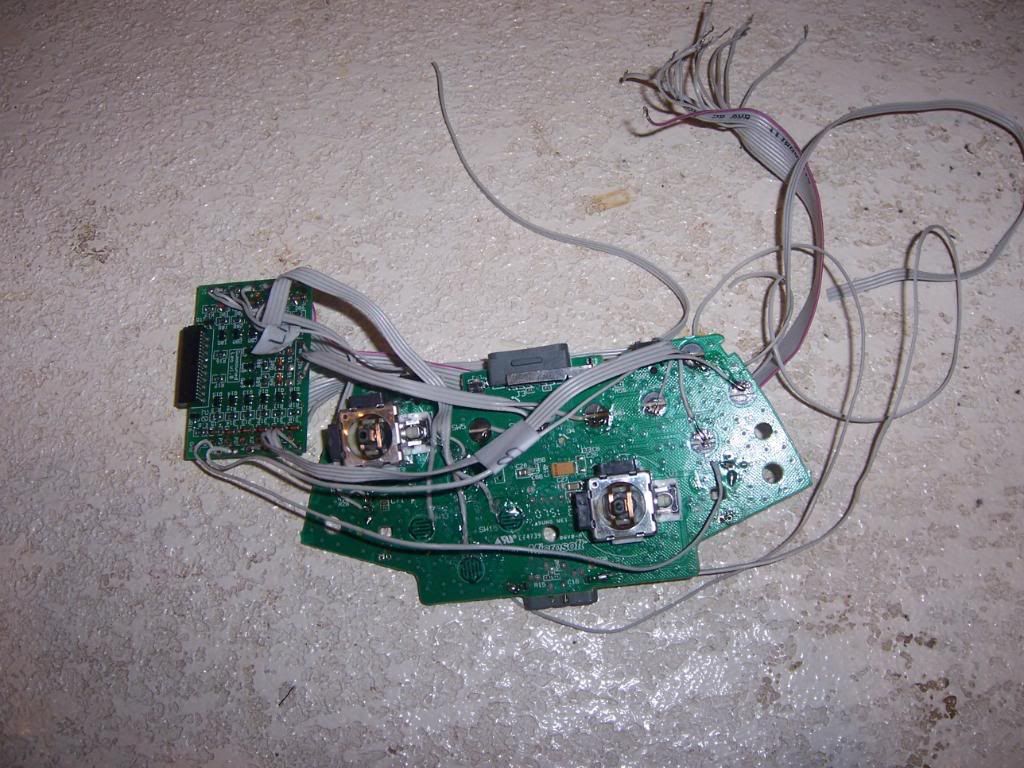
Instead of running the leads directly to the button and joystick switches, I decided to run them to a junction block. This would ease installation as I could vary the length of the leads I needed from the switches and make swapping out parts easier in the event anything needed to be replaced. The junction block would be secured to the right side of the case with 2 screws. But before I could worry about that, I had a few more wiring harness to make.
The first harness I decided to tackle would be for the joystick switches. I cut 4 pieces of wire, soldered on the QDs and snaked them through some cable sleeving. The harness would wrap around the base of the JLW and the exposed leads would go to the appropriate place on the junction block. Next up was the harness for the start/home/select buttons on the front of the case, which I did the same way as the joystick harness. After that, I had to make one long ground harness to tie the joystick, start/select/home buttons and the USB cable grounds together and run them to the power junction block on the other side of the case. By time I was finished that harness I didn’t want to solder anything for a while. Before calling it quits for the day, I wanted to see whether my soldering job on the leo worked. So I connected the harnesses to all the buttons and the joystick and ran them to the junction block, and connected the corresponding wires from the leo board to the junction block. I was smart enough to write down the order of the wires from the button harness so I didn't make a mistake and connect the jab button with the 3rd kick lead on the leo...

Even though I didn’t have everything fully wired, I could still plug the battery to the sixaxis PCB and see if the buttons and stick connections were correct. Sure enough, the PS3 fired right up just it was supposed to. I did realize I had misread the labels on the leo board, so my up and down inputs were reversed. Since the iron was still plugged up, I made a quick swap of the wires on the leo board and called it a night.
About 30+ points all on one board. Get comfy with your iron...
A smaller tip iron would have made this MUCH easier
The next task was to solder leads from the leo to the buttons and joystick. I pulled 2 sections of wire from my IDE cable – one 12 wire section for the button and joystick row and a 3 wire section for the home/start/select row. Since I didn’t wan to take a chance on any of the wires touching or accidentally desoldering one of the 360 leads, I soldered the button leads from the bottom of the leo board. Before I started, I wrote down the order of the holes for the leo board on a sheet of paper, then wrote down which wire from the IDE cable section went with each one, starting with the #1 wire (marked with a red line). Then, I soldered the 15 leads just as before. I trimmed the button and joystick leads to length to fit a bit neater on the backside of the leo board (something I failed to do for the 360 leads, but I was learning as I went along, so sue me…)
Much neater, but took much more time to do it
The whole enchilada soldered together.
Instead of running the leads directly to the button and joystick switches, I decided to run them to a junction block. This would ease installation as I could vary the length of the leads I needed from the switches and make swapping out parts easier in the event anything needed to be replaced. The junction block would be secured to the right side of the case with 2 screws. But before I could worry about that, I had a few more wiring harness to make.
The first harness I decided to tackle would be for the joystick switches. I cut 4 pieces of wire, soldered on the QDs and snaked them through some cable sleeving. The harness would wrap around the base of the JLW and the exposed leads would go to the appropriate place on the junction block. Next up was the harness for the start/home/select buttons on the front of the case, which I did the same way as the joystick harness. After that, I had to make one long ground harness to tie the joystick, start/select/home buttons and the USB cable grounds together and run them to the power junction block on the other side of the case. By time I was finished that harness I didn’t want to solder anything for a while. Before calling it quits for the day, I wanted to see whether my soldering job on the leo worked. So I connected the harnesses to all the buttons and the joystick and ran them to the junction block, and connected the corresponding wires from the leo board to the junction block. I was smart enough to write down the order of the wires from the button harness so I didn't make a mistake and connect the jab button with the 3rd kick lead on the leo...

The wiring can't stop, won't stop...
Even though I didn’t have everything fully wired, I could still plug the battery to the sixaxis PCB and see if the buttons and stick connections were correct. Sure enough, the PS3 fired right up just it was supposed to. I did realize I had misread the labels on the leo board, so my up and down inputs were reversed. Since the iron was still plugged up, I made a quick swap of the wires on the leo board and called it a night.
Friday, March 26, 2010
Berserker Barrage: the Marvel Vs. Capcom Stick Saga Part 7 – Case Conundrums (And Why Reading Is Fundamental)
While I was enduring my massive helping of FAIL with the bat top, I started work on getting the case painted. The first step was to cut the hole for the USB adaptor (which I forgot to do before I painted the first case, if you remember). The edge of the adaptor was much straighter and flatter than the last adaptor I used, so I wouldn’t have to work so hard on shaping the hole to make it fit.

Once I figured out where I could put the adaptor inside the case where is wouldn’t interfere with anything, I traced the outline on the outside of the case. I then had a few options on how to proceed. I could have drilled a number of holes in the space I drew and used the chisel to clean away the rest of the waste, slowly shaping the hole to the correct size. Or, I could have whipped out the dremel, screwed on the cutting attachment and gone to town.

I put the case back in my project vice and set up the dremel. The multicutting bit made relatively quick work of cutting through the material. The only thing is, you really need a steady hand with this thing, which I didn’t have. The lines I cut were nowhere near straight. Had I clamped a straight edge guide to the case beforehand I probably would have fared a little better. No matter. A few more minutes with the wood file and the USB adaptor fit nice and snug. I made sure the adaptor was flush with the case then used some wood putty to make sure the edges were smooth and to fill in the little gaps I saw. Once the putty was dried, I taped up the adaptor plug and sanded it smooth, making sure to feather the edges and make the putty areas as level as possible. Once that was done I set up my paint area in the garage and sprayed on the primer. Once I had enough coats done, I sanded with 200 and 400 grit sandpaper, and wet sanded with 600 and 1000 grit sandpaper to make the primer nice and smooth. So far so good.
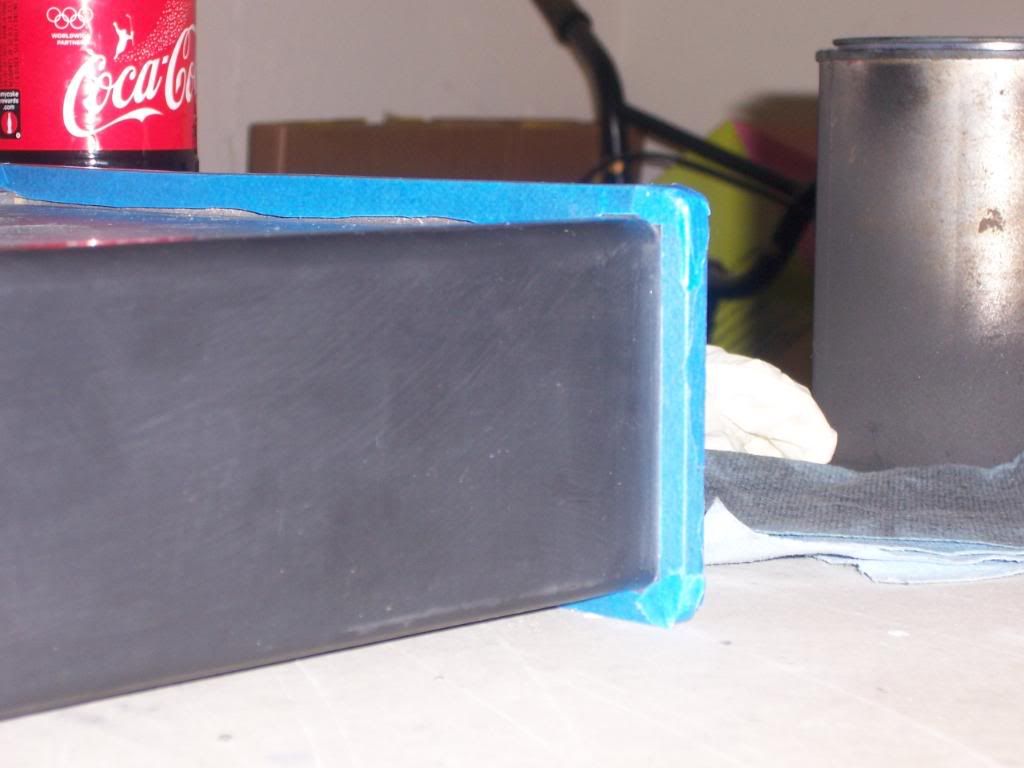
With the primer out of the way, it was time to mask off the case for painting. The front and back of the case were going to be painted metallic blue, while the sides were going to be painted yellow. In addition to the Rustoleom yellow that I was using (and failing) with the bat top, I had picked up a can of Duplicolor Metal Flake spray paint.

I used some 3M blue painter’s tape and masked the sides of the case and the edges that would be painted yellow.

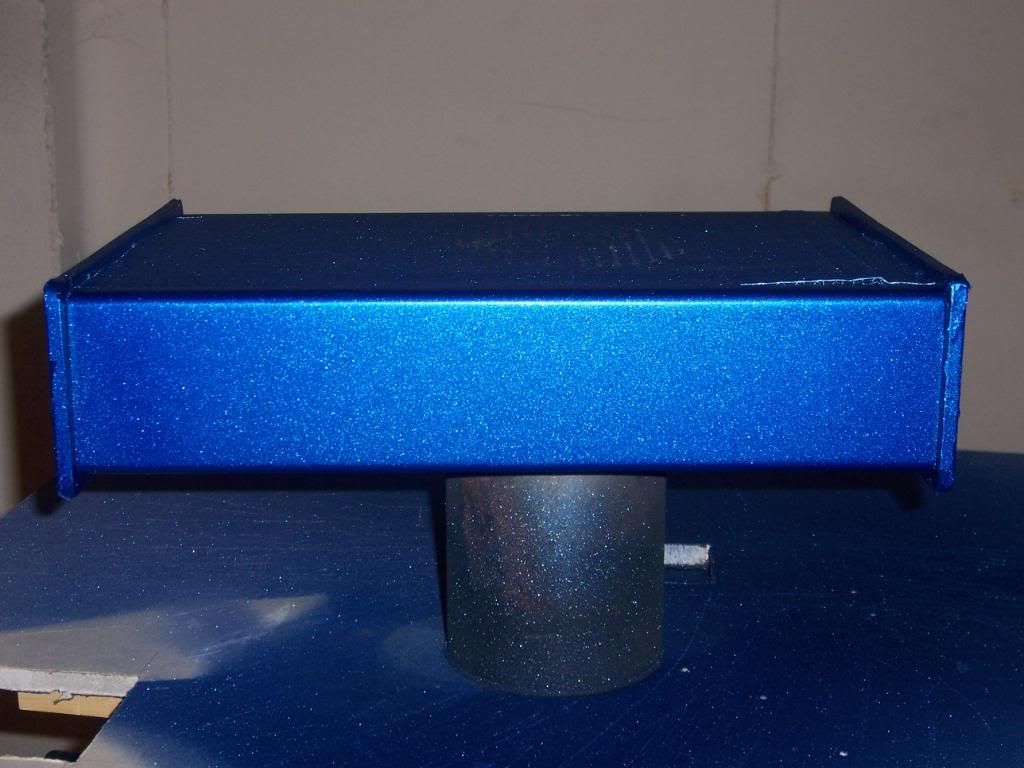
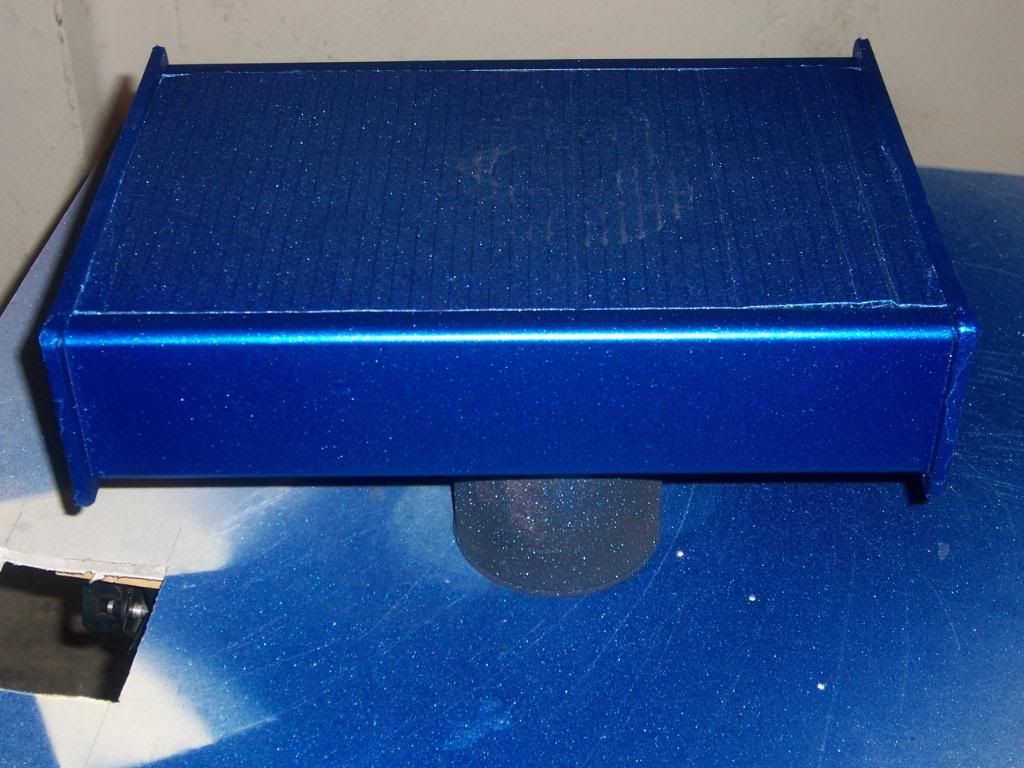
Afterward I wiped everything down with mineral spirits, set up the paint area in the garage and sprayed on about 4 coats of the metal flake, making sure to wear my respirator so as not to breathe in too many noxious chemicals. As the name suggests, the finish had a nice metallic look to it, without looking like someone tossed some glitter into a can of blue paint. Once the paint dried, I sanded it down with 200 and 400 grit sandpaper, cleaned it with the mineral spirits, and sprayed 4 more coats of paint. Once that was dry I repeated the sanding, but this time followed up by wet sanding the paint with 600, 1000, and 1500 grit sandpaper. I started to worry a bit when I noticed the blue was getting duller and duller. However, when I cleaned the paint off with mineral spirits, I noticed that the blue was nice and shiny before the spirits evaporated. So, I was pretty confident that once the clearcoat was applied that all would be alright. Once that was done, I let the case sit for a few days to make sure the paint was fully dry before proceeding.
Once I felt the paint was dry I removed the tape from the sides and applied it to the front and back of the case that had been painted. After I cleaned the sides with mineral spirits to make sure there was no paint residue, I sprayed on a few coats of the yellow paint and let it dry overnight. The next day, I sanded it down with 200 and 400 grit sandpaper, just as I did with the metallic flake. After giving it another mineral spirit wipe, I sprayed on another two light coats. When I went back to apply the next few light coats, to my bemusement the paint had started to wrinkle, just as it had with the bat top. This was becoming insane. So, once that paint dried, I sanded all the wrinkled paint off (which stated to come off in little balls of paint), and sanded the underlying finish smooth again. At this point I had just about run out of the Rustoleum, and really didn’t feel like getting another can, since it appeared I could only get one layer of paint on any given surface before wrinkling started to occur. So, against all recommendations and common sense, I grabbed the can of Krylon Fusion and sprayed that on top of the Rustoleum layer I managed to save (it’s usually suggested not to mix brands of paint, as they may react differently with each other). Less than 10 minutes later, I had a runny, wrinkled and ugly mess. So much FAIL, so little time…
I decided to leave the whole spray paint thing alone and go down another path. The weather was colder, the paint smell hung around in the garage longer than I wanted, I still had overspray I had to clean off my wife’s car, and so far the majority of my attempts at using spray paint had ended in failure. So, I started to look for a pint of yellow paint to brush on the case. I figured since I was going to wet sand the paint anyway, I wouldn’t really have to worry about brush marks showing up in the paint finish. Besides, I would be using a foam roller to minimize any applicator marks. Before I went to the store I went online to try to figure out what was going wrong with the spray paint. It worked fine when I sprayed the lacquer for my first case. This time, not so much. In the FAQ section on the Duplicolor site I came across this little nugget:
Q. What is a re-coat window?
A. Re-coat windows apply to enamel paints and refers to the time period during which a second coat maybe applied. After spraying the first coat of an enamel, a second coat must be applied with in 1 – 2 hours or wait 5 days for the coating to cure. The paint may wrinkle or lift when resprayed during this curing period. Lacquers do not have a “re-coat window.” Subsequent coats of Lacquer can be applied over a Lacquer finish without wrinkling or lifting due to a “re-coat window”.
This sounded vaguely familiar. Could it be because I used the same information when I wrote my mirror finish paint guide on my first build?
One of the advantages of lacquer paint is that it dries more quickly than enamel and does not have a re-coat window (a time when a subsequent coat must be reapplied). With lacquer, you can spray the next coat once it is dry. With an enamel, you generally have a 1-2 hour time period in which you must spray the next coat, or you will need to wait for the paint to cure, which can take 3-5 days, depending on your brand of paint. Check the instructions on your paint can and be sure to follow those.

This is what I get for not following what I wrote. All that fail could have been avoided. I wasted about a month trying to get the bat top painted, at least a week on the case, all because I didn’t read. Sometimes, I’m not so bright, I tell you…
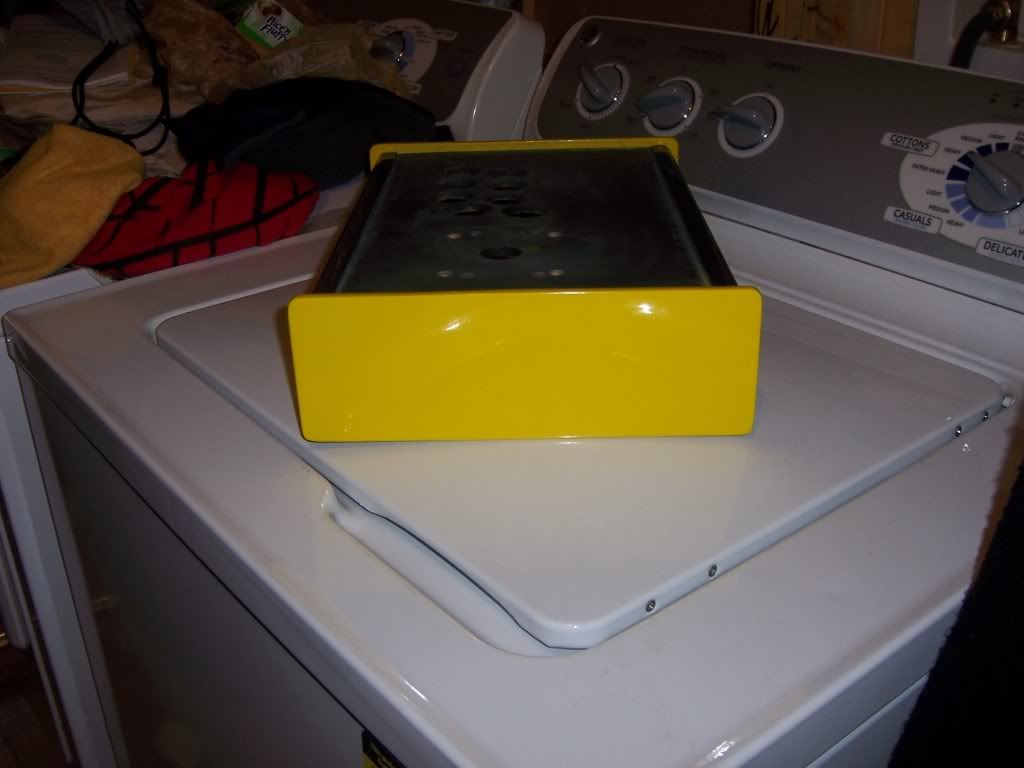
In any event, the case had to get finished, and I was determined to get it right, come hell or high water. So, back to Lowes I went. This time I picked up a pint of Rustoleum Safety Yellow enamel paint, a foam touch up roller kit (no need for a 4 inch roller on such a small case), a can of paint thinner and some 3M stripping pads. When I got home, I poured a little paint thinner on the stripping pad and started sanding down the yellow paint. My goal was to remove as much of the yellow enamel spray paint as I could, then use some more primer as a base for the new can of paint. With a bit of elbow grease, I was actually able to sand down to the original coat of primer, which looked just fine. I went over the primer with some 400 grit sandpaper to remove any possible residue and wiped it down with mineral spirits. Then, I cracked open the can of paint. The instructions said the paint would be dry to the touch within 3-4 hours, could be handled in 9 hours, and could be recoated in 24 hours. I poured some paint in the roller tray then rolled the paint on the case, making sure to get a nice even layer of paint down. There were a few small air bubbles on the surface, which I went back over after about 15 minutes, but I knew when the paint dried they would go away. Sure enough, the next day had a nice, smooth glossy finish. I sanded the paint down with the 220 and 400 grit paper, cleaned with the mineral spirits, and put rolled on a second of paint. Same results the next day – a nice glossy finish with NO WRINKLES!!! Amazing what happens when you read. Over the next 2 days I put 2 more coats of paint on to make sure I had a nice layer of paint. After the 4th coat, I sanded with 220 and 400 grit paper, then wet sanded with 600, 1000 and 1500 grit sandpaper.
I now had to make a decision on the clearcoat for the case. Since my results with spray anything had been less than stellar, to put it mildly, I did not want to use the clear enamel I had originally bought. Instead, I opted to buy a can of Minwax Polycrylic, which is a water based polyurethane top coat. Poly is often used as a protective clearcoat on wood, giving the finish a nice shine. Since the polycrylic is water based, there would be less chance of it reacting with the painted case, and easier cleanup.Of course, nothing had gone according to plan on painting the case, and this would be no exception. The first coat of poly I put on the yellow paint caused the same wrinkling that had occurred with everything else. Sadly, part of me wasn't even surprised. I had actually come to expect it by now. This time, I couldn’t quite understand why. Being water based, it shouldn’t have reacted as badly with the finish (the poly over the blue sparkle paint would have no problem). Plus, the can of Rustoleum said you could recoat within 24 hours. Apparently, that didn’t apply to top coating with another product. After all, I was still was an enamel paint, which requires a cure time. I was determined to lick this once and for all. So, I wiped off the poly as best I could before it completely dried, sanded out the wrinkles once again and painted the yellow sides one last time. Once it dried, I sanded everything up to 1500 grit again and set the box aside for a week. I wanted to make sure the paint had enough time to cure before I attempted to do anything else.
After 7 days it was time to get back to work. Using a natural bristle brush, I went back over the case with the polycrylic. This time it went on with no problems at all. The poly looks like thin milk when brushed on, but once it sets up it dries crystal clear in about 2 hours. After it was dry, I sanded the poly down with 220 grit sandpaper, wiped it clean with mineral spirits, and recoat. It’s recommended to put on at least 3 coats of polycrylic to your project. I decided to go with 6. Since I was going to wet sand the poly to a mirror shine, I wanted to make sure I had enough layers down to make sure I didn’t sand all the way down to the paint by accident.
After all the coats of poly were applied, I went thru my sanding and wet sanding routine all the way up to 2000 grit sandpaper. With each successive grit of paper the surface got smoother and smoother, while the finish looked duller and duller. After the rubbing compound went on, all was right with the world, as both the blue sparkle paint and the yellow paint had that nice, glassy mirror finish. I followed up with the polishing compound and a coat of glaze for that extra bit of shine. After weeks of failure, finally I had the sweet taste of victory. But my celebration couldn’t last too long, as I had to get back to soldering. And there was a WHOLE lot of soldering to be done. Time to get to it…
Why is it so hard to find these things?
Once I figured out where I could put the adaptor inside the case where is wouldn’t interfere with anything, I traced the outline on the outside of the case. I then had a few options on how to proceed. I could have drilled a number of holes in the space I drew and used the chisel to clean away the rest of the waste, slowly shaping the hole to the correct size. Or, I could have whipped out the dremel, screwed on the cutting attachment and gone to town.
I have to justify buying this Dremel in the first place, so....
I put the case back in my project vice and set up the dremel. The multicutting bit made relatively quick work of cutting through the material. The only thing is, you really need a steady hand with this thing, which I didn’t have. The lines I cut were nowhere near straight. Had I clamped a straight edge guide to the case beforehand I probably would have fared a little better. No matter. A few more minutes with the wood file and the USB adaptor fit nice and snug. I made sure the adaptor was flush with the case then used some wood putty to make sure the edges were smooth and to fill in the little gaps I saw. Once the putty was dried, I taped up the adaptor plug and sanded it smooth, making sure to feather the edges and make the putty areas as level as possible. Once that was done I set up my paint area in the garage and sprayed on the primer. Once I had enough coats done, I sanded with 200 and 400 grit sandpaper, and wet sanded with 600 and 1000 grit sandpaper to make the primer nice and smooth. So far so good.
With the primer out of the way, it was time to mask off the case for painting. The front and back of the case were going to be painted metallic blue, while the sides were going to be painted yellow. In addition to the Rustoleom yellow that I was using (and failing) with the bat top, I had picked up a can of Duplicolor Metal Flake spray paint.
I used some 3M blue painter’s tape and masked the sides of the case and the edges that would be painted yellow.
Painter's tape is your friend. Believe it...
Very important to get the corners right. A Xacto knife helps
Afterward I wiped everything down with mineral spirits, set up the paint area in the garage and sprayed on about 4 coats of the metal flake, making sure to wear my respirator so as not to breathe in too many noxious chemicals. As the name suggests, the finish had a nice metallic look to it, without looking like someone tossed some glitter into a can of blue paint. Once the paint dried, I sanded it down with 200 and 400 grit sandpaper, cleaned it with the mineral spirits, and sprayed 4 more coats of paint. Once that was dry I repeated the sanding, but this time followed up by wet sanding the paint with 600, 1000, and 1500 grit sandpaper. I started to worry a bit when I noticed the blue was getting duller and duller. However, when I cleaned the paint off with mineral spirits, I noticed that the blue was nice and shiny before the spirits evaporated. So, I was pretty confident that once the clearcoat was applied that all would be alright. Once that was done, I let the case sit for a few days to make sure the paint was fully dry before proceeding.
Sparkly!
See why the tape was necessary?
Once I felt the paint was dry I removed the tape from the sides and applied it to the front and back of the case that had been painted. After I cleaned the sides with mineral spirits to make sure there was no paint residue, I sprayed on a few coats of the yellow paint and let it dry overnight. The next day, I sanded it down with 200 and 400 grit sandpaper, just as I did with the metallic flake. After giving it another mineral spirit wipe, I sprayed on another two light coats. When I went back to apply the next few light coats, to my bemusement the paint had started to wrinkle, just as it had with the bat top. This was becoming insane. So, once that paint dried, I sanded all the wrinkled paint off (which stated to come off in little balls of paint), and sanded the underlying finish smooth again. At this point I had just about run out of the Rustoleum, and really didn’t feel like getting another can, since it appeared I could only get one layer of paint on any given surface before wrinkling started to occur. So, against all recommendations and common sense, I grabbed the can of Krylon Fusion and sprayed that on top of the Rustoleum layer I managed to save (it’s usually suggested not to mix brands of paint, as they may react differently with each other). Less than 10 minutes later, I had a runny, wrinkled and ugly mess. So much FAIL, so little time…
I decided to leave the whole spray paint thing alone and go down another path. The weather was colder, the paint smell hung around in the garage longer than I wanted, I still had overspray I had to clean off my wife’s car, and so far the majority of my attempts at using spray paint had ended in failure. So, I started to look for a pint of yellow paint to brush on the case. I figured since I was going to wet sand the paint anyway, I wouldn’t really have to worry about brush marks showing up in the paint finish. Besides, I would be using a foam roller to minimize any applicator marks. Before I went to the store I went online to try to figure out what was going wrong with the spray paint. It worked fine when I sprayed the lacquer for my first case. This time, not so much. In the FAQ section on the Duplicolor site I came across this little nugget:
Q. What is a re-coat window?
A. Re-coat windows apply to enamel paints and refers to the time period during which a second coat maybe applied. After spraying the first coat of an enamel, a second coat must be applied with in 1 – 2 hours or wait 5 days for the coating to cure. The paint may wrinkle or lift when resprayed during this curing period. Lacquers do not have a “re-coat window.” Subsequent coats of Lacquer can be applied over a Lacquer finish without wrinkling or lifting due to a “re-coat window”.
This sounded vaguely familiar. Could it be because I used the same information when I wrote my mirror finish paint guide on my first build?
One of the advantages of lacquer paint is that it dries more quickly than enamel and does not have a re-coat window (a time when a subsequent coat must be reapplied). With lacquer, you can spray the next coat once it is dry. With an enamel, you generally have a 1-2 hour time period in which you must spray the next coat, or you will need to wait for the paint to cure, which can take 3-5 days, depending on your brand of paint. Check the instructions on your paint can and be sure to follow those.
I could have worn this around for a week...
This is what I get for not following what I wrote. All that fail could have been avoided. I wasted about a month trying to get the bat top painted, at least a week on the case, all because I didn’t read. Sometimes, I’m not so bright, I tell you…
In any event, the case had to get finished, and I was determined to get it right, come hell or high water. So, back to Lowes I went. This time I picked up a pint of Rustoleum Safety Yellow enamel paint, a foam touch up roller kit (no need for a 4 inch roller on such a small case), a can of paint thinner and some 3M stripping pads. When I got home, I poured a little paint thinner on the stripping pad and started sanding down the yellow paint. My goal was to remove as much of the yellow enamel spray paint as I could, then use some more primer as a base for the new can of paint. With a bit of elbow grease, I was actually able to sand down to the original coat of primer, which looked just fine. I went over the primer with some 400 grit sandpaper to remove any possible residue and wiped it down with mineral spirits. Then, I cracked open the can of paint. The instructions said the paint would be dry to the touch within 3-4 hours, could be handled in 9 hours, and could be recoated in 24 hours. I poured some paint in the roller tray then rolled the paint on the case, making sure to get a nice even layer of paint down. There were a few small air bubbles on the surface, which I went back over after about 15 minutes, but I knew when the paint dried they would go away. Sure enough, the next day had a nice, smooth glossy finish. I sanded the paint down with the 220 and 400 grit paper, cleaned with the mineral spirits, and put rolled on a second of paint. Same results the next day – a nice glossy finish with NO WRINKLES!!! Amazing what happens when you read. Over the next 2 days I put 2 more coats of paint on to make sure I had a nice layer of paint. After the 4th coat, I sanded with 220 and 400 grit paper, then wet sanded with 600, 1000 and 1500 grit sandpaper.
That took soooooo much longer than it should have
I now had to make a decision on the clearcoat for the case. Since my results with spray anything had been less than stellar, to put it mildly, I did not want to use the clear enamel I had originally bought. Instead, I opted to buy a can of Minwax Polycrylic, which is a water based polyurethane top coat. Poly is often used as a protective clearcoat on wood, giving the finish a nice shine. Since the polycrylic is water based, there would be less chance of it reacting with the painted case, and easier cleanup.Of course, nothing had gone according to plan on painting the case, and this would be no exception. The first coat of poly I put on the yellow paint caused the same wrinkling that had occurred with everything else. Sadly, part of me wasn't even surprised. I had actually come to expect it by now. This time, I couldn’t quite understand why. Being water based, it shouldn’t have reacted as badly with the finish (the poly over the blue sparkle paint would have no problem). Plus, the can of Rustoleum said you could recoat within 24 hours. Apparently, that didn’t apply to top coating with another product. After all, I was still was an enamel paint, which requires a cure time. I was determined to lick this once and for all. So, I wiped off the poly as best I could before it completely dried, sanded out the wrinkles once again and painted the yellow sides one last time. Once it dried, I sanded everything up to 1500 grit again and set the box aside for a week. I wanted to make sure the paint had enough time to cure before I attempted to do anything else.
After 7 days it was time to get back to work. Using a natural bristle brush, I went back over the case with the polycrylic. This time it went on with no problems at all. The poly looks like thin milk when brushed on, but once it sets up it dries crystal clear in about 2 hours. After it was dry, I sanded the poly down with 220 grit sandpaper, wiped it clean with mineral spirits, and recoat. It’s recommended to put on at least 3 coats of polycrylic to your project. I decided to go with 6. Since I was going to wet sand the poly to a mirror shine, I wanted to make sure I had enough layers down to make sure I didn’t sand all the way down to the paint by accident.
Glossy!
Just wait 'till the hard work is done...
After all the coats of poly were applied, I went thru my sanding and wet sanding routine all the way up to 2000 grit sandpaper. With each successive grit of paper the surface got smoother and smoother, while the finish looked duller and duller. After the rubbing compound went on, all was right with the world, as both the blue sparkle paint and the yellow paint had that nice, glassy mirror finish. I followed up with the polishing compound and a coat of glaze for that extra bit of shine. After weeks of failure, finally I had the sweet taste of victory. But my celebration couldn’t last too long, as I had to get back to soldering. And there was a WHOLE lot of soldering to be done. Time to get to it…
Subscribe to:
Comments (Atom)