First, while I’m firmly in the PS3 camp, Nick is a Microsoft fanboy, even after his 360 Elite got the RRoD (I still laugh at him about that). If he were to take the stick home and play, I’d need to set his stick up as a dual mod, so he could play at both houses. I had also wanted to try out some Japanese parts just to see how they felt and if I could get used to them. The original plan was to build myself another box later on with Sanwa parts, but this project gave me the opportunity to try them sooner. Plus, if I didn’t like it, it wouldn’t me mine anyway! My first thought for his stick was to use the Cthulhu board, buy a MadCatz 360 pad and padhack it. I’d also have to buy him a long USB cable. While I was in the planning process, Gummowned actually finished the first run of Leo boards. This opened the possibility of doing a wireless dual mod setup. Since I had been in contact with Gummowned during his initial design process, he agreed to sell me one of the first run boards. I was going to use the Leo in my next stick, but again, the project for Nick was already on the table. So, Nick now becomes a guinea pig AND a beta tester with this one stick! Since he’s a MvC2 fan, I decided to put my own spin on the MadCatz MvC stick, going with yellow and white buttons, a yellow bat top, and a blue and yellow paint scheme ala the X-Men. With the general plan in mind, it was time to start ordering parts.
First up was figuring out what to do about a case. While I plan on making my own cases for a project or two, I’m not quite ready yet. I still need to gather more tools and find the time to do it. Besides, I’d end up doing a lot of work in my garage, and it’s not exactly warm this time of year. The plan was to have a case that could work with a Sanwa stick but still use Happ/iL buttons (Happanese? Japerican?), so a slim stick wouldn’t really work. After some searching, I came across these cases made by a cat named Physh in Canada:
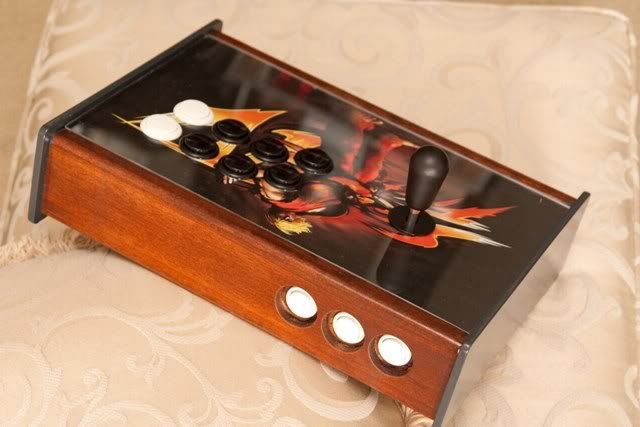
How 'bout that wood grain...
The case looked like it had everything I was looking for: 8 button layout, precut plexiglass for the artwork, tall enough for Happ/iL buttons, and wide enough to have space for the 3 boards that would be needed for this to work. While the joystick holes were drilled for a Sanwa joystick, with a little modification, there would be enough room to install a Happ Competition joystick just in case the Sanwa experiment didn’t work out. The price of the case was pretty good, all things considered: $75 shipped to the US. Physh even agreed to print out the artwork and send it with the stick so I wouldn’t have to work on setting up a template in Photoshop (I would, however, need to figure out how to label the buttons, since all Physh would do is resize the art and print it on his color printer at work). I Paypaled the money and waited for Canadian Express to deliver it.
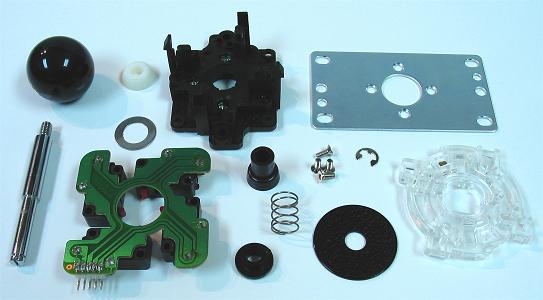
Next on the hitlist were the buttons and joystick. Sanwa makes two different joysticks: a JLF, which is used in arcade cabinets, the MadCatz stick and most custom sticks, and a JLW, which isn’t as popular but still has it’s supporters in the fightstick community. Slagcoin has a very detailed breakdown of the two sticks here. One of the biggest differences is the tension of the two sticks. The JLW is stiff and tight, compared to the looser feel of the JLF. If you’re used to the feel of American styled (Happ) sticks, it’s believed the JLW is as close as you can get with a Japanese style stick. Sanwa sticks generally come with a ball top, which gives you options of a solid colored ball , a transparent colored ball, or a meshtop ball , (which looks a bit like carbon fiber). But since I wanted it to be similar to the American arcade style, I needed to order a small adapter and the bat top. I also had to consider which restrictor gate to use for the JLW (for a detailed explanation, read this. Unlike the Happ Competition, which doesn’t use a gate at all and has a even, circular feel as you move the joystick around, the JLW comes stock with a square/rhombus gate, which you can feel the corners when you move the stick in a diagonal direction. If you grew up on Japanese sticks, you’re used to it. If you grew up on American sticks, you’ll have a learning curve ahead of you. Fortunately, Sanwa also offers a circular gate which mimics the feel of the Happ, so I picked that up as well. For the buttons, I wanted to stick with concave Happ buttons. I wanted a little more style than the Madcatz MvC stick, so I picked up set of 6 yellow buttons and 2 clear buttons from GroovyGameGear.com. The case was set up to use 24mm buttons for the start, select and home buttons, so I picked up 3 of those as well.
Last were the prerequisite odds and ends needed to complete the stick. I picked up a bunch of .187 quick disconnect terminals for the Happ buttons and some .110 female disconnects for the 24mm buttons. Since I still didn’t want to use a Neutrick connector for the USB connection, I found a Female USB a to Female USB b adaptor and ordered 2 of those for a future project (amazingly, you can only find these things online. No store in the area even knows what I’m talking about…). I went to Lowes and picked up some metallic blue spray paint, Sunburst Yellow paint and some clearcoat. Since the setup would require 2 dual pole dual throw switches, I went to Radio Shack and picked up a few slide switches and a few rocker switches. I still wasn’t sure where and how I was going to set them up, so I figured it would be good to have both kinds. Since I had to do a lot of soldering, I also picked up some soldering flux (essential for a soldering so many tiny places) and some 10k resistors for the Xbox stick. Now with everything either on hand or on order, I could read up on how involved it would be to actually pull this off and start getting some things put together in my head.
No comments:
Post a Comment